
User guide
This guide explains, step by step, how to use the Kosovo Business Registry system (ARBK): how to create an account, how to apply to register a new business, how to request changes to your business data, and how to request deregistration and additional information.
- Your accountCreating an account, signing in, the main page and choosing a business.
- Business registrationApplying for a new business, step by step, for every type of business.
- Change requestsChanging the name, address, activities, owners and more.
- DeregistrationRequesting the deregistration of a business.
- Additional informationRequesting information about your business.
How to use this guide
- The table of contents on the left takes you to each section. On a phone, open it with the Contents button.
- In the Search the guide field, type a word, e.g. address or payment slip, to find the section you need.
- Click a picture to see it larger.
- Inside the system, the User guide link under the icon at the top right opens the guide directly at the section for the page you are on.
- Names of buttons and menus are shown like this: Continue. A menu path is shown like this: Business change Request for change.
This guide is written for citizens who apply online. Where a counter officer (the Applicant Officer access) has different steps, they are explained in a box like this one.
1Your account
To apply online, you need a personal account in the system. With the same account you apply to register a new business and, if you are an owner or representative of a registered business, you submit requests for change, deregistration or additional information for that business.
Creating an account
Anyone aged 18 or over can create an account. Only one account is allowed per personal number (or passport number) and per email address.
- Open the system's website. On the sign-in page, below the Sign In button, next to the text If you do not have an open account? click the Register link.
- The Create account form opens. If you are not a citizen of Kosovo, check the Foreign citizen box (see the table below).
- Citizens of Kosovo enter their Personal number (10 digits). When you leave the field, the system retrieves your Name, Surname and Date of birth from the Civil Registry and shows them partly hidden (e.g. Te***). These fields cannot be changed. If the number is not found, an error message appears and the fields are cleared.
- Fill in Phone number, E-mail and Confirm email address. Your email will be your username for signing in and the address where you receive notifications.
- Enter a Password and repeat it in Confirm password.
- Click Register. The button becomes active after a moment, once the page finishes its automatic anti-robot check.
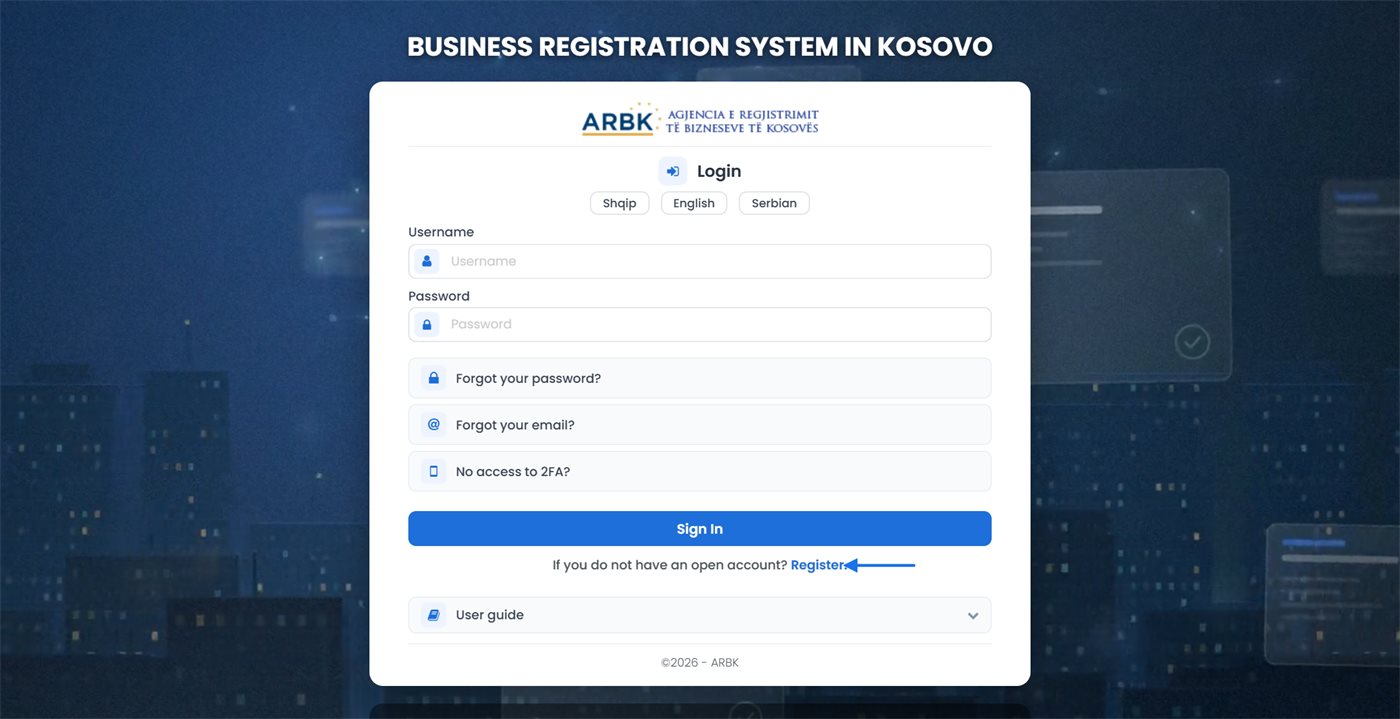
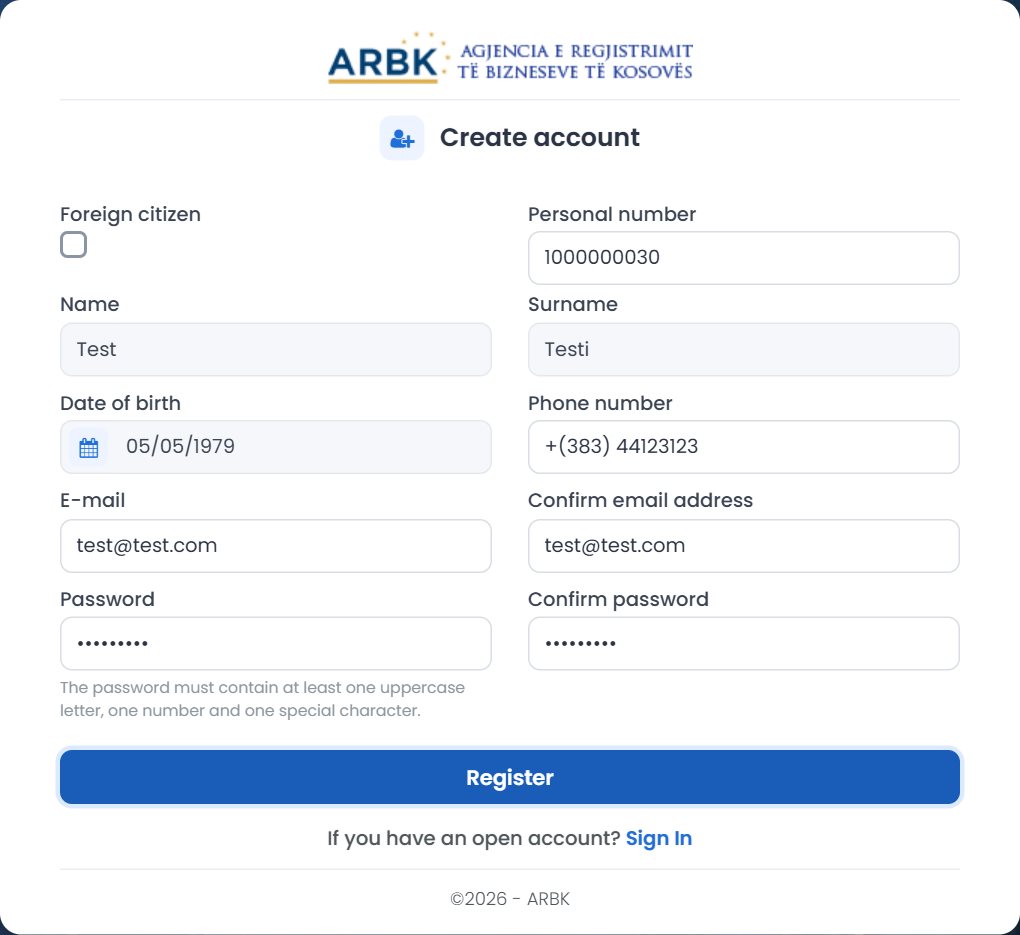
Fields for citizens of Kosovo and for foreign citizens
| Field | Citizen of Kosovo | Foreign citizen |
|---|---|---|
| Foreign citizen | Unchecked | Checked |
| Personal number | Yes, 10 digits | Called Personal passport number; enter it if your passport has one |
| Passport number, Passport issue date, Passport expiration date | — | Yes (*) |
| State | — | Yes (Kosovo is not offered) |
| Name, Surname, Date of birth | Filled in automatically from the personal number | You enter them yourself |
| Phone number, E-mail, Confirm email address, Password, Confirm password | Yes | Yes |
The system rejects the registration in these cases:
- the person is under 18;
- an account with the same personal number or the same passport number already exists. If you have forgotten your password, reset it from the sign-in page (see Signing in);
- an account with the same email already exists;
- the email is an institutional address (e.g. on the rks-gov.net domain);
- the password has fewer than 8 characters or does not contain at least one uppercase letter, one number and one special character;
- the email or the password does not match its confirmation field.
Confirming your email
- After you register, the sign-in page opens with the message “The account has been successfully created, please confirm account by clicking on the link sent to the mail.” Your email is already filled in the Username field.
- Open the email titled Confirm account and click the Confirm account opening link.
- The system takes you back to the sign-in page with the message “The account has been successfully confirmed, now you can log in.” You can now sign in.
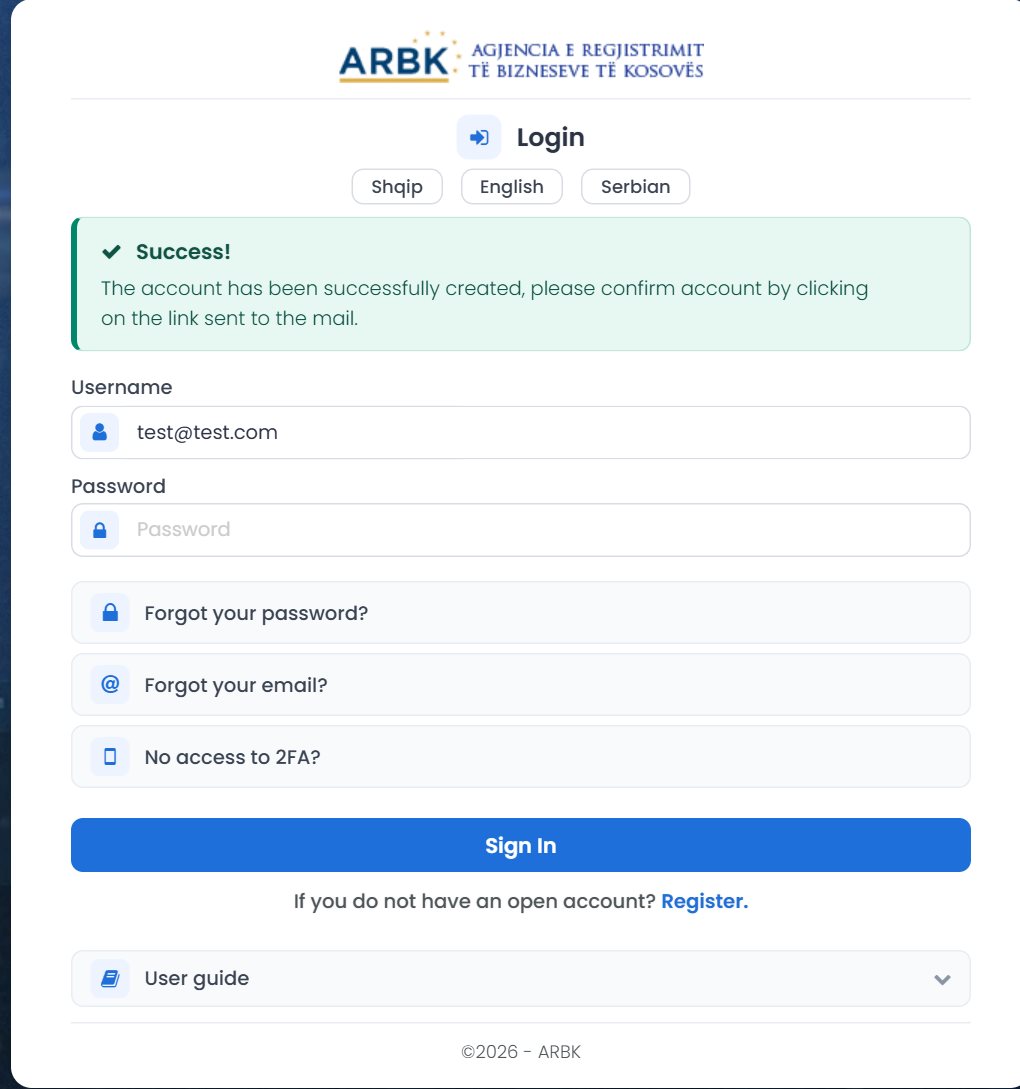
Can't find the email? Also check your Spam folder. If you try to sign in without confirming your account, the system shows the message “Your account is unverified…” and the click here to resubmit link, which sends the confirmation email again.
Signing in
- On the Login page, choose the language if you wish: Shqip, English or Serbian.
- In Username, enter the email you registered with.
- In Password, enter your password.
- Click Sign In. If you have enabled two-factor authentication, continue with the code (see below). Otherwise the Main page opens.
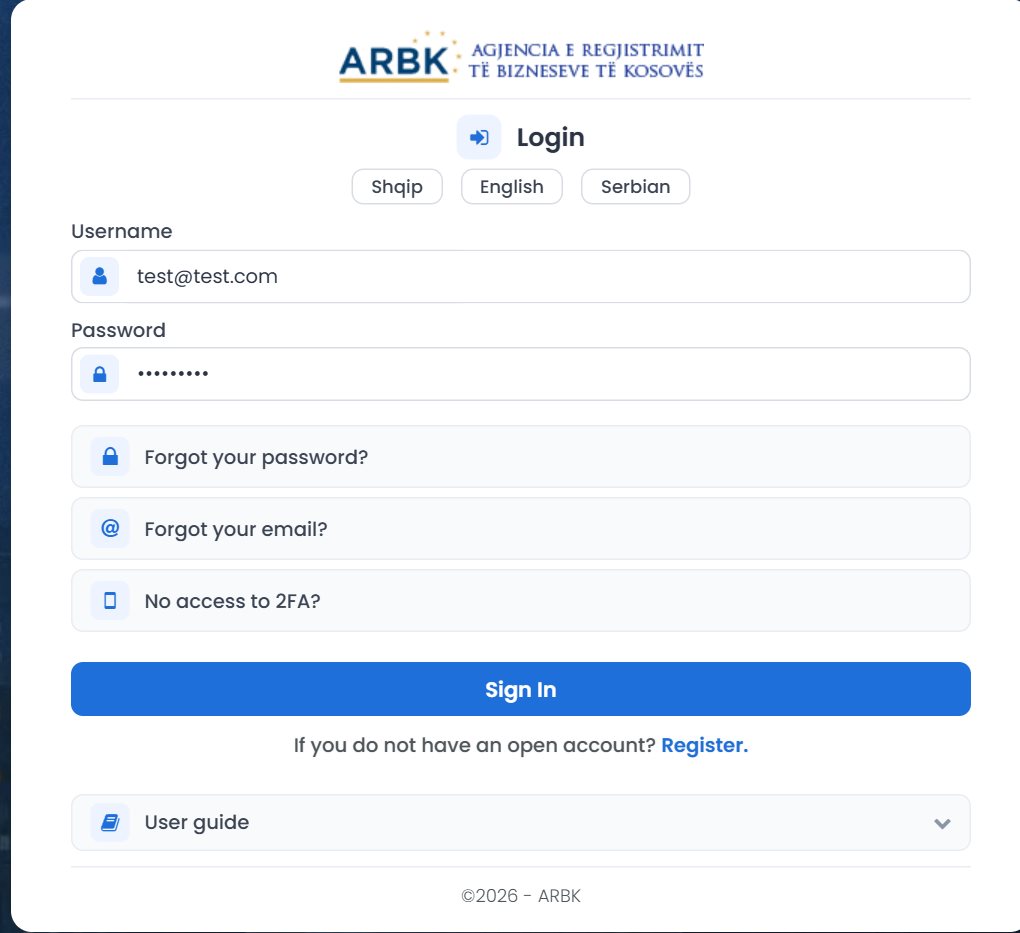
The most common messages when signing in:
- “Username or password is incorrect.” Check your email and password.
- “Your account is unverified…” Confirm your account from the email (see Confirming your email).
- “You are not authorized to access.” The account does not have access to the system.
Second step: the verification code (2FA)
This step appears only if you have enabled two-factor authentication yourself (see Profile).
- After the correct password, the text “Enter the six-digit code from the authenticator app on your phone.” appears.
- Open the authenticator app on your phone and enter the current code in Verification code.
- Click Verify. Cancel takes you back to the sign-in form.
You must enter the code within 5 minutes of entering your password; otherwise “The verification time expired. Please sign in again.” appears. After 5 wrong codes, signing in is temporarily blocked for 15 minutes.
Forgot your password?
- On the sign-in page, click Forgot your password?. The Password change window opens.
- In E-mail, enter your account email and click Send code. A six-digit code is sent to you by email and the countdown The code expires in: 05:00 appears.
- Enter the code in Code.
- Enter the new password in New password and in Confirm password. The same rules apply as when you register.
- Confirm the “I'm not a robot” check and click Change. The message “Password has been successfully changed.” appears.
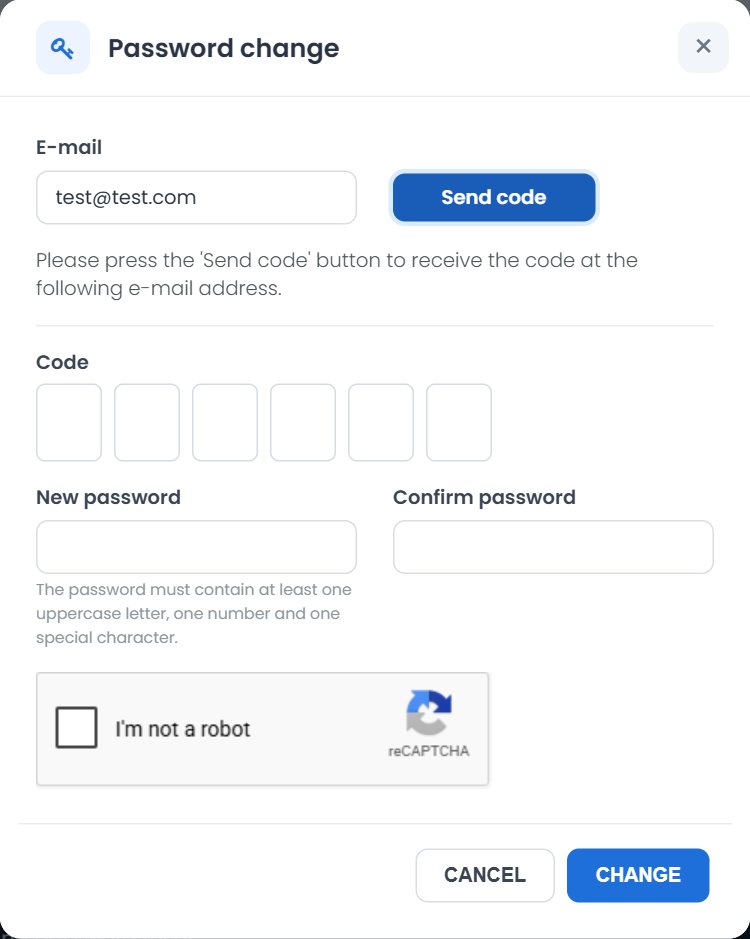
The code is valid for 5 minutes and can be used only once. You can request a new code only after the previous code has expired.
Forgot your email?
- Click Forgot your email?. The Email change window opens.
- Enter your Personal number (*) and click Send code. The code is sent to you by SMS, to the phone number you gave in your account.
- Enter the Code (*), the new email in E-mail (*) and repeat it in Confirm email address (*).
- Confirm “I'm not a robot” and click Change. After the message “Email has been changed successfully.” sign in with your new email.
No access to 2FA?
If you have lost your phone or the authenticator app, you can disable two-factor authentication yourself:
- Click No access to 2FA?. The Disable 2FA window opens.
- Enter Username (*) (your account email) and Personal number (*), then click Send code. The code is sent by SMS to the account's phone number.
- Enter the Code (*), confirm “I'm not a robot” and click Disable 2FA.
- After the message “Two-factor authentication was disabled successfully.” sign in with your password only. If you wish, enable it again from your profile.
Main page and menu
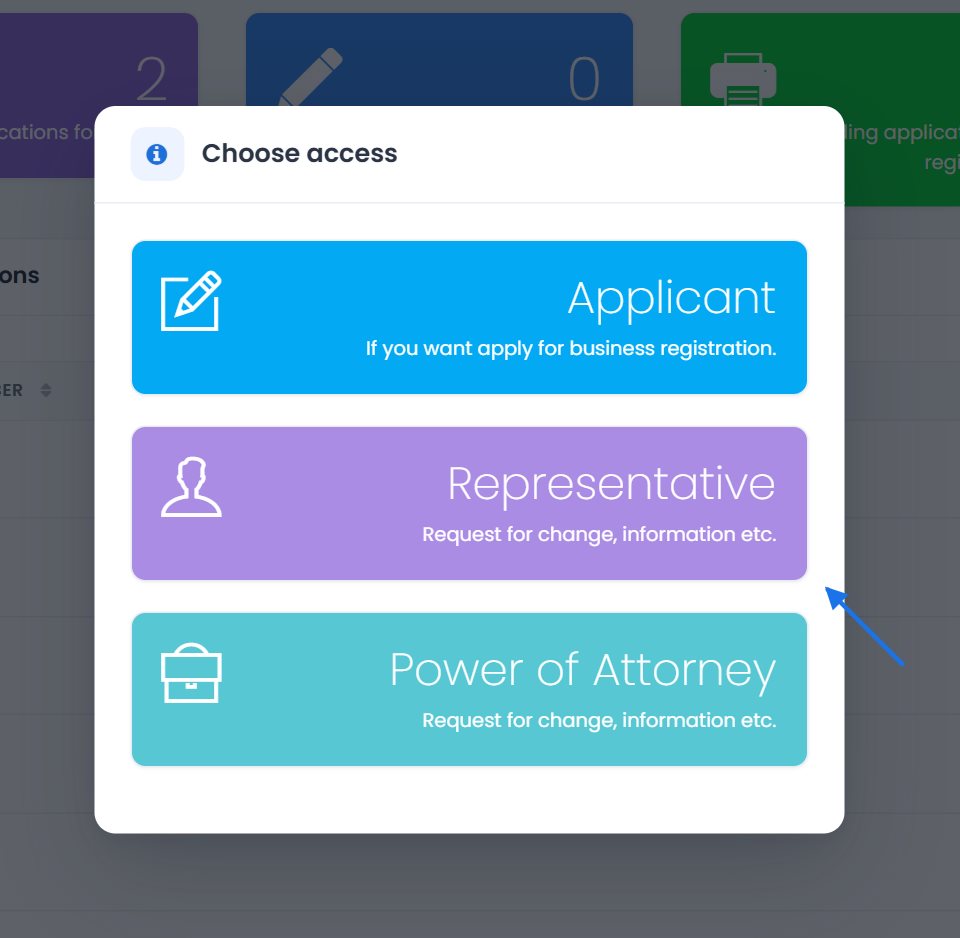
After you sign in, the Main page opens. If you are an owner or representative of a registered business, the Choose access window opens on top of it, so you can choose whether you work as an applicant or for a business (see Choosing a business).
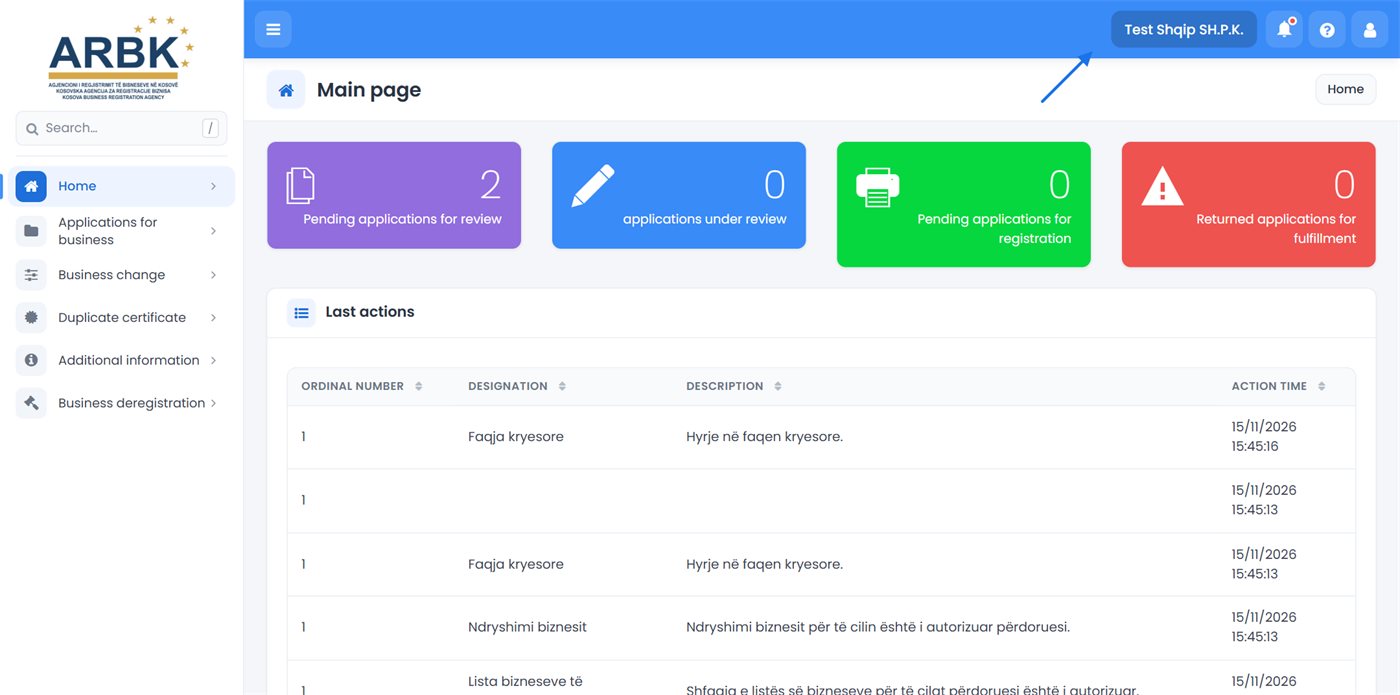
Top bar (header)
- hides or shows the menu on the left.
- The business name appears when you have selected a business.
- Notifications: the number of your applications and requests by type and status. Clicking a notification takes you to the related list.
- Help: User guide (this guide, opened at the section for the page you are on).
- opens the user panel: profile, password, 2FA, access, language and signing out (see Profile).
Central area
- The yellow Account verification box appears when you have selected a business and your account has not been verified yet (see Account verification).
- If you do not have any applications or businesses yet, the Apply for business registration box appears. Clicking it takes you to choosing the business type (see Business registration).
- Otherwise, four boxes show the number of your applications by status: Pending applications for review, applications under review, Pending applications for registration and Returned applications for fulfillment.
- The Last actions table shows your latest actions in the system: Ordinal number, Designation, Description and Action time.
Menu
To open a group in the menu on the left, click its name. In the Search… field above the menu, type a word to find an item quickly (the / key takes you straight to this field).
| Menu | Submenus | What it is for |
|---|---|---|
| Home | — | Returns you to this page. |
| Applications for business | Apply for business, List of applications | Applying to register a new business and following your applications. See Business registration. |
| Business change | Request for change, List of requests | Changing the business data. See Change requests. |
| Duplicate certificate | Certificate Request, List of requests | Requesting a copy (duplicate) of the business certificate. |
| Additional information | Request for information, List of requests | Requesting information registered for the business. See Request for additional information. |
| Business deregistration | List of requests, Deregistration request | Requesting the closure of the business. See Business deregistration. |
Requests for change, duplicate certificate, additional information and deregistration are always made for the business you have selected. So, before you make them, choose the business (Choosing a business) and verify your account (Account verification).
Choosing the business you work with
The system works with access types. The access shows whether you work as an applicant for a new business or on behalf of an existing business. You choose the access in the Choose access window:
- it opens by itself on the Main page after you sign in, when you are an owner or representative of a registered business and have not chosen an access yet;
- you can open it at any time from at the top right, with Change access.
| Access | When to choose it | What happens |
|---|---|---|
| Applicant | When you want to apply to register a new business. | You return to the Main page with no business selected. |
| Representative | When you are an owner or authorized representative of the business and want to submit requests for change, information, deregistration, etc. | The List of businesses opens, where you choose the business. |
| Power of Attorney | When you represent a commercial company with a power of attorney (a written authorization). | The List of businesses for representation by power of attorney opens (see below). |
Choosing a business as a representative
- In the Choose access window, click Representative.
- The List of businesses opens with the text “Please select business from list of businesses that you are authorized…”. The list shows the active businesses where you are registered as an owner or authorized representative. If there are many businesses, type part of the name in Search.
- In the business row, click Choose.
- The Main page reopens with the message “Business has been successfully selected. All the actions you make during this approach are business related.”
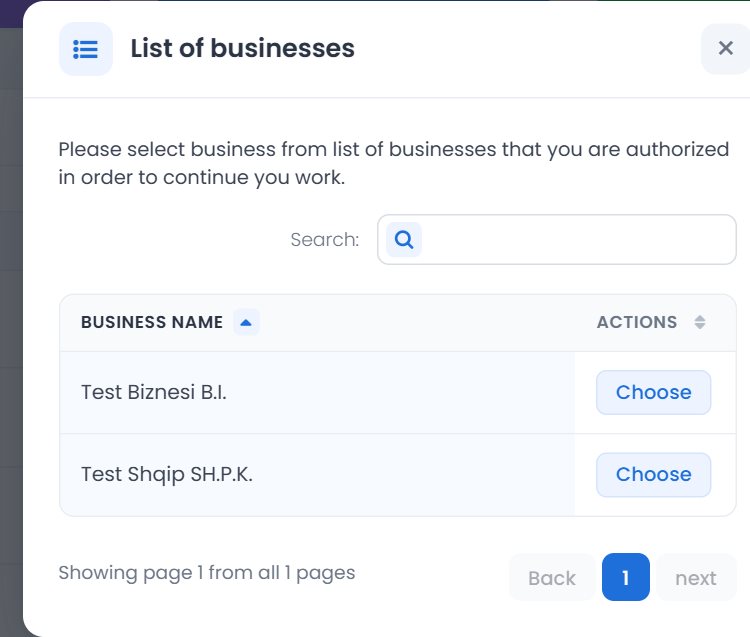
Once you have chosen the business:
- the business name appears in the top bar;
- in the user panel, below Change access, it says “All actions you make during this approach are related with business …”;
- the requests you make (change, duplicate certificate, information, deregistration) are linked to this business;
- if your account has not been verified, the Account verification box appears on the Main page.
To work with another business, click at the top right, Change access, and repeat the steps.
Representative with power of attorney
If a commercial company has authorized you with a power of attorney, ARBK must approve the power of attorney before you can choose the business.
- In Choose access, click Power of Attorney. The List of businesses for representation by power of attorney opens.
- If the business is in the list, click Choose. The list shows only approved powers of attorney that are within the authorization period.
- For a new request, click Submit the request below the list. The Application data for power of attorney representation window opens.
- Enter the business's NUI/NRB (*). Business name is filled in automatically.
- Choose Date of authorization from (*) and Date of authorization until (*).
- In Document (*), click Append authorization and choose the power of attorney as a PDF (up to 10 MB).
- Click Submit the request. Back takes you back to the list.
ARBK reviews the request and notifies you by email (the business's email is notified too). A company can have only one active representative with power of attorney; if it already has one, “This commercial company has representatives with power of attorney!” appears. When the authorization end date passes, the access is canceled automatically.
The officer does not see the window with Applicant / Representative. They switch access with the button at the top right (Applicant or Processor) or from the user panel, Change access, where they choose Applicant (Applicant Officer) or Processor (Processing Officer), according to their authorizations. They do not choose the business from the list of authorized businesses: they search for it in the Register and, under Actions in its row, choose the request (e.g. Request for change, Deregistration request; see Requests at the counter). Switching access removes the previously selected business.
Account verification
For requests for change, duplicate certificate, additional information and deregistration, your account must be verified by ARBK. Without verification, the system returns you to the Main page with the message “To make a business change request, you must first verify your account…”. Verification is not required to apply for a new business.
- Choose the business as a Representative (see Choosing a business). The yellow Account verification box appears on the Main page only when you have selected a business and your account has not been verified.
- Click Account verification. A window with the same title opens.
- In Identification document (*), click Append and choose a copy of your ID card or passport as a PDF (up to 10 MB). The button turns green and shows the file name.
- Click Submit your request. The message “The verification request has been successfully submitted.” appears.
- The box on the Main page turns blue: “You are in the process of verification…”. According to the system's text, you receive an answer within 24 hours.
- Once ARBK has verified your account, the box no longer appears and you can make requests for the business.
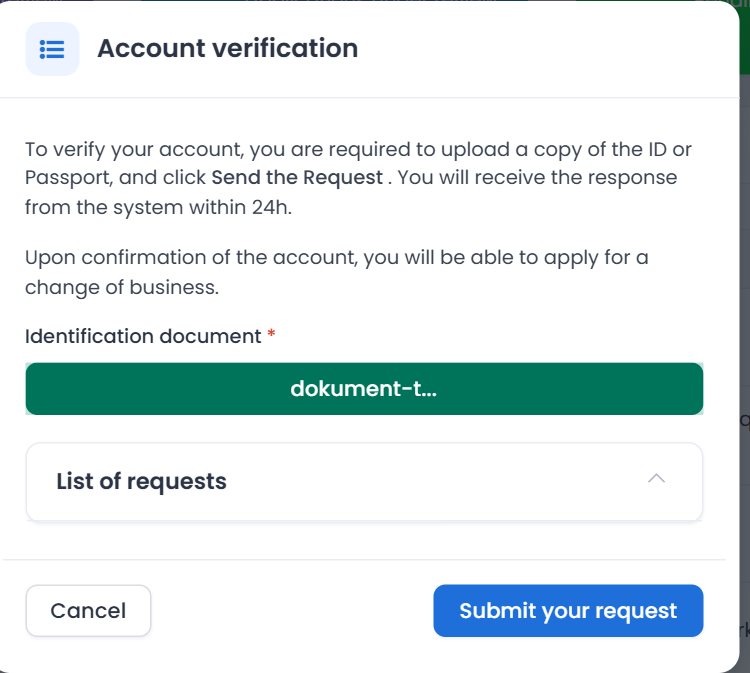
Only PDF documents are allowed. While a verification request is under review, you cannot send another one: “You have already made a request for verification and you have to wait for the answer.” appears. You can see your previous requests and their status in the List of requests in the same window.
Profile, password, 2FA and language
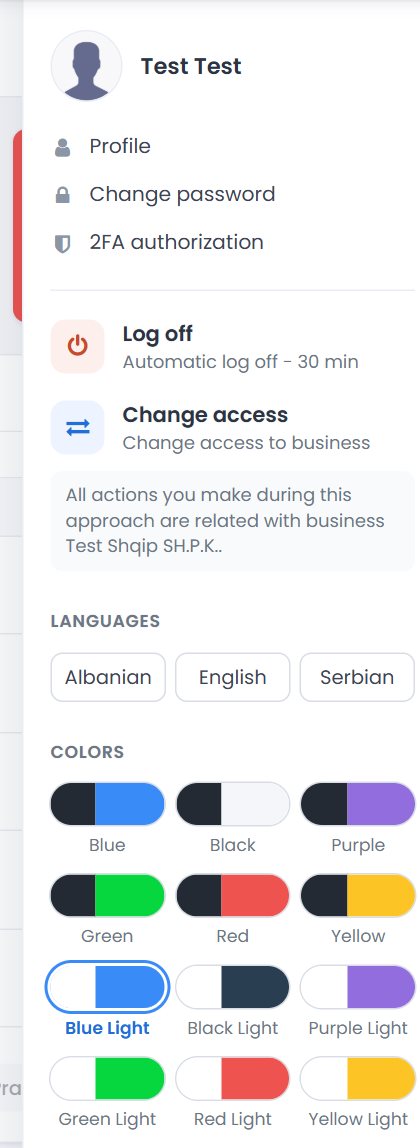
Click at the top right. The user panel opens with your name and these options:
- Profile: your data;
- Change password;
- 2FA authorization: two-factor authentication;
- Log off: sign out of the system. After 30 minutes of inactivity, the system signs you out automatically;
- Change access: choosing the access and the business (see Choosing a business);
- Languages: Albanian, English, Serbian;
- Colors: the color of the system's header and menu (e.g. Blue Light). Your choice changes only the appearance.
Profile
The Profile window shows Personal data (Personal number, Name and surname, Date of birth) and Address and contact (State, Municipality, Residence, Address, Phone number, E-mail). The data is only displayed here and cannot be changed. You change your email from the sign-in page, with Forgot your email? (see Signing in).
Change password
- Click Change password.
- Enter Current password, New password and Confirm password. The new password must have at least 8 characters, with at least one uppercase letter, one number and one special character.
- Click Save. “Data has been successfully changed.” appears. If the current password is wrong: “The written password is incorrect.”
Two-factor authentication (2FA)
Two-factor authentication adds a second step to signing in: besides the password, a six-digit code from your phone is also required. It is optional, but it protects your account better.
- Click 2FA authorization. Status shows Inactive.
- Install the Google Authenticator or Microsoft Authenticator app on your phone.
- In the app, add a new account and scan the QR code shown in the window. If the camera cannot read it, enter the Secret key in the app.
- Enter the six-digit code from the app in Verification code and click Enable 2FA.
- The status becomes Active. From your next sign-in, the code is also required after the password (see Signing in).
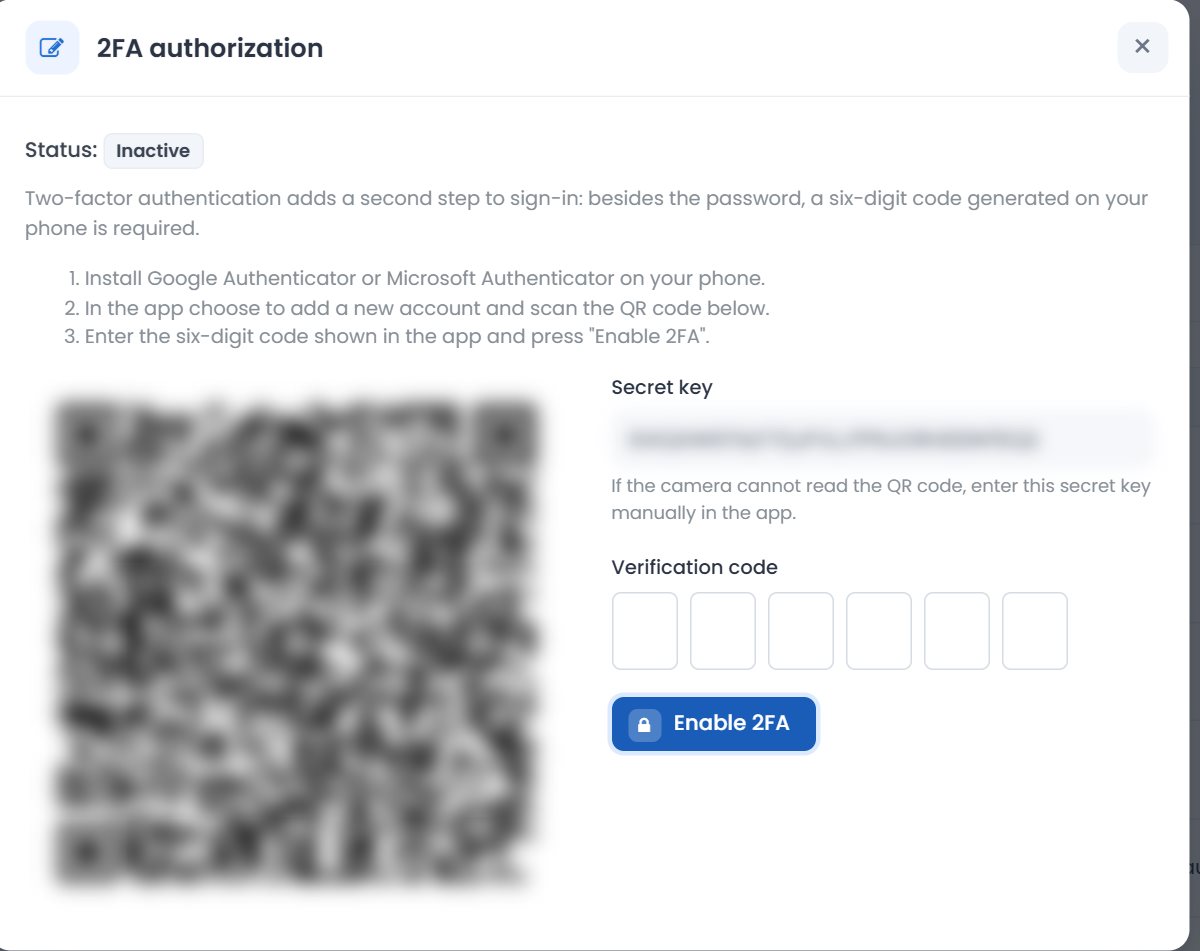
To disable it, open 2FA authorization, enter the current code from the app in Verification code, click Disable 2FA and confirm with Confirm. If you no longer have access to the app, use No access to 2FA? on the sign-in page.
Language
In Languages in the user panel, click Albanian, English or Serbian. The page reloads in the chosen language and your choice is saved in your account. Before signing in, choose the language with the Shqip, English and Serbian links on the sign-in page.
2Applying to register a business
A new business is registered through a form with several steps. In each step you fill in part of the data and click Continue. The number of steps depends on the business type (6 to 8), but most of the steps are the same for all types.
That is why this chapter explains the shared steps only once. For each business type it shows only what is specific: how many owners are required, which documents and which rules. At the end it explains the list of applications, where you follow your application after you send it.
Before you start, you need an account and you must be logged in to the system (see Your account).
Prepare in advance: the personal numbers of the owners and the representatives (for foreign citizens, their passports), the scanned identification documents, the business address, the activities according to the NACE classification and, for companies, the capital and the share of each owner. All documents are uploaded only as PDF, up to 10 MB each.
Starting the application and choosing the business type
- In the menu, choose Applications for business Apply for business. The Apply for business registration page opens.
- In the Choose type of business box, click the type you want to register. If you are not sure, the Help button briefly describes each type.
- The application form for that type opens at the first step. Fill in the steps in order (see Steps by business type).
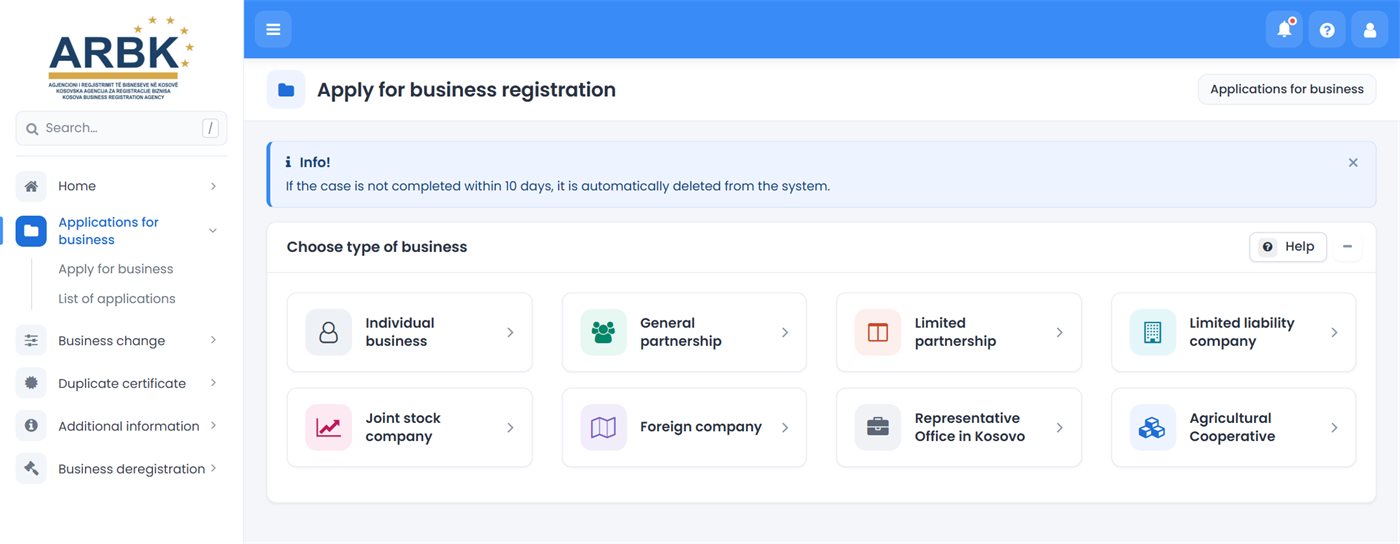
The business types and the part of this guide for each one:
- Individual businessOne owner, a natural person. 6 steps.
- General partnershipAt least two partners. 6 steps.
- Limited partnershipAt least two partners. 6 steps.
- Limited liability companyManaging director required. 8 steps.
- Joint stock companyCapital of at least €10,000, board required. 8 steps.
- Foreign companyThe Kosovo branch of a foreign company. 7 steps.
- Representative Office in Kosovo7 steps, as for the foreign company.
- Agricultural CooperativeBoard required. 8 steps.
If the case is not completed within 10 days, it is automatically deleted from the system. Also, you cannot start a new application while you have an unfinished one: the system takes you to the list with the message “You can not apply for business registration as long as you have unfinished applications.” Either continue that application or delete it (see List of applications).
How the step-by-step form works
- The step bar is at the top. The step you are on is highlighted, and completed steps are marked with .
- Fields marked with an asterisk (*) are required. If something is missing or incorrect, the message appears below the field or in the red Error! box at the top of the page.
- Continue saves the data of the step and takes you to the next step. Back takes you back to the previous step, with the data you have saved.
- You can stop the application and continue it later: in the List of applications, choose Continue. The application opens at the step where you left off.
- Documents are uploaded only as PDF, up to 10 MB. Otherwise the message “Please upload only pdf documents.” or “The maximum allowed size of the document is 10 MB.” appears.
- Data that comes from the civil registry is shown partly hidden (e.g. Te***). This is normal: the full data is saved in the application.
Steps by business type
The table shows the steps of each type, in order and with the name you see in the step bar. Click a step to read about it.
The last step, Documents, ends with completing the application.
Owners, partners and shareholders
In this step you register the owners of the business. For the individual business the step is called Owner data and it is the first step. For partnerships it is called Owners/Partners, while for companies, the foreign company, the representative office and the cooperative it is called Shareholders.
- The individual business has only one owner, a natural person. Fill in the form and click Continue.
- For the other types the form is on the left and the list is on the right (List of owners or Shareholders list). Register each owner with Register. When all of them are registered, click Continue.
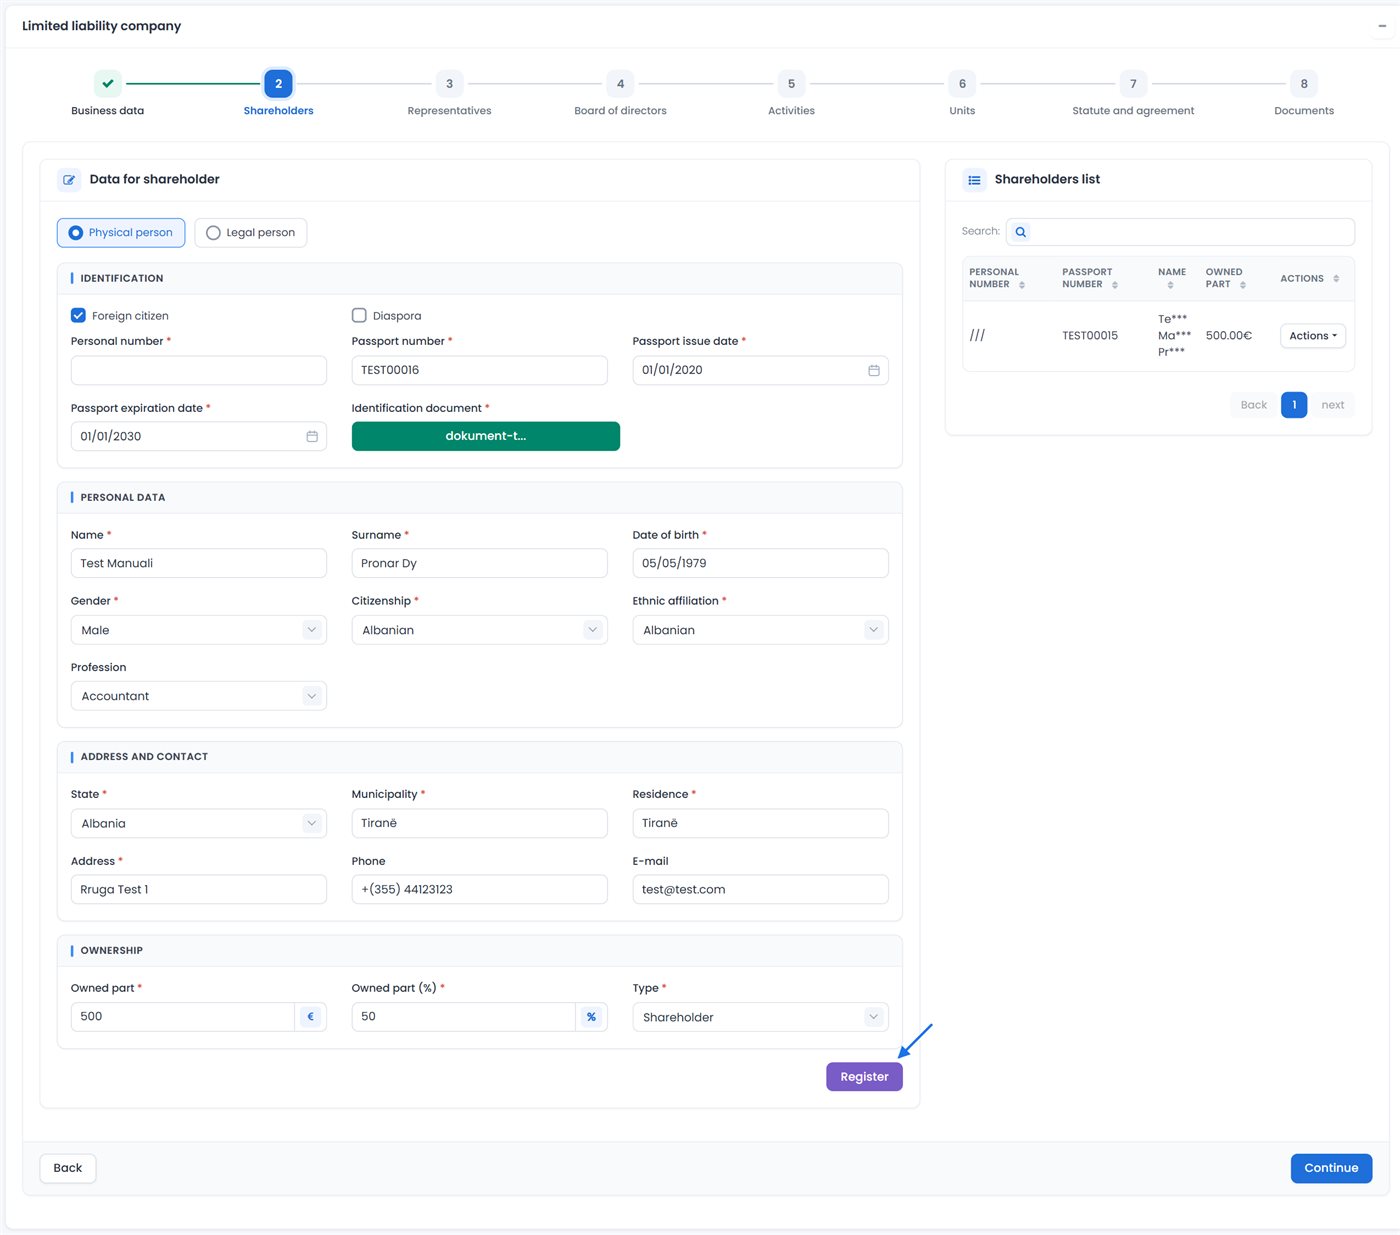
Natural person with a Kosovo personal number
- Leave Physical person selected (where the choice is offered).
- In Personal number, enter the 10 digits. The system gets the data from the civil registry and fills in the first name, last name, date of birth, gender, citizenship, municipality, place of residence and address by itself. These fields cannot be changed.
- Fill in the remaining fields: Ethnic affiliation (*) and, as needed, Profession, Phone and E-mail.
- In Identification document, click Append and choose the scanned ID card. The button turns green and shows the file name.
- In the Ownership section, enter Owned part (in €) or Owned part (%). When you enter one, the other is calculated automatically. (This section does not exist for the individual business.)
- Click Register. The owner appears in the list. For the individual business, click Continue.
If the personal number is not found, the message appears in the red box at the top. Check the number. The person must be at least 18 years old.
Foreign citizen
- Check Foreign citizen. The fields become available for input and the passport fields appear.
- Fill in Passport number, Passport issue date and Passport expiration date. For the individual business, Father's name is also required.
- Enter the personal data and the address manually. In State, choose the country where the person lives.
- In Identification document, upload the scanned passport.
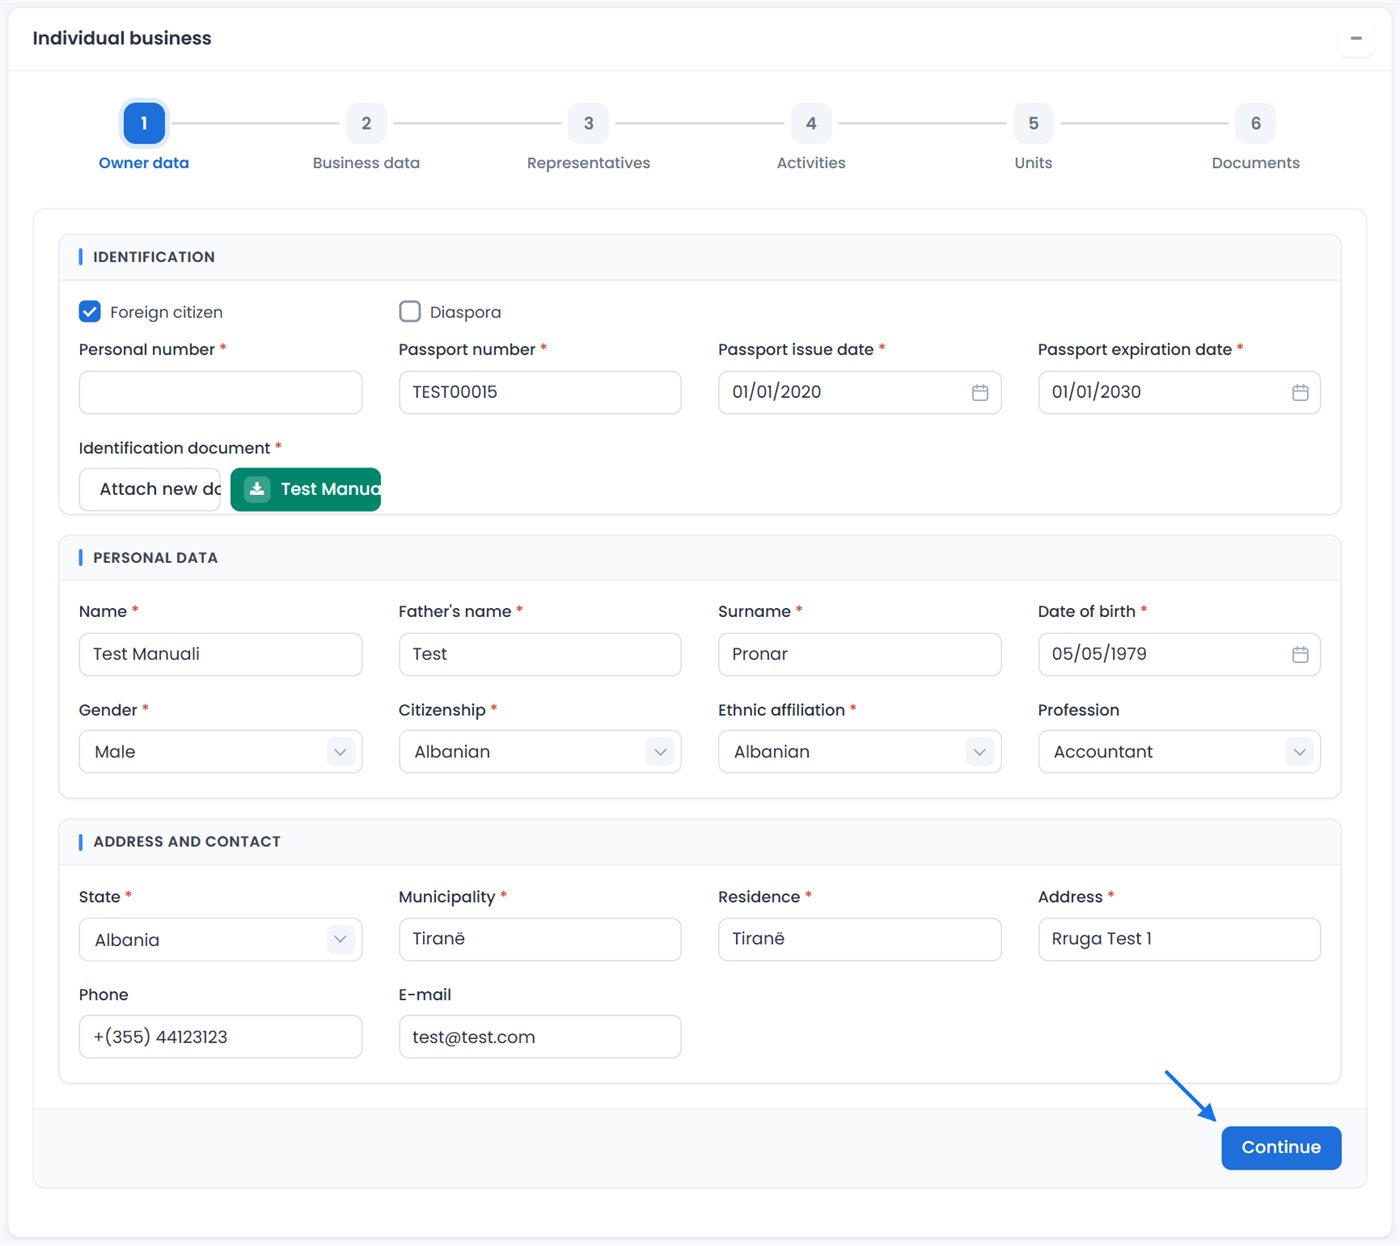
The passport must be valid. Otherwise “The passport has expired.” or “The expiration date must be after the issue date.” appears.
The Diaspora field is checked when the person is from the diaspora.
Legal person (a business as owner)
Offered for all types except the individual business.
- Choose Legal person.
- For a business registered in Kosovo, enter the NUI (9 digits). The system fills in the business name and the address. If the NUI is not found, “Business with this NUI has not been found.” appears.
- For a company from abroad, check Foreign company and fill in the data manually.
- In Identification document, upload the business certificate.
- Fill in the owned part and click Register.
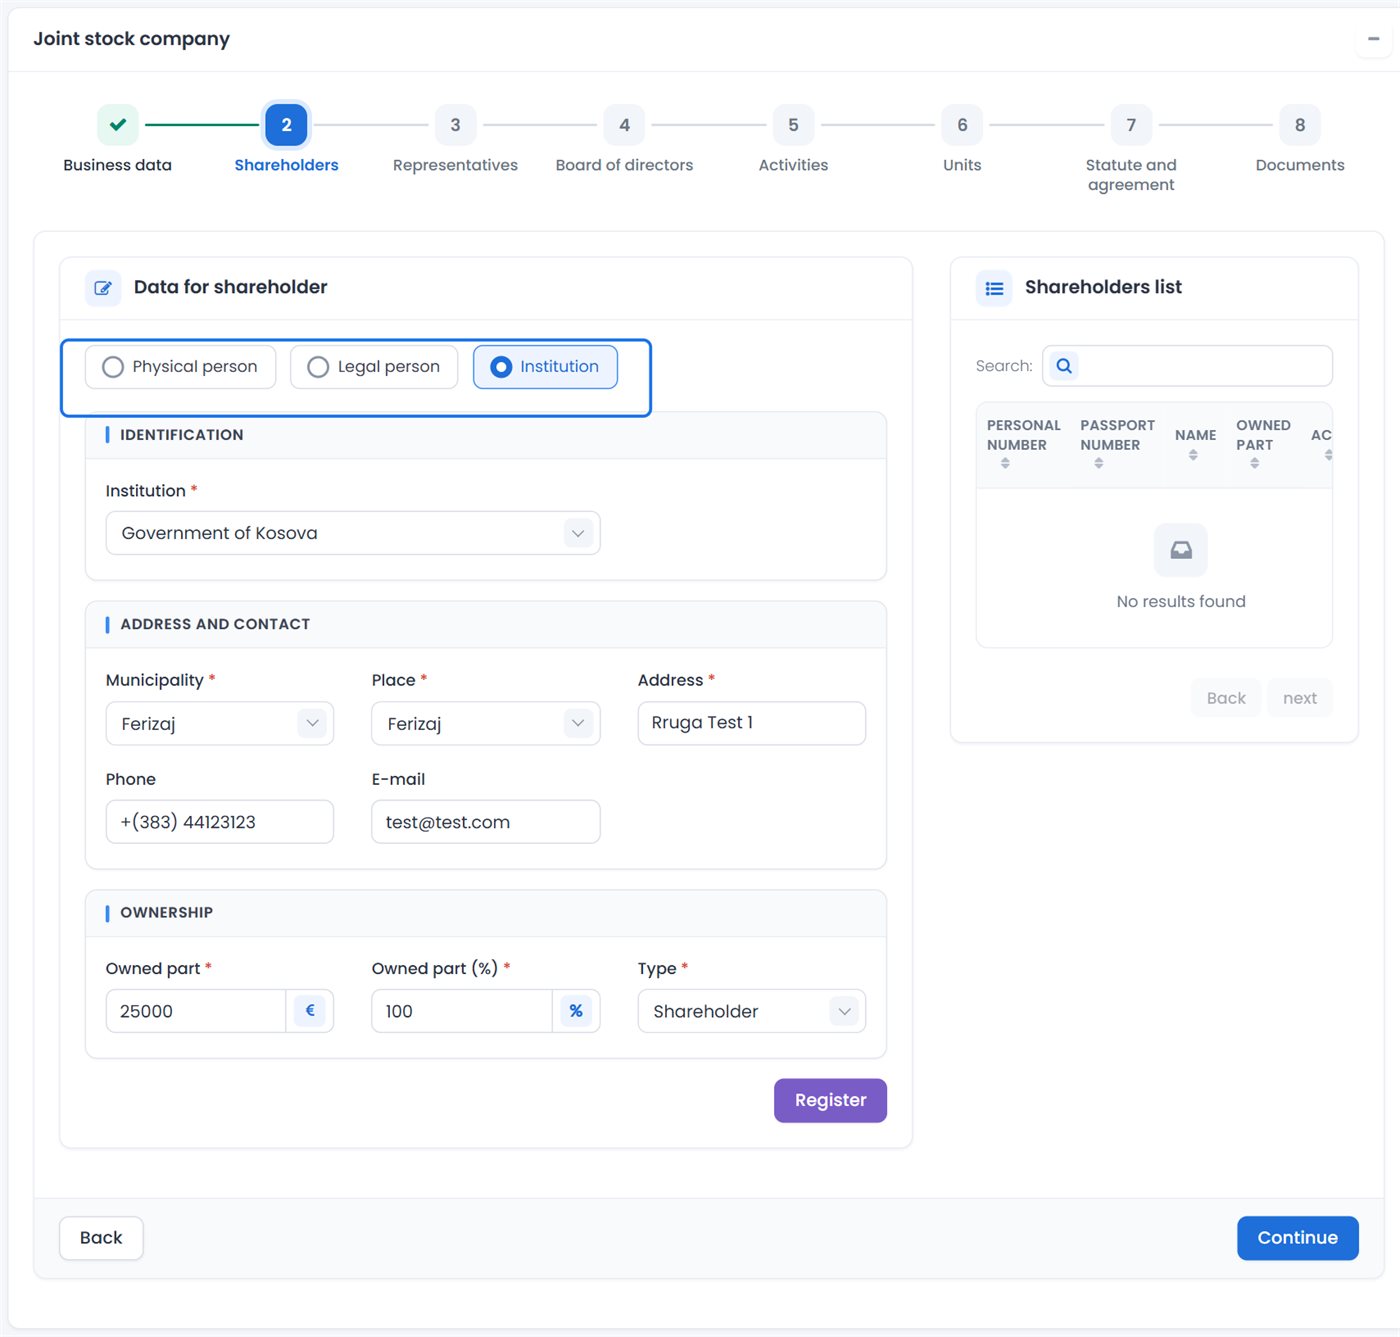
For the joint stock company there is also the Institution option: choose the institution from the list, the municipality, the address and the owned part. For companies (L.L.C. and J.S.C.), each shareholder also has the Type field, where you choose the type of shareholder.
The list and the rules
- In the list, the Actions menu has Change and Delete for each owner.
- The same person cannot be registered twice: “You can not register the same owner more than once.”
- When you click Continue, the sum of the owners' shares must equal the capital of the business: “The equity amount of the owners should be the same as the total capital of the business.”
- If you later change the capital in Business data, the owners' shares are recalculated according to their percentages. If needed, change them with Change.
- The minimum number of owners depends on the type: two for partnerships, one for the other types (see the part for your type).
Next to each Append button the official also has Scan, which takes the document directly from the scanner. The scanning program must be installed and open.
Business data
The form has four sections: Name and incorporation, Capital and employees (for the individual business only Employees), Contact and Business address.
- In Business name, enter the name without quotation marks and without the type suffix (e.g. Google). The suffix is added automatically. For the individual business, the name is taken from the owner's first and last name and cannot be changed here.
- Click Abbreviations and choose the suffix (e.g. L.L.C.). It is offered in Albanian, English and Serbian. Without it, “Please select the abbreviation for the business type.” appears.
- Trade name is not required. If you enter one, it must be different from the business name and must not be used by another business (“Business with this trade name exists.”).
- In Dt. constitution/statute, choose the date. It cannot be in the future.
- In Number of workers, enter the number of employees (at least 1).
- For all types except the individual business: Capital (in €) and Nr. stock (if you have no capital, enter 0). Class stock is not required.
- In Contact: Phone number (*), E-mail (*) and, optionally, Web site. The e-mail address cannot be an institutional one.
- Fill in the address (see below) and click Continue.
The business name cannot contain special characters and must be unique. If the name is already taken, “Business with this name exists.” appears.
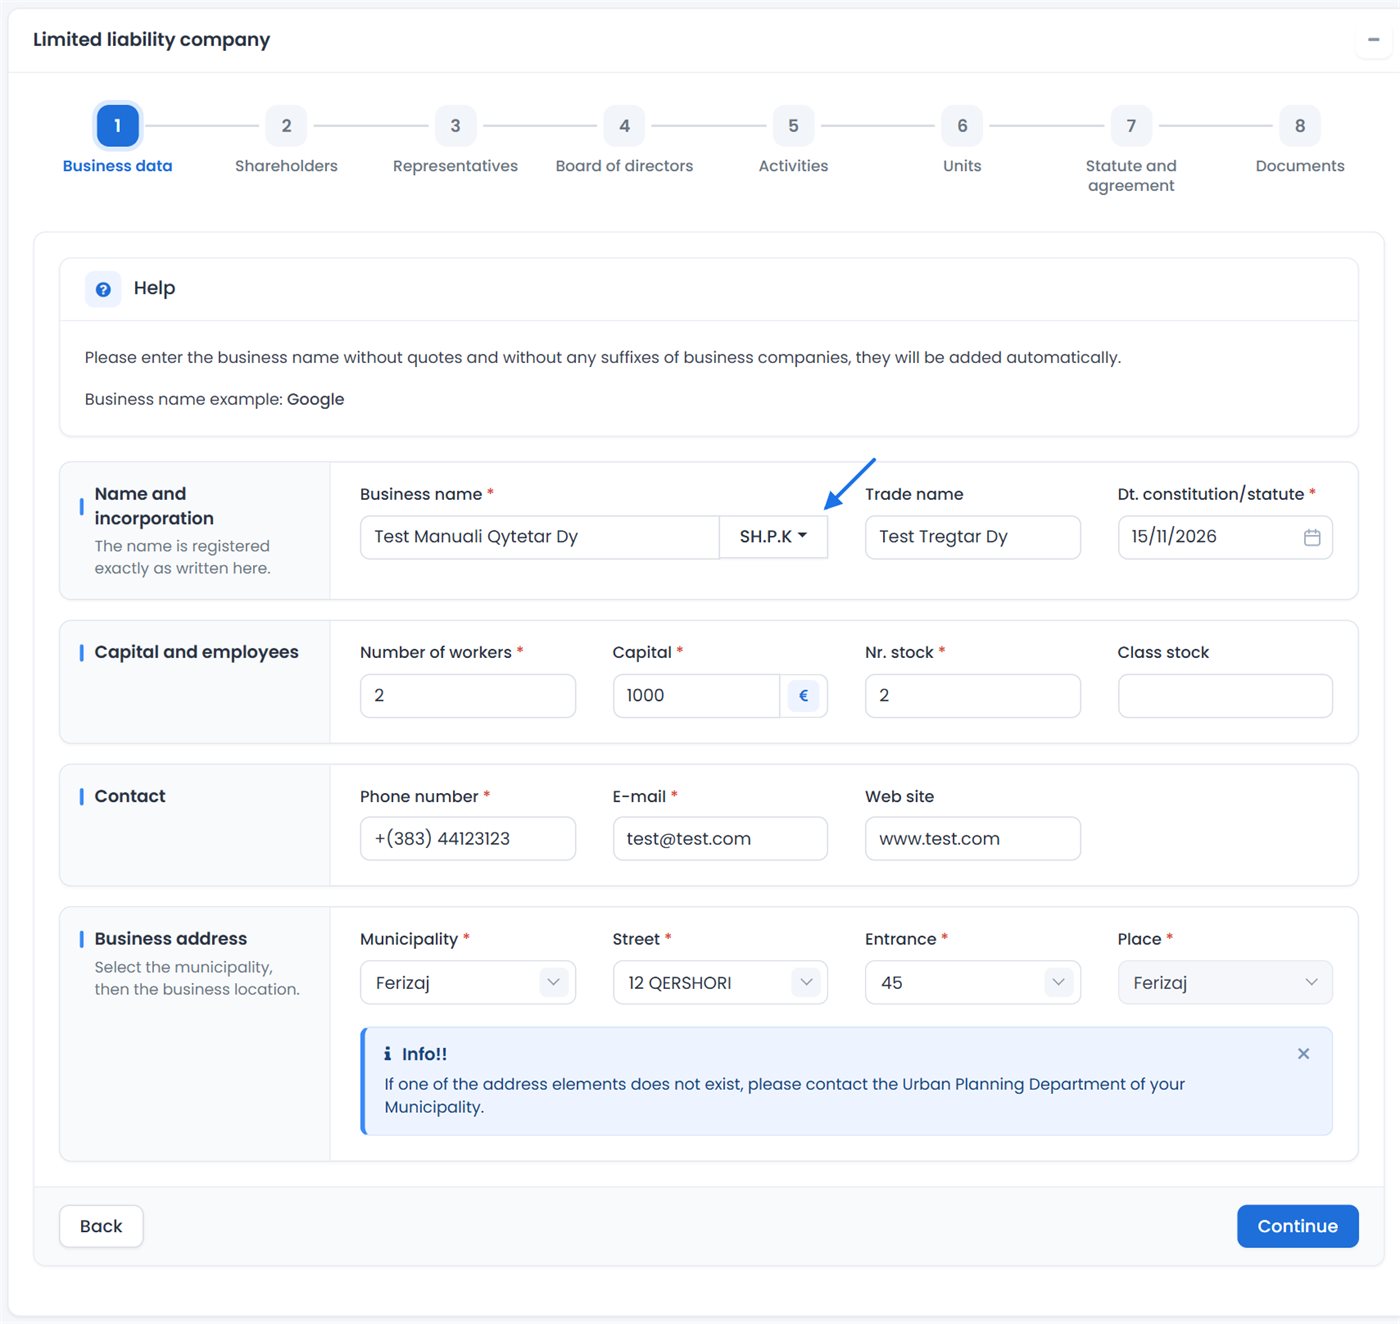
Business address
First choose Municipality. The other address fields depend on the municipality:
- In most municipalities the address is chosen from lists: Street, Entrance and Place. If the entrance has apartments, Floor Number and Apartment number also appear. If an element of the address is missing from the list, go to the Urban Planning Department of your municipality.
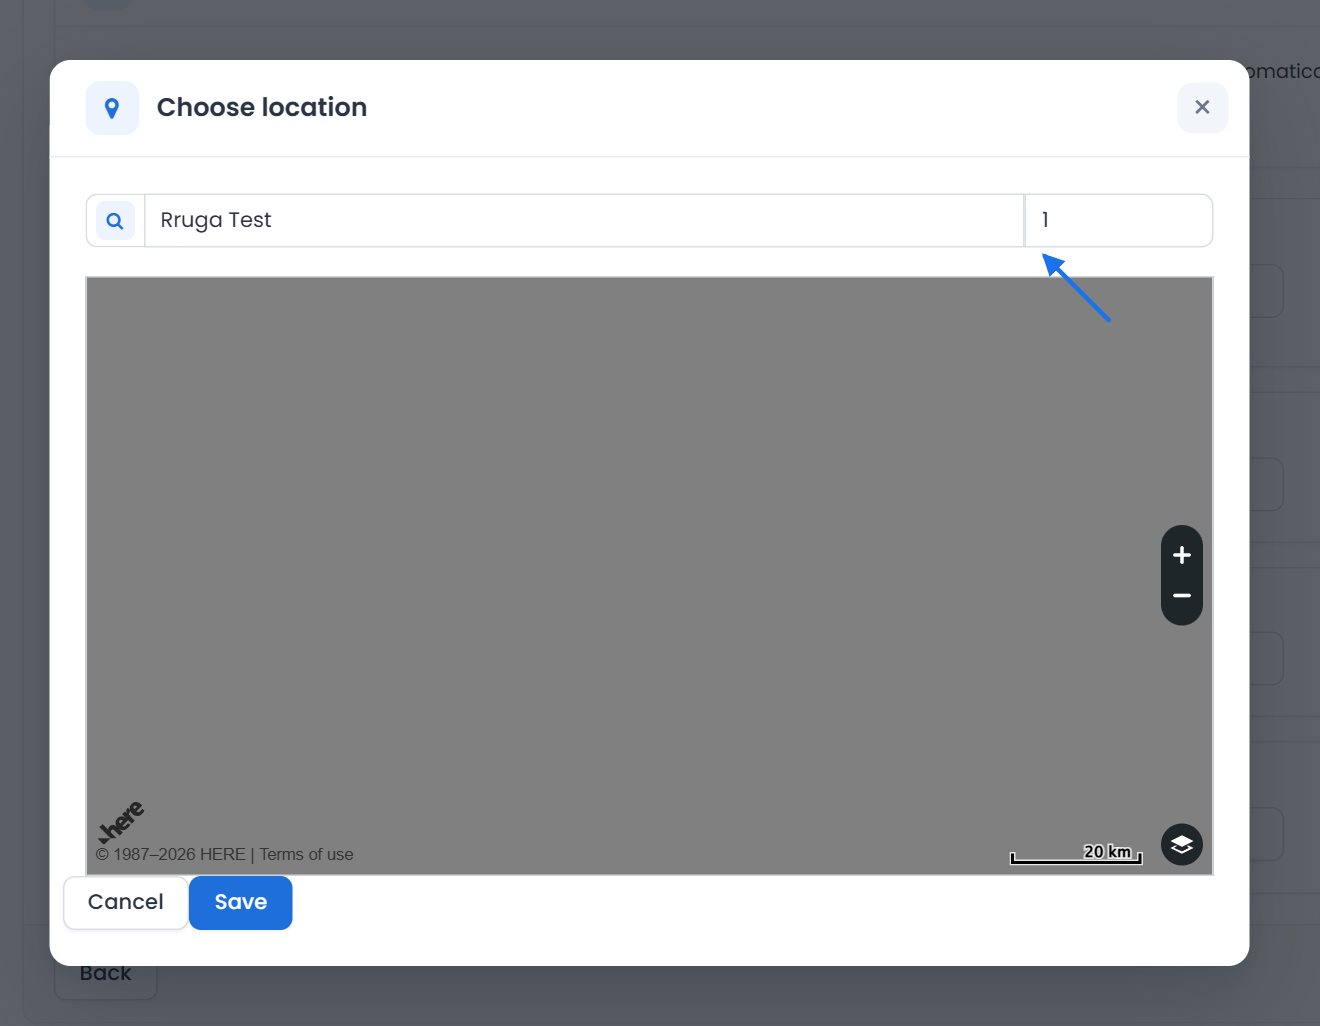
- In some municipalities you choose Place and then the address on the map, with the Choose location button:
- In the Choose location window, enter the street (e.g. Agim Ramadani) and, in the field next to it, the number.
- If you wish, drag the marker on the map to the exact location of the business.
- Click Save and confirm the address with Yes, confirm it!. The saved address appears on the button.
If the street is not found on the map, the address is saved as you entered it. If you change the municipality, you must choose the address again.
Next to Business name and Trade name the official also has the Similar names button, to check the names of existing businesses.
Representatives
Here you register the persons who represent the business. In the Position in business field you set the position of each one (e.g. director, agent, accountant). A representative is always a natural person, a local or a foreign citizen. To continue you need at least one representative: “You must register at least one representative.”
On the right there are two lists: List of owners and List of representatives.
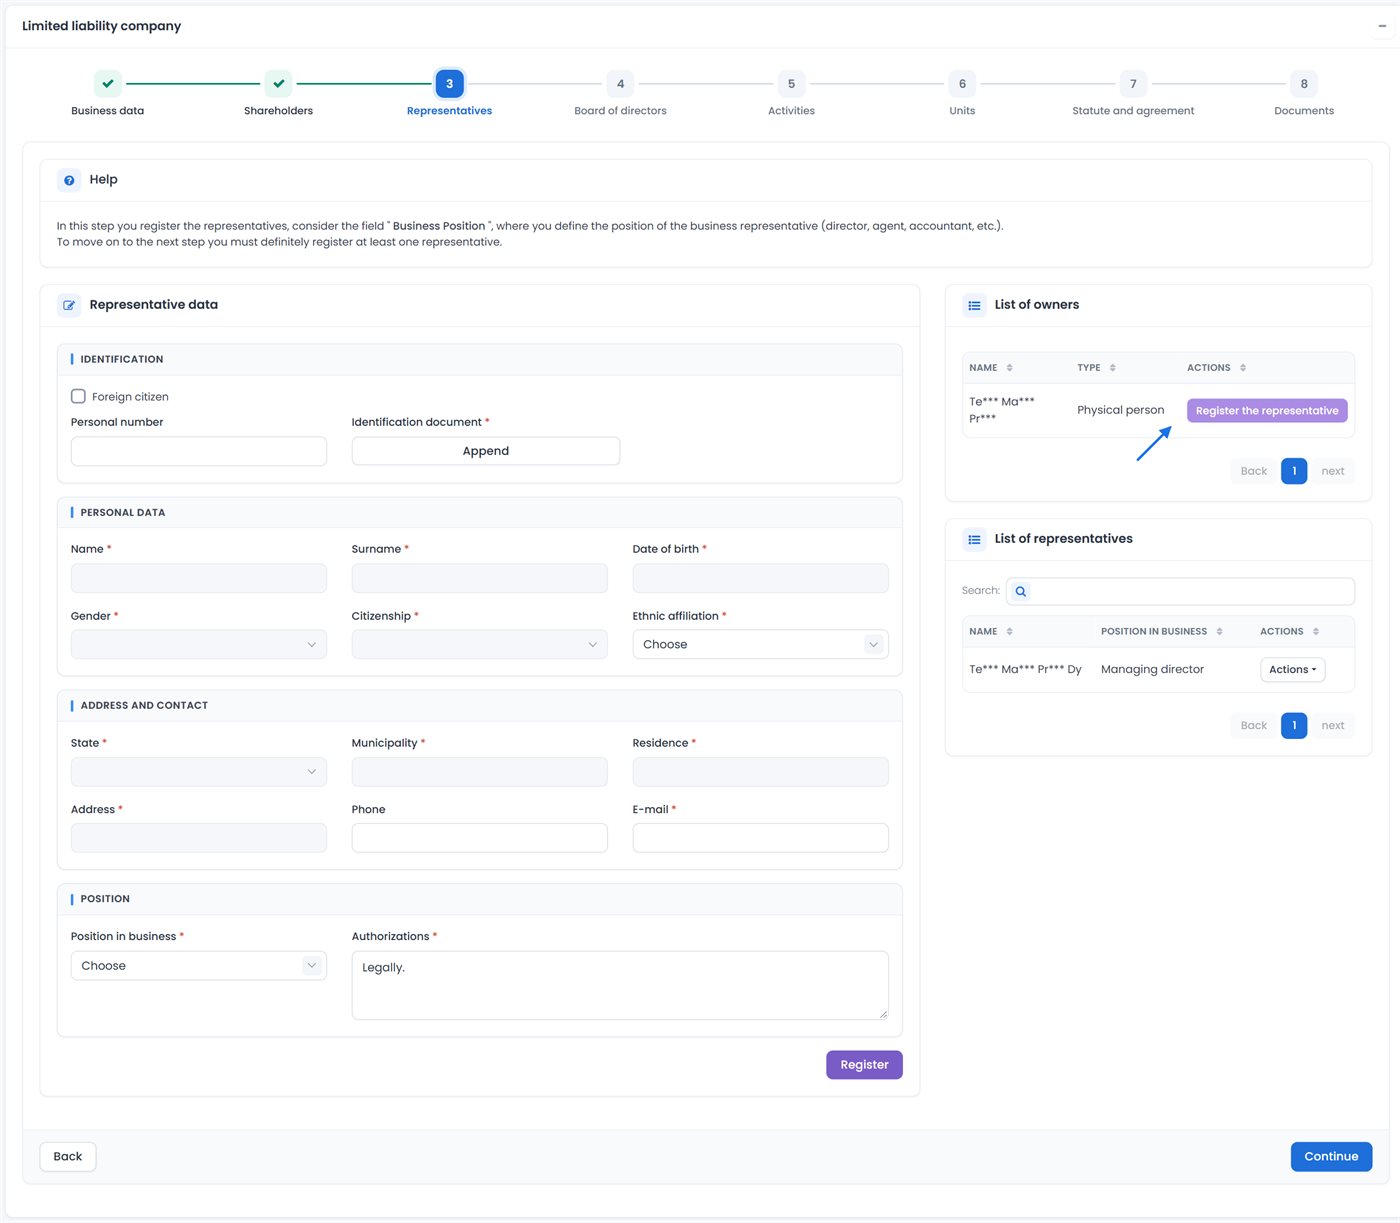
Owner as representative: Register the representative
When the representative is one of the owners, you do not need to enter the data again:
- In the List of owners, on the owner's row, click Register the representative.
- The Register the representative/director window opens with the owner's data.
- In Position in business, choose the position, e.g. Managing director. Fill in E-mail and check Authorizations (by default “By law and statute.”).
- Click Save the representative and close the message “Data has been successfully saved.”.
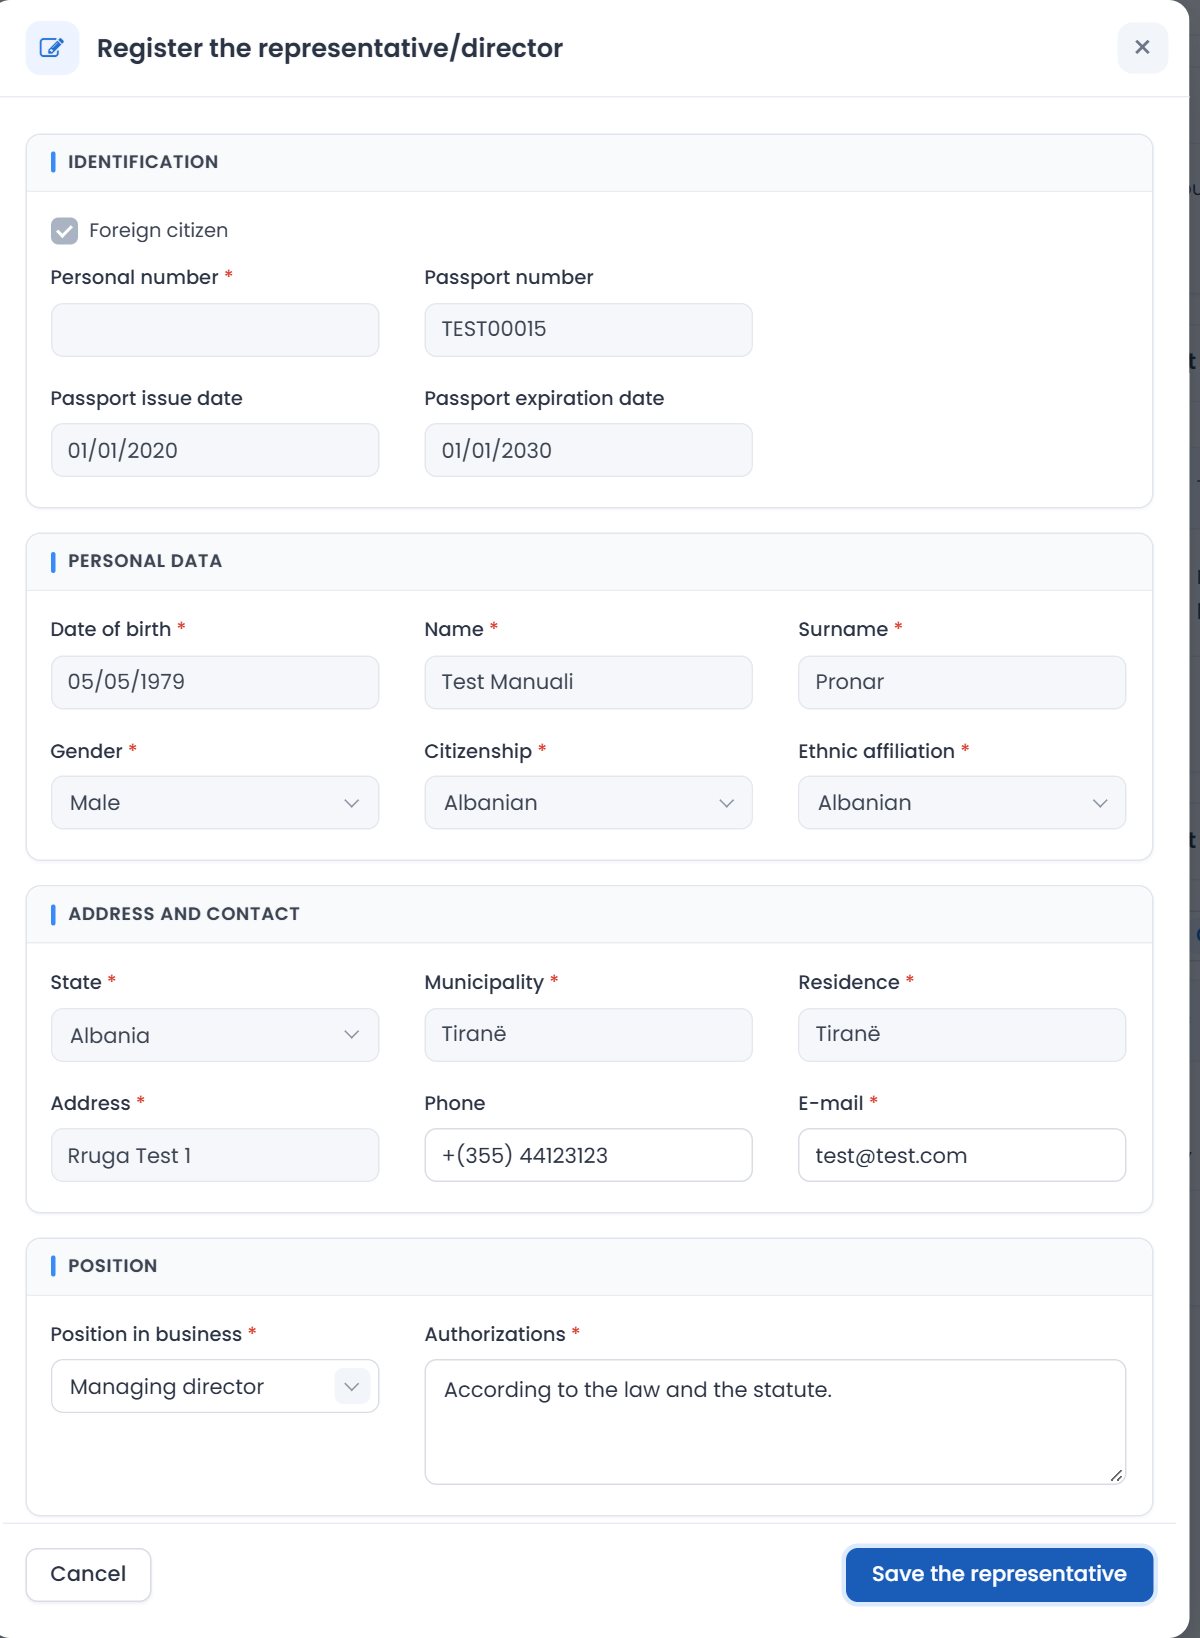
Representative who is not an owner
- In Representative data, enter the Personal number, or check Foreign citizen and fill in the passport details (as for owners).
- Upload the identification document with Append. If the person has already uploaded it in this application (e.g. as an owner), “This person's identification document has already been uploaded in this application. There is no need to upload it again.” appears.
- Fill in Ethnic affiliation, E-mail (*) and, optionally, Phone.
- In the Position section, choose Position in business and enter the Authorizations.
- Click Register. The representative appears in the List of representatives.
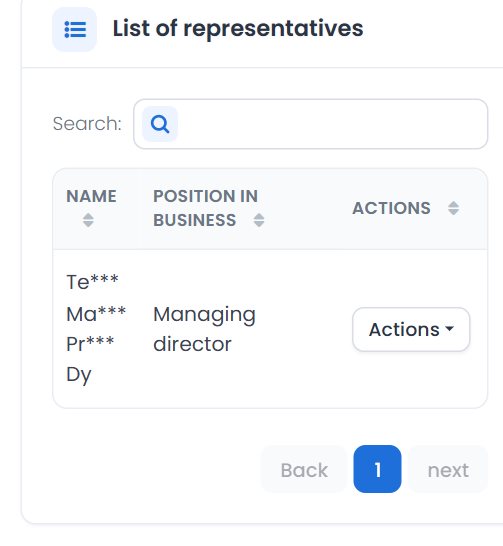
In the list, the Actions menu has Change and Delete. The same person cannot be registered twice: “You can not register the same representative more than once.”
Some types require a specific position: for the individual business the owner is the Authorized representative, for an L.L.C. a Managing director is required, while for a J.S.C. a managing director, executive director, chairman or chief executive officer is required.
Board of directors
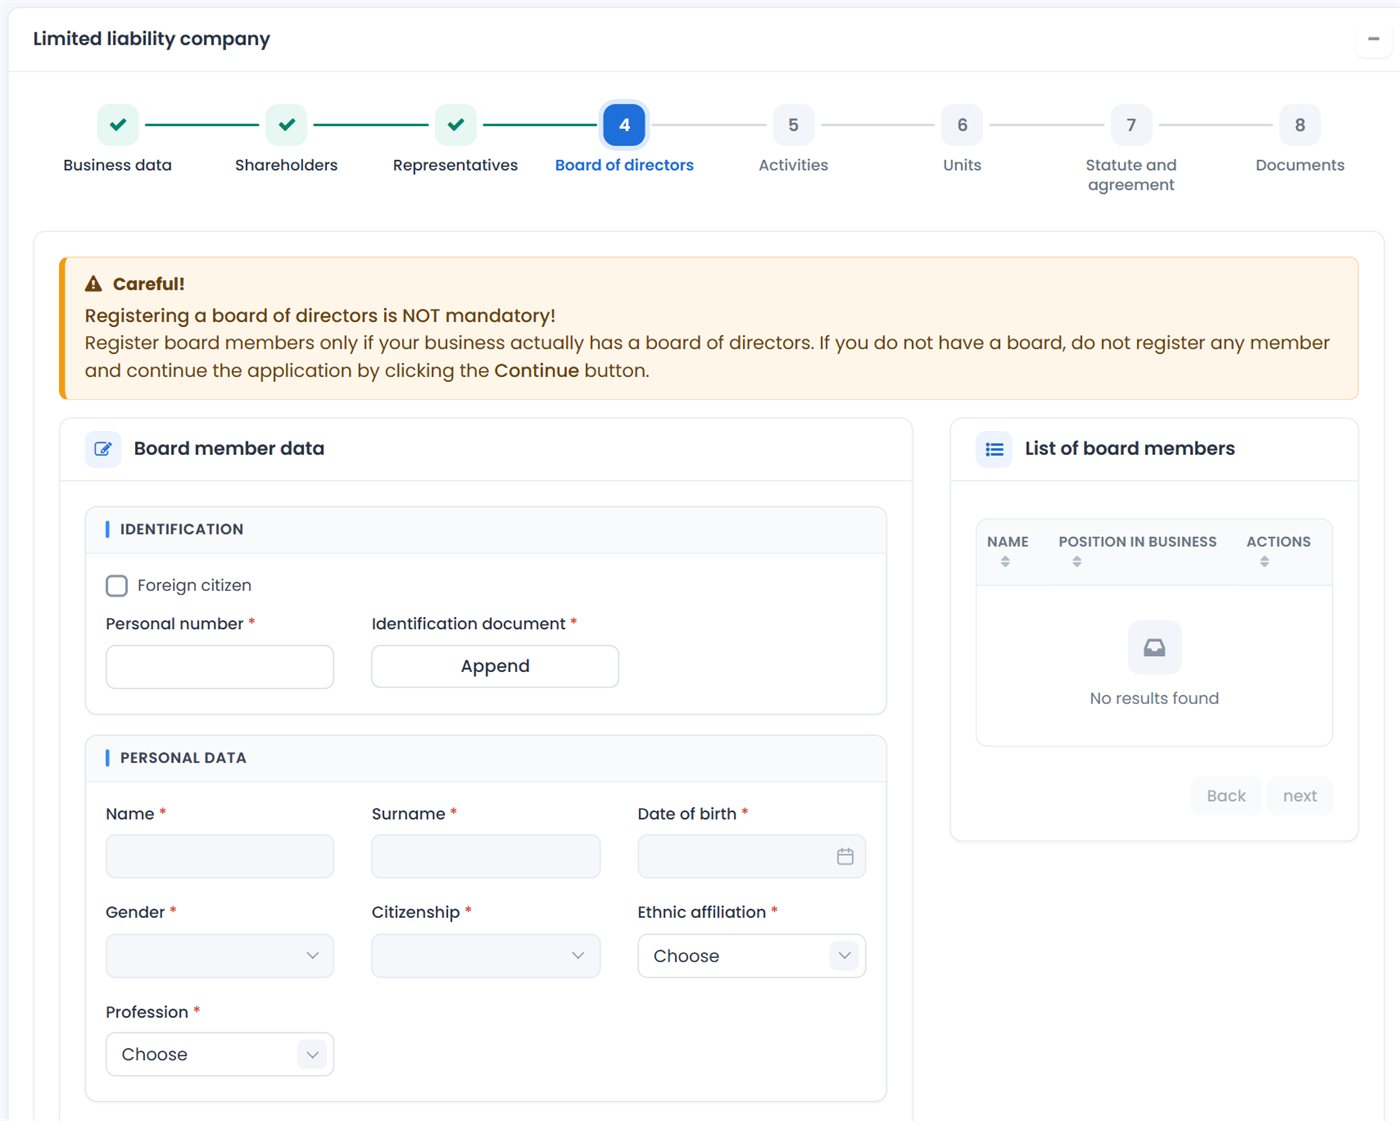
This step exists for the L.L.C., the J.S.C., the foreign company, the representative office and the agricultural cooperative. For the L.L.C., the foreign company and the representative office the warning “Registering a board of directors is NOT mandatory!” appears: if the business has no board, just click Continue. For the J.S.C. and the agricultural cooperative the board is mandatory.
- In Board member data, fill in the personal number (or the passport), the identification document and the personal data, the same as for owners. Here Profession is required.
- In the Position section, choose Position in business, e.g. Member of the Board of Directors.
- Click Register. The member appears in the List of board members.
- After you register all the members, click Continue.
The same person cannot be registered twice on the board: “This person is already registered at the board of directors.”
Activities
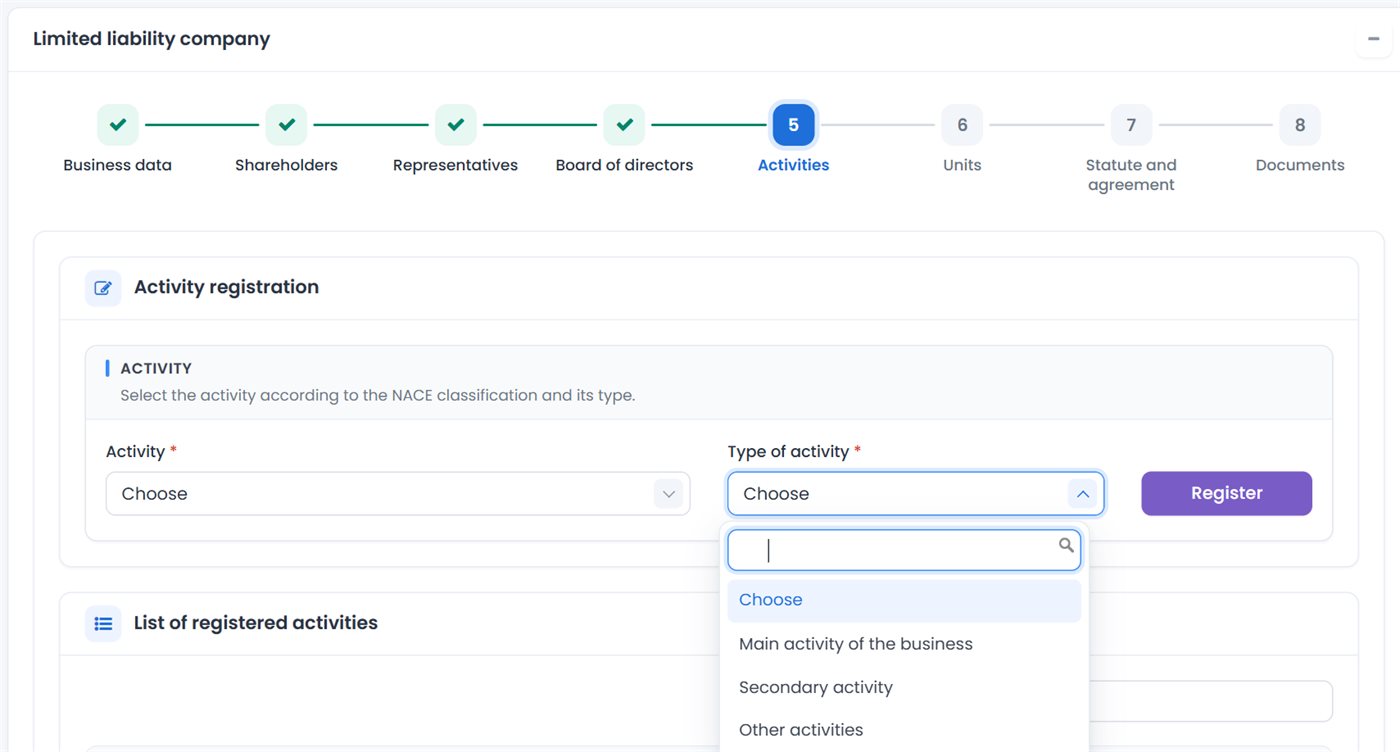
Register the activities of the business according to the NACE classification. The main activity is required, while the others are added as needed.
- In Activity, choose the activity. In the list you can search by code or by name.
- In Type of activity, choose Main activity of the business, Secondary activity or Other activities.
- Click Register. The activity appears in the List of registered activities.
- Repeat for each activity. Then click Continue.
To remove an activity registered by mistake, click Delete in the list.
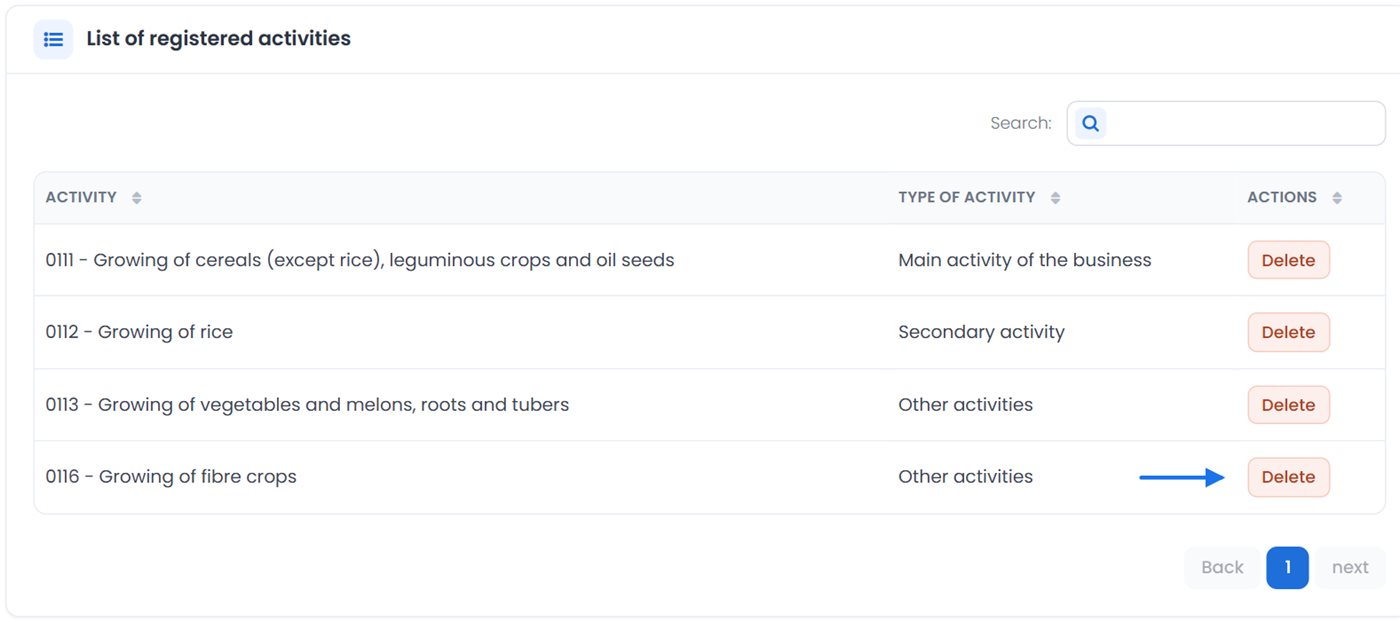
Without a main activity you cannot continue: “Registration of the main activity is mandatory, so you can not go to the next step.”
Units
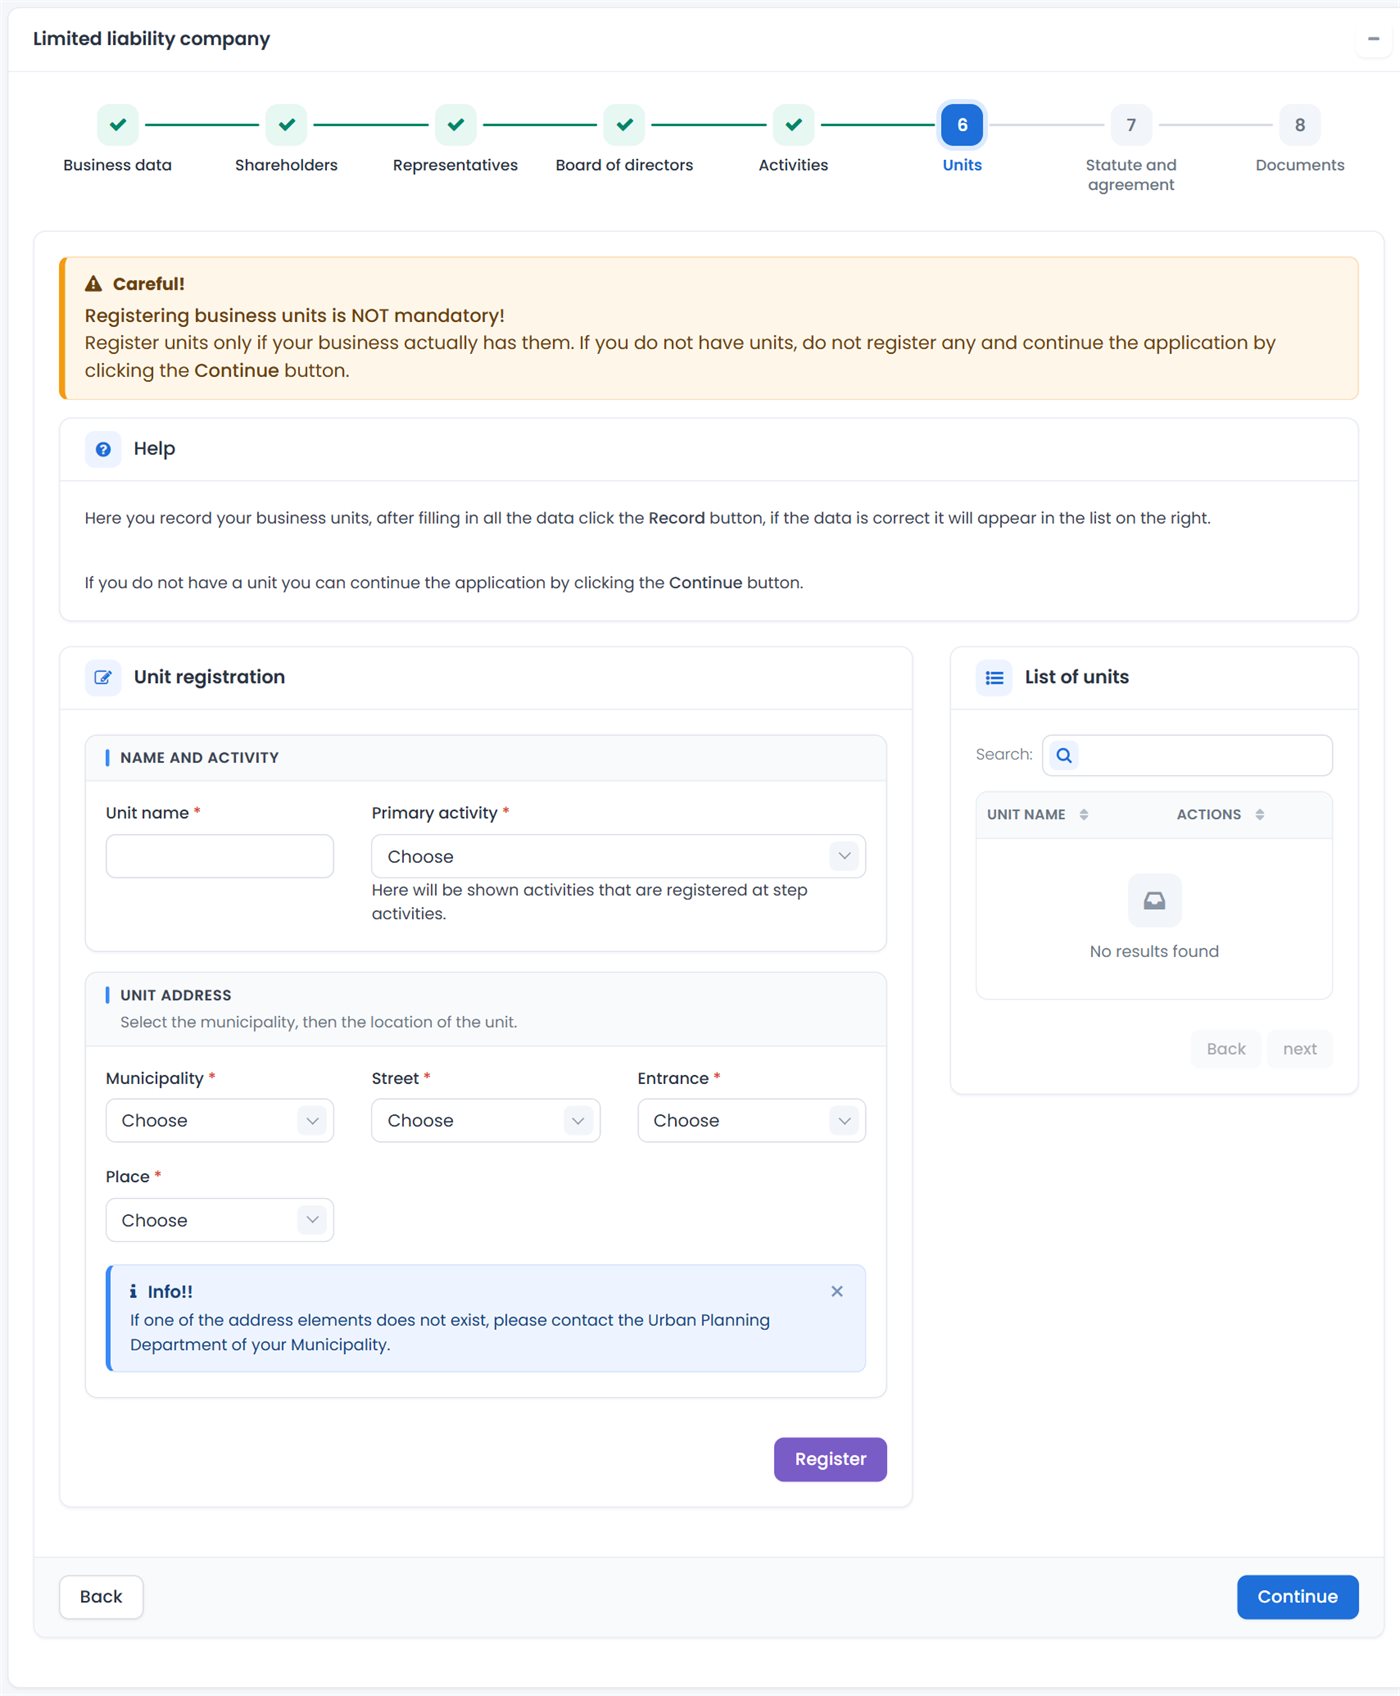
Registering units is not required. Register units only if the business has them. Otherwise just click Continue.
- In Unit registration, enter the Unit name.
- In Primary activity, choose the activity of the unit. The list contains only the activities registered in the Activities step.
- In Unit address, choose the municipality and the address, the same as for the business address.
- Click Register. The unit appears in the List of units.
- Click Continue.
Statute and agreement
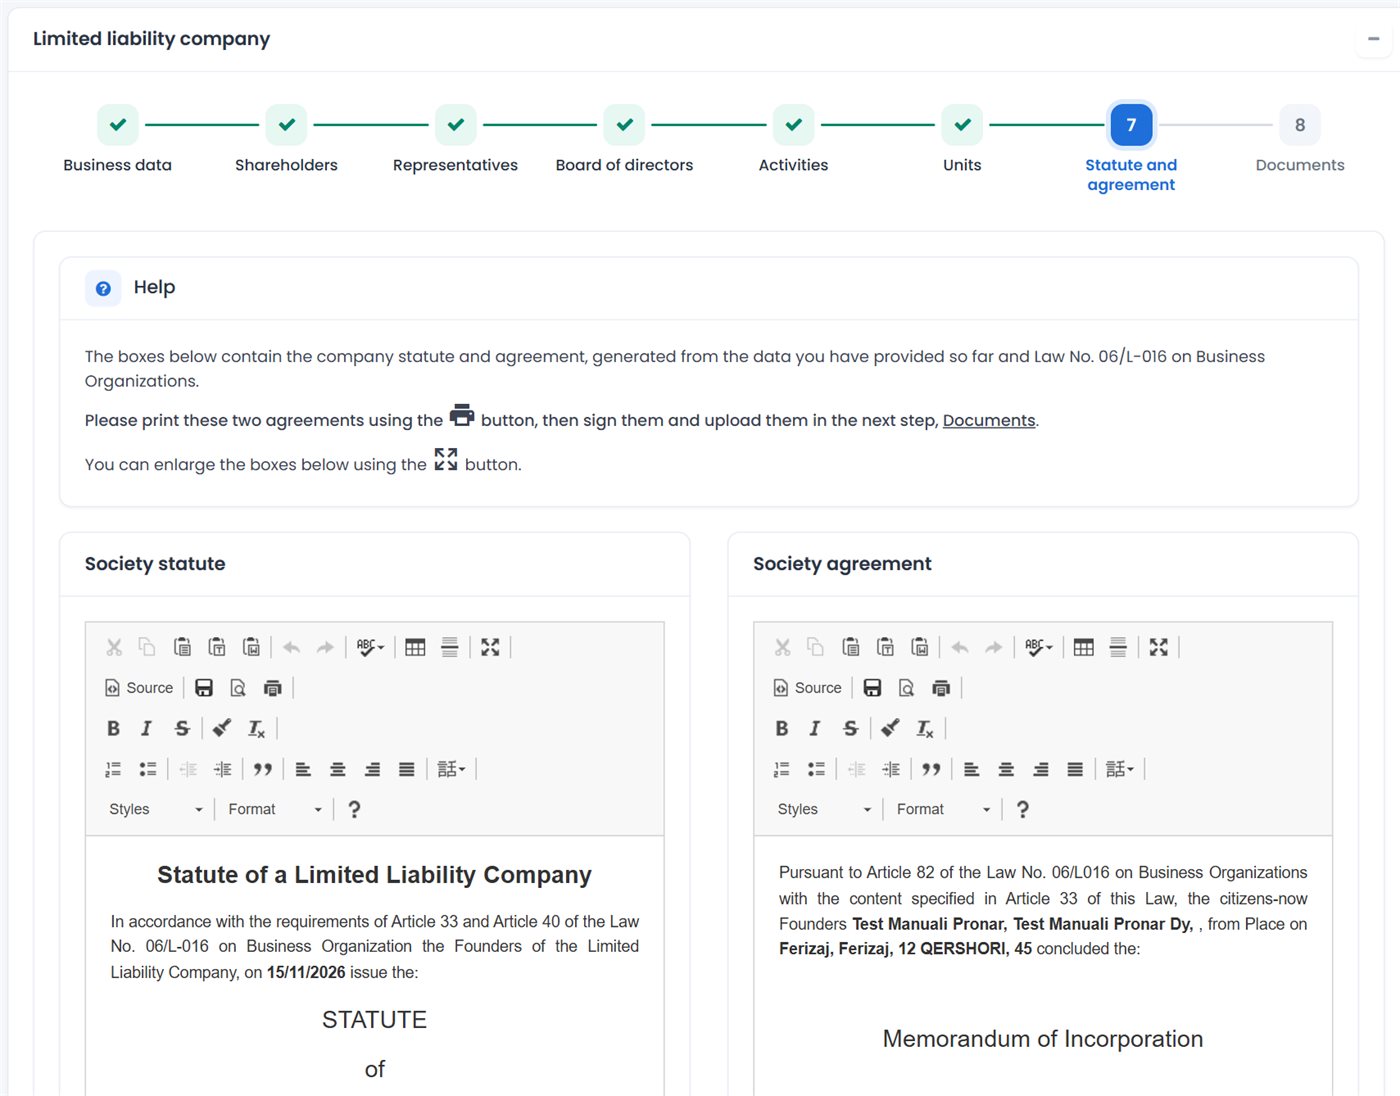
This step exists only for the L.L.C., the J.S.C. and the agricultural cooperative. The system generates the Society statute and the Society agreement from the data you have entered and from Law No. 06/L-016 on Business Organizations.
- Read both texts. If needed, you can edit them directly in the box.
- To restore the original text, click the Here link in “Regenerate the statute by clicking Here” or “Regenerate the agreement by clicking Here”.
- Print each text with the printer button in the toolbar of the box. You can enlarge the box with the enlarge button .
- Sign the documents and scan them as PDF. They are uploaded in the Documents step.
- Click Continue.
For the foreign company and the representative office this step does not exist: the statute is uploaded as a PDF in Documents.
Documents
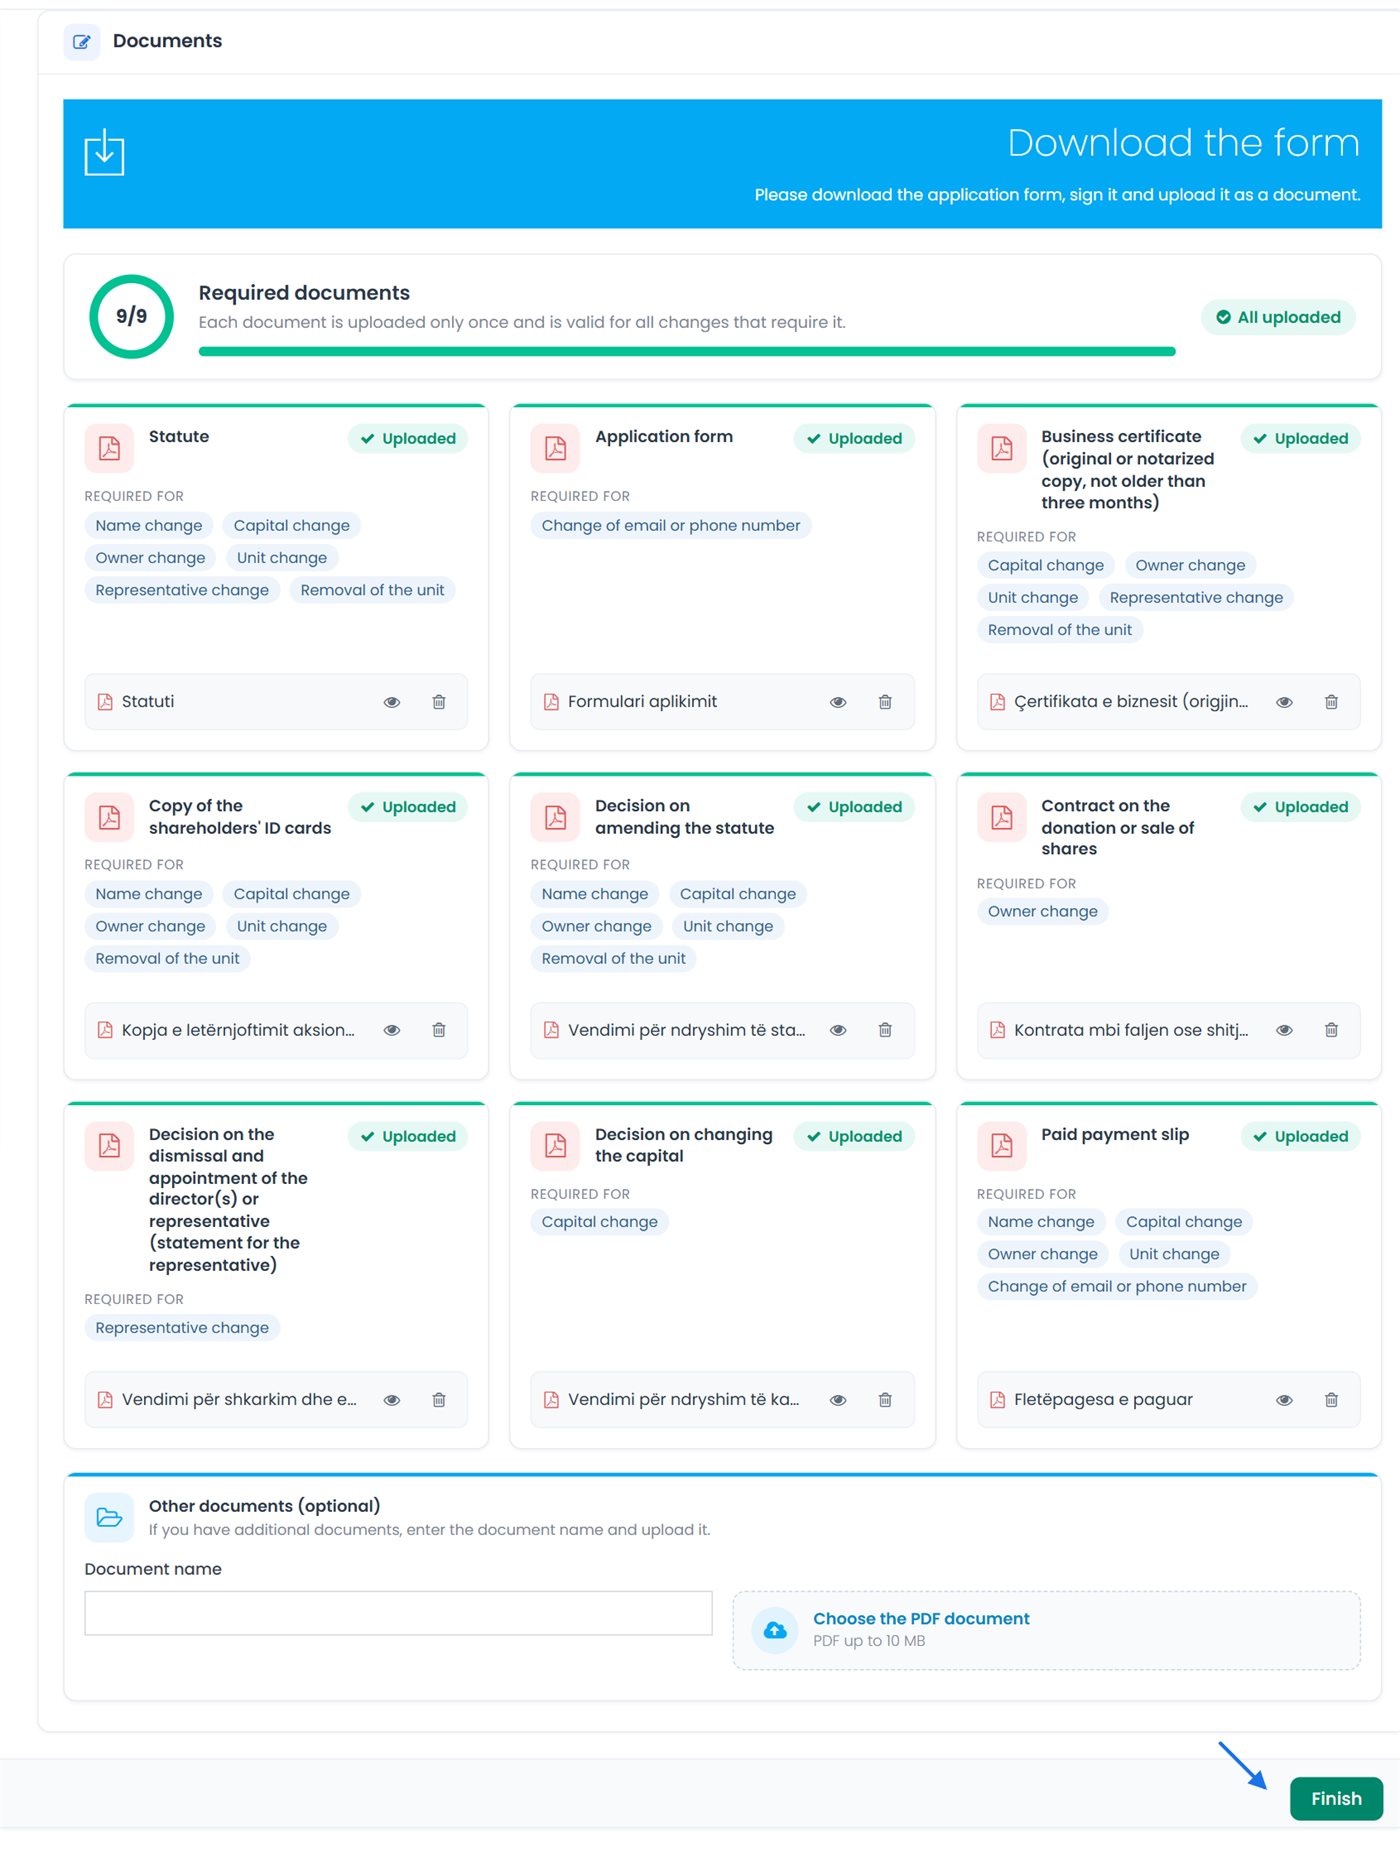
The last step shows, in the List of documents, all the documents the application requires. At the top, in Required documents, you see how many have been uploaded (e.g. 1/3). Each document has its own card:
- Missing (orange line): the document has not been uploaded yet.
- Uploaded (green line): the document has been uploaded.
- At completion: the application form is uploaded when you complete the application (see Completion).
- On the document card, click Choose the PDF document (PDF up to 10 MB) and choose the file.
- The upload starts automatically. When it finishes, the card turns green and shows the file name.
- With the icon (Look) you open the document. With the icon (Delete) you delete it and can upload another one.
- Repeat for each card marked Missing.
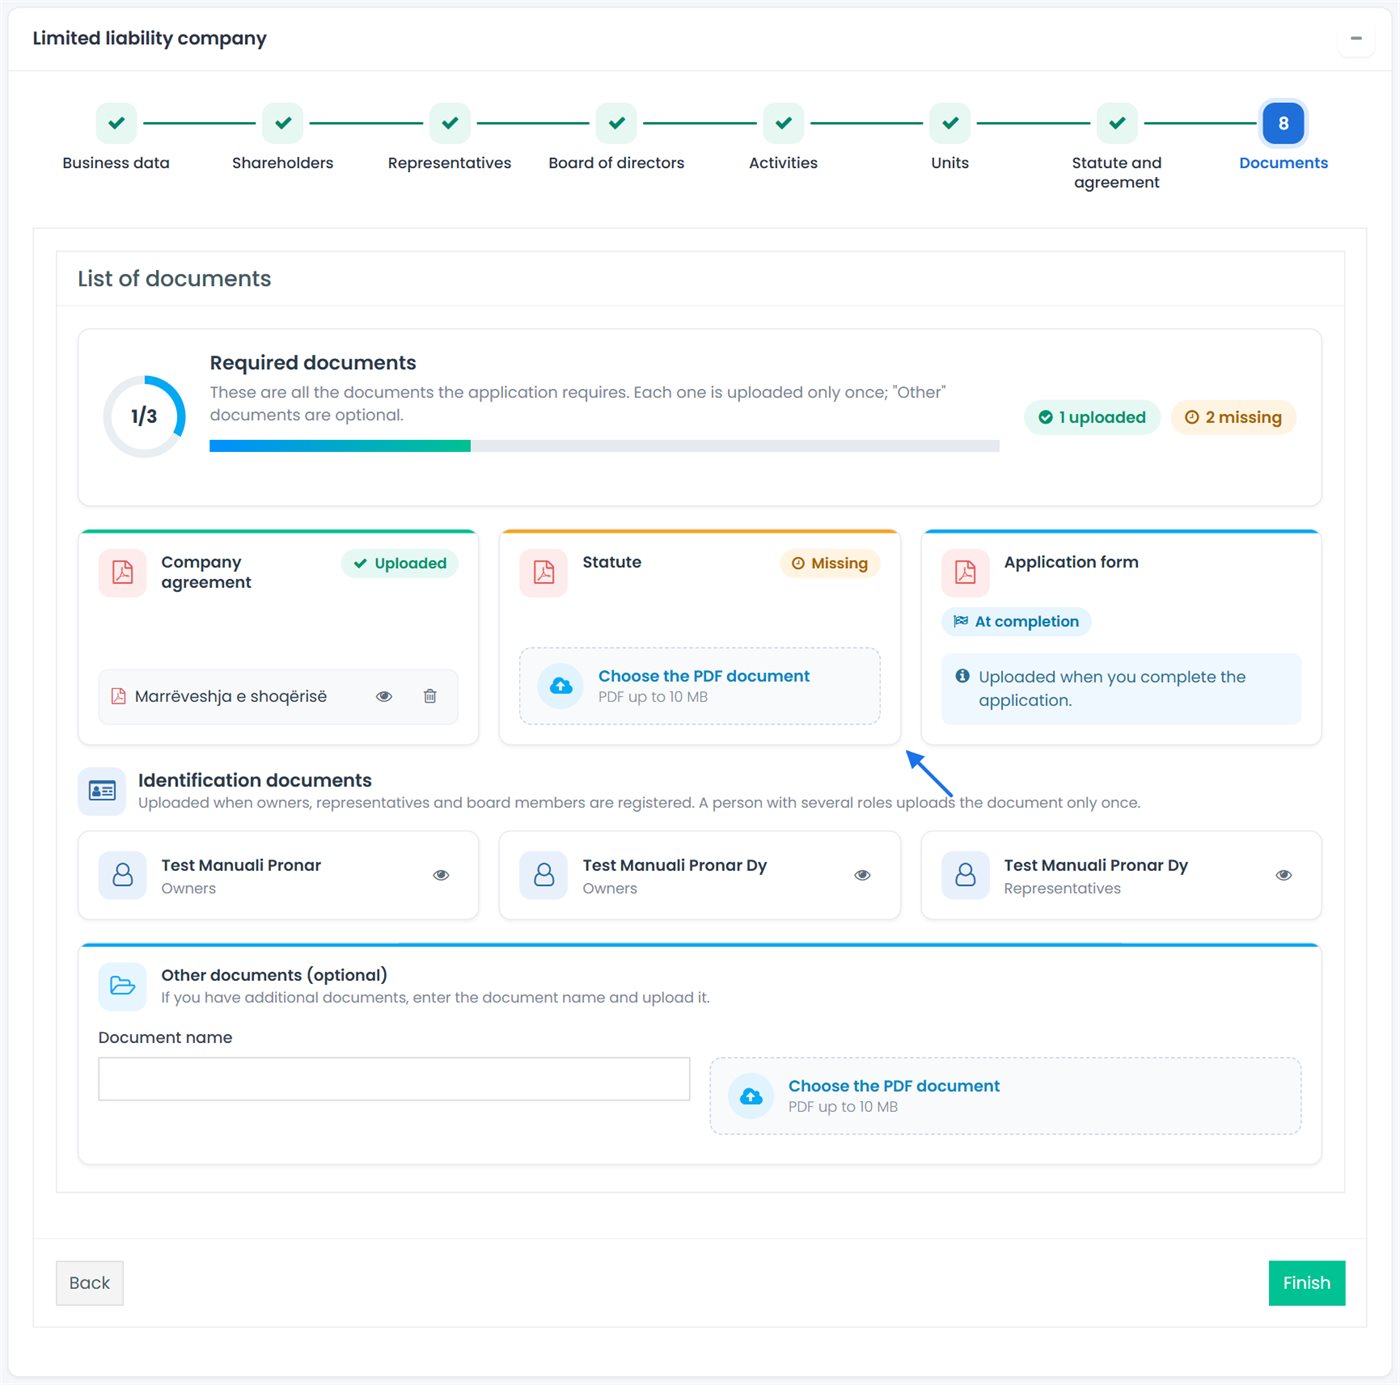
- Identification documents shows the persons (owners, representatives, board members) who uploaded their document in the previous steps. Here you can only view them. A person with several roles uploads the document only once, but appears under each role (e.g. an owner who is also a representative appears under both Owners and Representatives).
- In Other documents (optional) you can add extra documents: enter the Document name and choose the PDF.
- The required documents depend on the business type (see the part for your type). The consent of the representative is not required when the owners and the representatives are the same persons.
Completing the application and what happens next
- When the documents are uploaded, click Finish at the bottom right of the Documents step.
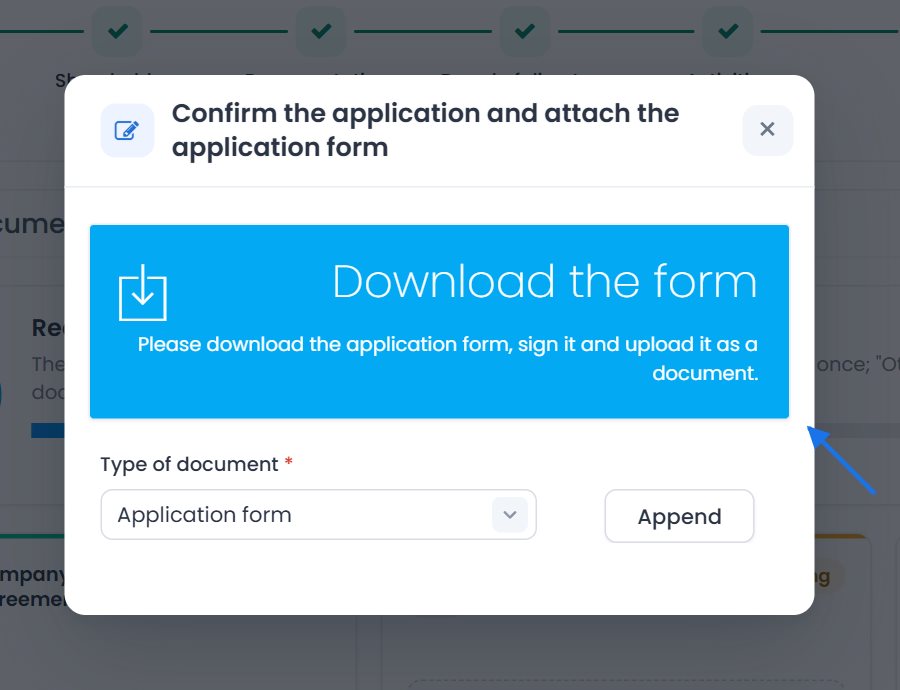
- The Confirm the application and attach the application form window opens. Click Download the form: the application form opens with your data.
- Print the form, sign it and scan it as PDF.
- In the window, the form is already selected in Type of document. Click Append and choose the signed PDF.
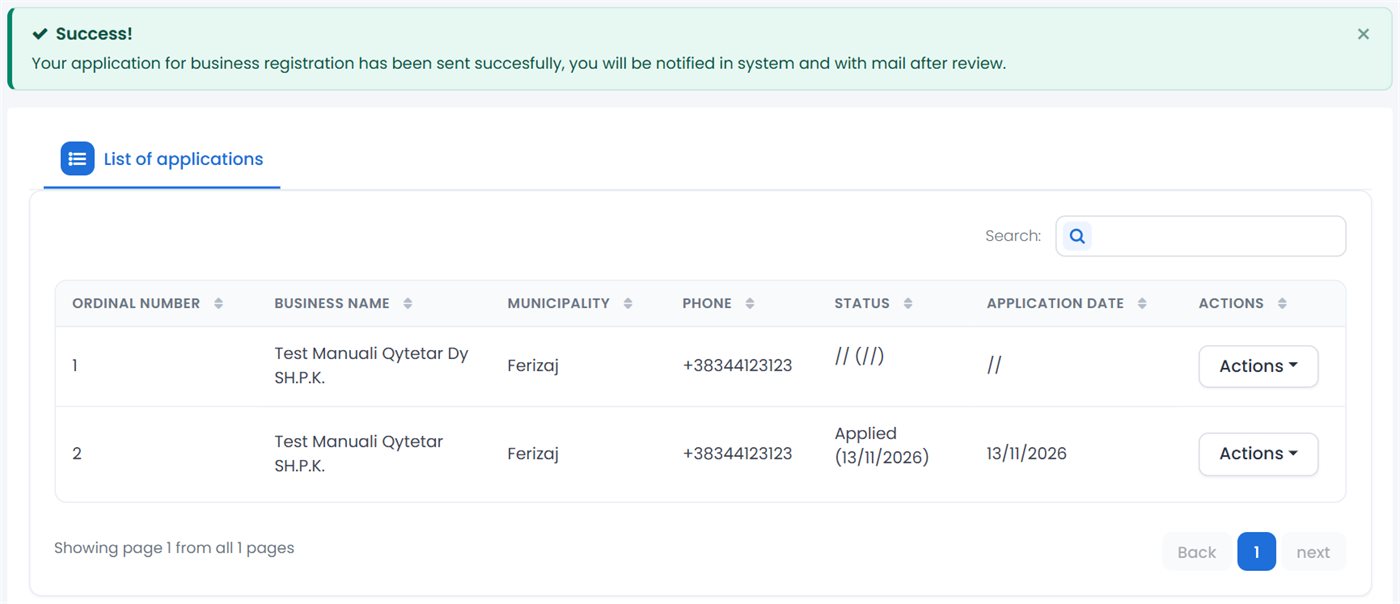
- After the upload, the application is completed automatically. The List of applications opens with the message “Your application for business registration has been sent succesfully, you will be notified in system and with mail after review.”
If a required document is missing, the application is not completed and the message “The following documents are missing: …” appears with the names of the documents. Upload them and click Finish again.
What happens next
- The application gets the status Applied. When ARBK starts reviewing it, the list shows Under review.
- When a payment slip is issued for the application, it appears in the list, under Actions Receipt. Right after sending, Actions may contain only Form and Statuses history.
- If ARBK returns the application for completion, the e-mail and Notes tell you what needs to be corrected. Open the application with Fill: in each step, the blue Notes for … box shows the remarks of ARBK. Make the changes, go through the steps with Continue and at the end click Finish. The application must be completed within 10 days, otherwise it is deleted automatically.
- When the application is approved or rejected, you are notified by e-mail. If it is rejected, the e-mail gives the reason.
Before Finish, the official clicks the blue Register/Change applicant bar at the top of Documents and registers the applicant. Otherwise “Please register the applicant before you complete the application.” appears. For the official, the application form is uploaded like the other cards, and Finish only opens the confirmation “Are you sure you want to end the application?” with Yes, confirm it!.
Individual business (I.B.)
In an individual business the owner has unlimited liability for all debts. The business name includes the first name and last name of the owner, with the suffix I.B.
- Steps: 6, starting with Owner data. There is no board and no statute (see the table).
- Owner: one natural person, a local or a foreign citizen. The same person can have only one individual business: “You can not register more than one individual business for the same person.”
- Name: filled in automatically from the owner's first and last name, and it cannot be changed in Business data. Choose only the abbreviation (I.B.) and, if you wish, the trade name.
- Capital: not required. Only the number of employees is entered.
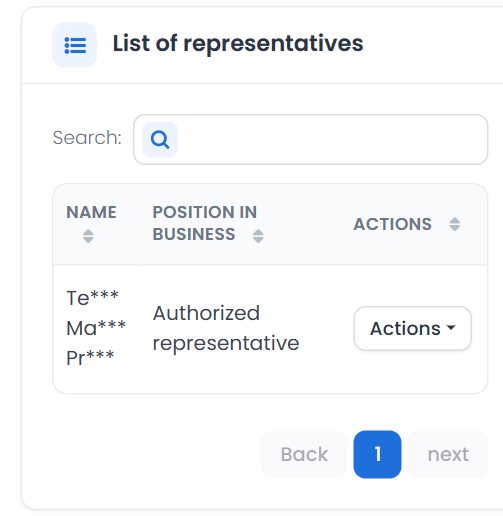
- Representative: the owner is added automatically to the List of representatives as Authorized representative. In the Representatives step, just click Continue. The owner cannot have another position: “The owner of the individual business can only be the authorized representative!”
- Documents: usually only the application form, which is uploaded at completion.
General partnership (G.P.)
In a general partnership all partners are liable for the debts without limit and jointly. The abbreviation G.P. goes after the name.
- Steps: 6, starting with Business data (with the capital), then Owners/Partners. There is no board and no statute.
- Partners: at least two, natural or legal persons: “You must register at least two owners/partners.” The sum of the shares must equal the capital.
- Representatives: at least one. Usually one of the partners is registered with Register the representative.
- Documents: usually the consent of the registered representative and the application form.
Limited partnership (L.P.)
In a limited partnership, besides the partners who are liable without limit, there are also partners who are liable up to the value of their contribution. The abbreviation L.P. goes after the name.
- Steps: 6, the same as for the general partnership.
- Partners: at least two, with the same form as for the G.P. The sum of the shares must equal the capital.
- Representatives: at least one.
- Documents: usually the consent of the registered representative, the statute and the application form. There is no Statute and agreement step here, so the statute is uploaded as a PDF.
Limited liability company (L.L.C.)
An L.L.C. is founded by one or more founders. The abbreviation L.L.C. goes after the name.
- Steps: 8, with Board of directors and Statute and agreement.
- Shareholders: at least one, a natural or legal person: “You must register at least one shareholder.” For each one you also choose the Type. The sum of the shares must equal the capital.
- Representatives: at least one representative with the position Managing director is required. Otherwise: “You need to register a representative with the position in business MANAGING DIRECTOR.”
- Board: not mandatory.
- Documents: usually the company agreement and the statute (signed, from step 7) and the application form.
Joint stock company (J.S.C.)
The capital of a joint stock company is divided into shares. It can have one or more shareholders. The abbreviation J.S.C. goes after the name.
- Steps: 8, as for the L.L.C.
- Capital: at least €10,000. Otherwise: “Equity capital must be grater than 10000€.”
- Shareholders: a natural person, a legal person or an Institution. The sum of the shares must equal the capital.
- Representatives: at least one with the position managing director, executive director, chairman or chief executive officer is required: “You must register a representative in one of the positions in the business MANAGING DIRECTOR, EXECUTIVE DIRECTOR, CHAIRMAN or CHIEF EXECUTIVE OFFICER.”
- Board: mandatory, at least one member (“You must register at least one board member.”). At least half of the members must be women. When the number of members is odd, one more man than women is allowed. Otherwise the message about the 50% quota of women on the board appears.
- Documents: usually the statute (signed, from step 7) and the application form.
Foreign company (Branch in Kosovo)
A foreign company is registered as a branch in Kosovo, without the identity of a legal person. “Branch in Kosovo” is written after the name (or the same in Albanian or Serbian).
- Steps: 7. There is no Statute and agreement step: the statute is uploaded as a PDF in Documents.
- Shareholders: at least one, a natural or legal person (for a company from abroad, check Foreign company). The sum of the shares must equal the capital.
- Representatives: at least one.
- Board: not mandatory.
- Documents: usually the statute, the application form, the decision to open the foreign company, the decision to appoint the director and the business certificate of the company. The exact requirements (e.g. original or notarized copy) are written on the document card.
Agricultural Cooperative (A.C.)
An agricultural cooperative is created by farmers who contribute their property to the capital. According to the description under Help, it is founded by at least five farmers, the capital is divided into shares of equal value (at least €10 each) and the director cannot be a member of the cooperative. The abbreviation A.C. goes after the name.
- Steps: 8, as for the L.L.C., with a generated statute and agreement.
- Shareholders: the system requires at least one to continue, but register all the members of the cooperative. The sum of the shares must equal the capital.
- Representatives: at least one.
- Board: mandatory, at least one member.
- Documents: usually the company agreement, the statute, the application form and the decision to appoint the director.
Representative Office in Kosovo (R.O.K.)
- Steps: 7, the same as for the foreign company. There is no Statute and agreement step.
- Abbreviation: R.O.K. (or the same in Albanian or Serbian).
- Shareholders: at least one, a natural or legal person. The sum of the shares must equal the capital.
- Representatives: at least one.
- Board: not mandatory.
- Documents: the list of required documents is shown in the Documents step.
List of applications
Here you see your applications for business registration and their status.
- In the menu, choose Applications for business List of applications. The list also opens automatically after you complete an application.
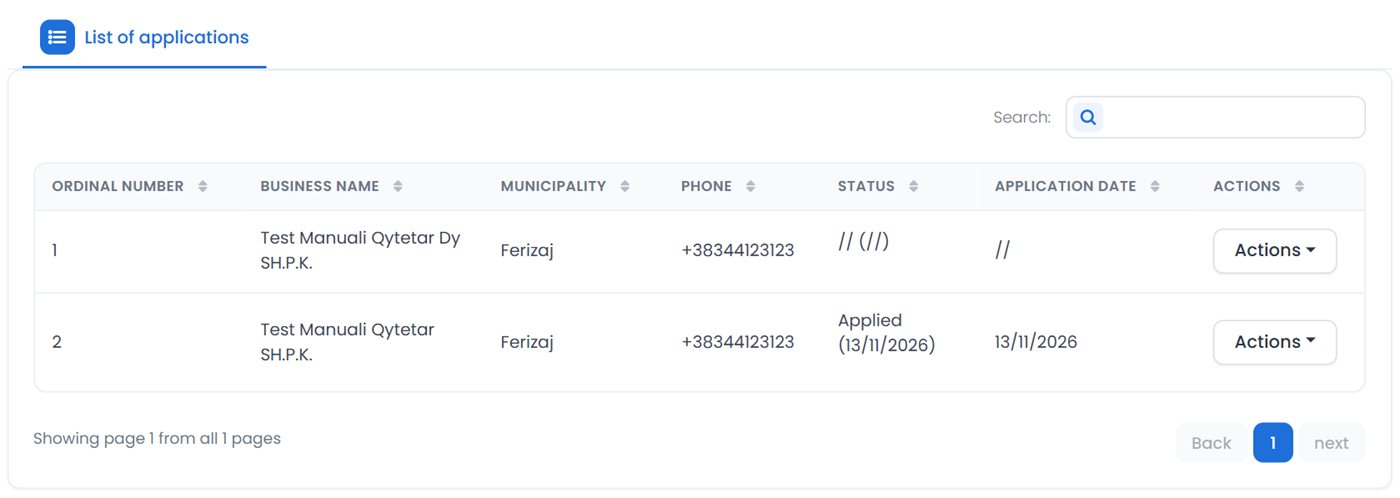
- The table has the columns Ordinal number, Business name, Municipality, Phone, Status, Application date and Actions.
- To find an application, enter part of the name in the Search field. Click a column title to sort the list. Use Back and next to move between pages.
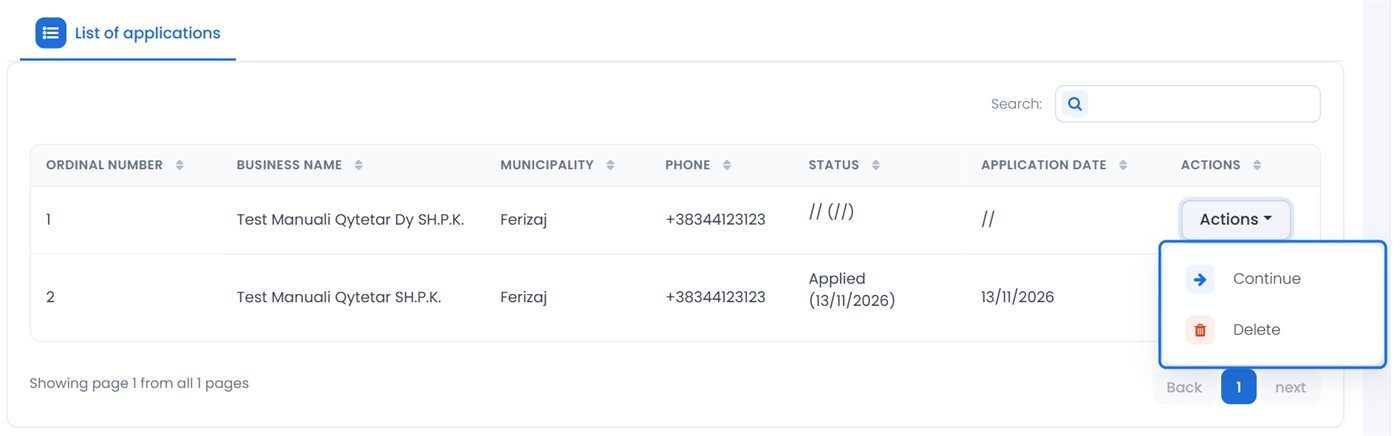
- For an application, click Actions and choose the action.
Status
The Status column shows the state of the application and the date it changed:
| State | What it means | What you can do |
|---|---|---|
| Unfinished application | You have not clicked Finish yet. | Continue or Delete. After 10 days it is deleted automatically. |
| Applied | The application has been sent to ARBK. | Form, Statuses history and, once it is issued, Receipt. |
| Under review | ARBK is reviewing the application. | Wait for the e-mail notification. |
| Returned for completion | ARBK requests corrections or additional information. | Notes and Fill, within 10 days. |
| Approved or rejected | ARBK has made a decision. | Follow the instructions in the e-mail. |
The exact status names are shown in the column. When the business is registered, the application is removed from the list. If the certificate or the additional information is obtained online, the business appears in the list with the corresponding actions.
Actions
The Actions menu shows only the actions that apply to the status of the application:
| Action | What it does |
|---|---|
| Continue | Opens the unfinished application at the step where you left off. |
| Fill | Opens the application returned for completion, from the first step, with the notes of ARBK (see What happens next). |
| Notes | Opens the Summary of notes window with the remarks of ARBK. |
| Receipt | Opens the payment slip in a new window, for printing. |
| Form | Opens the application form in a new window. |
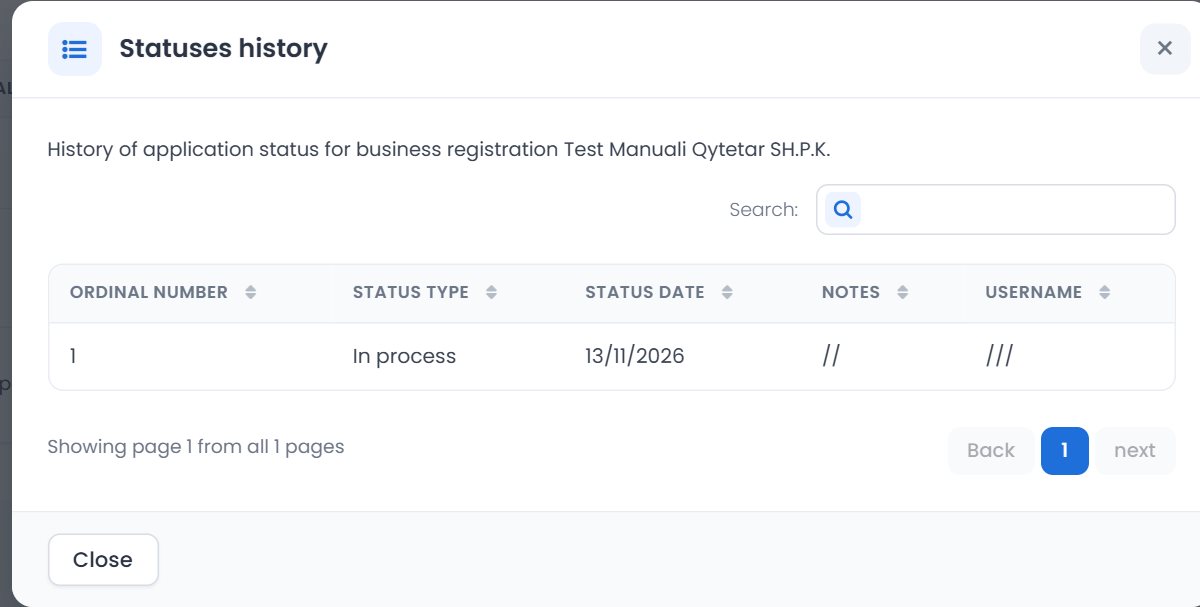
| Statuses history | Shows the status changes with the date and the notes. |
| Delete | Deletes the application after you confirm. This action cannot be undone. |
| Business certificate, Additional information | For a registered business, when the documents are obtained online: opens them for printing. |
The official also has the List of businesses to send to TAK tab next to List of applications.
3Business change requests
With a change request you update the data of a registered business: name, address, type, activities, units, capital, owners, representatives and more. You can choose several changes in one request at once. Each change is filled in on its own tab, while the documents are uploaded only once, at the end, for all the changes.
The request has three steps:
- Choose the changes: mark the cards of the changes you need (Choosing the changes).
- Fill in the data: fill in the tab of each change (Filling in the request).
- Documents and submission: upload the documents and click Finish (Documents and submission).
Then you follow the request in the List of requests. Before you start, also read the rules: for example, a business can have only one open request.
How to start a request
A change request is made by the owners and authorized representatives of the business. It is always made for the business you have selected in the system.
- On the home page, select the business you are making the request for (see Home).
- In the menu on the left, open Business change Request for change.
- The page where you choose the changes opens. Continue with Choosing the changes.
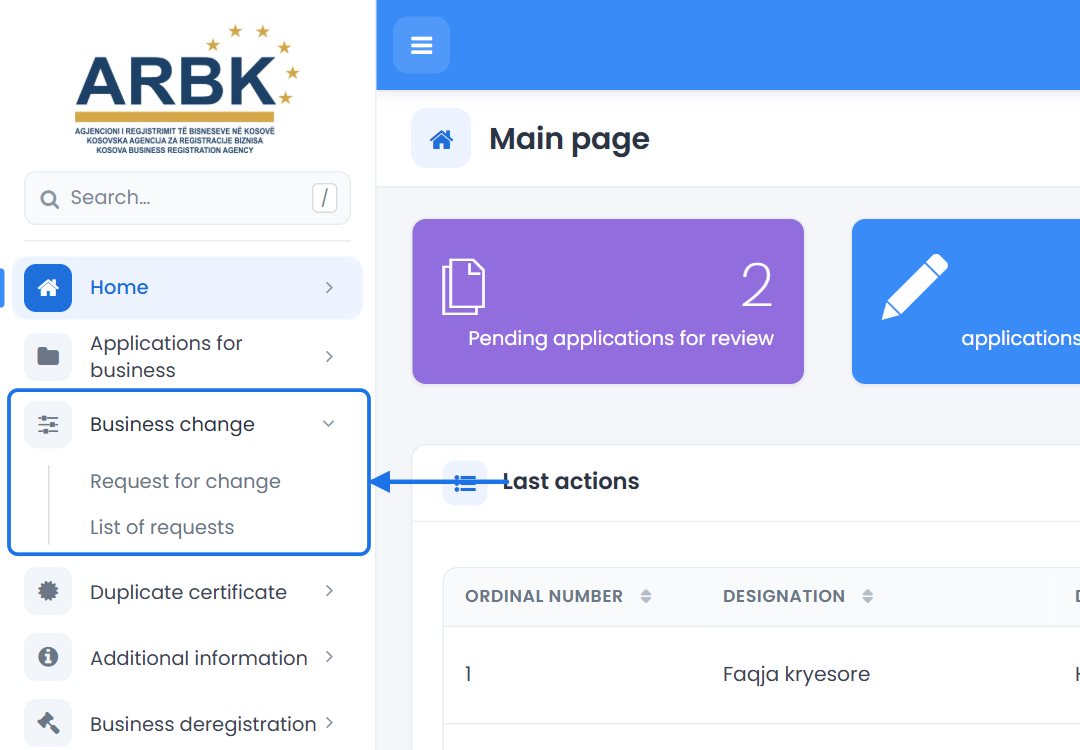
The system does not open the changes page. It takes you back to the list of requests with a notice that a change request can only be made by the owners and authorized representatives of the business. Select the business on the home page and try again.
When you create the request, the system also checks the following. If one of them is not met, the corresponding message appears and the request is not created:
- Your account must be verified. Otherwise: “To make a business change request, you must first verify your account…”
- The business must have been issued a new certificate. Otherwise: “To apply for a change, you must be provided with a new business certificate beforehand.”
- The business must not have another open request (see Rules).
- If the business has a prohibition, Warning! appears at the top with the reason for the prohibition. The cards of prohibited changes appear in red, marked Blocked, and cannot be selected.
The officer starts the request from the Register: they search for the business, open Actions on its row and select Request for change. If the officer opens Request for change without selecting a business, the system sends them to the Register with the message “To apply for a change you must first select the business from the register.”
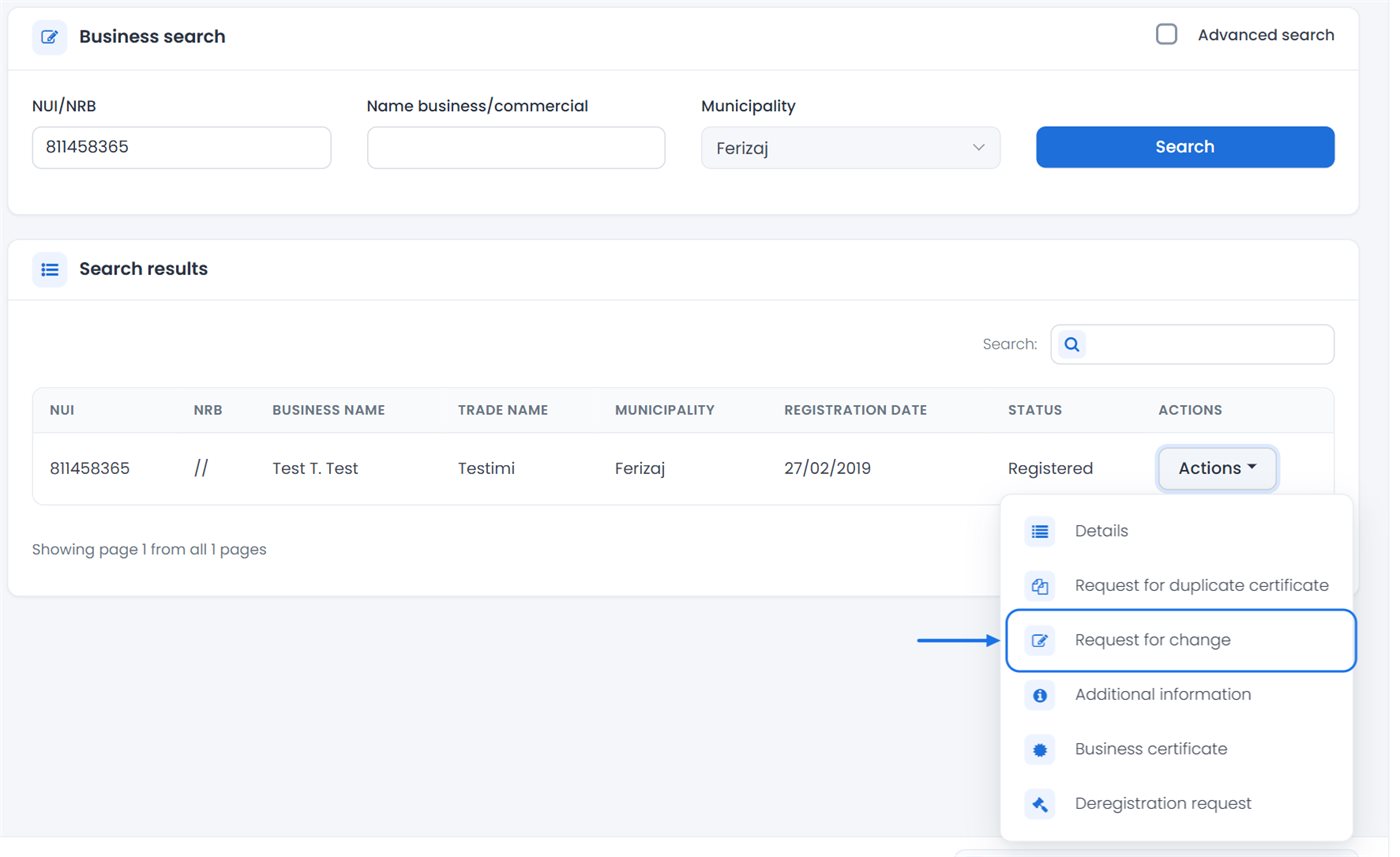
Choosing the changes
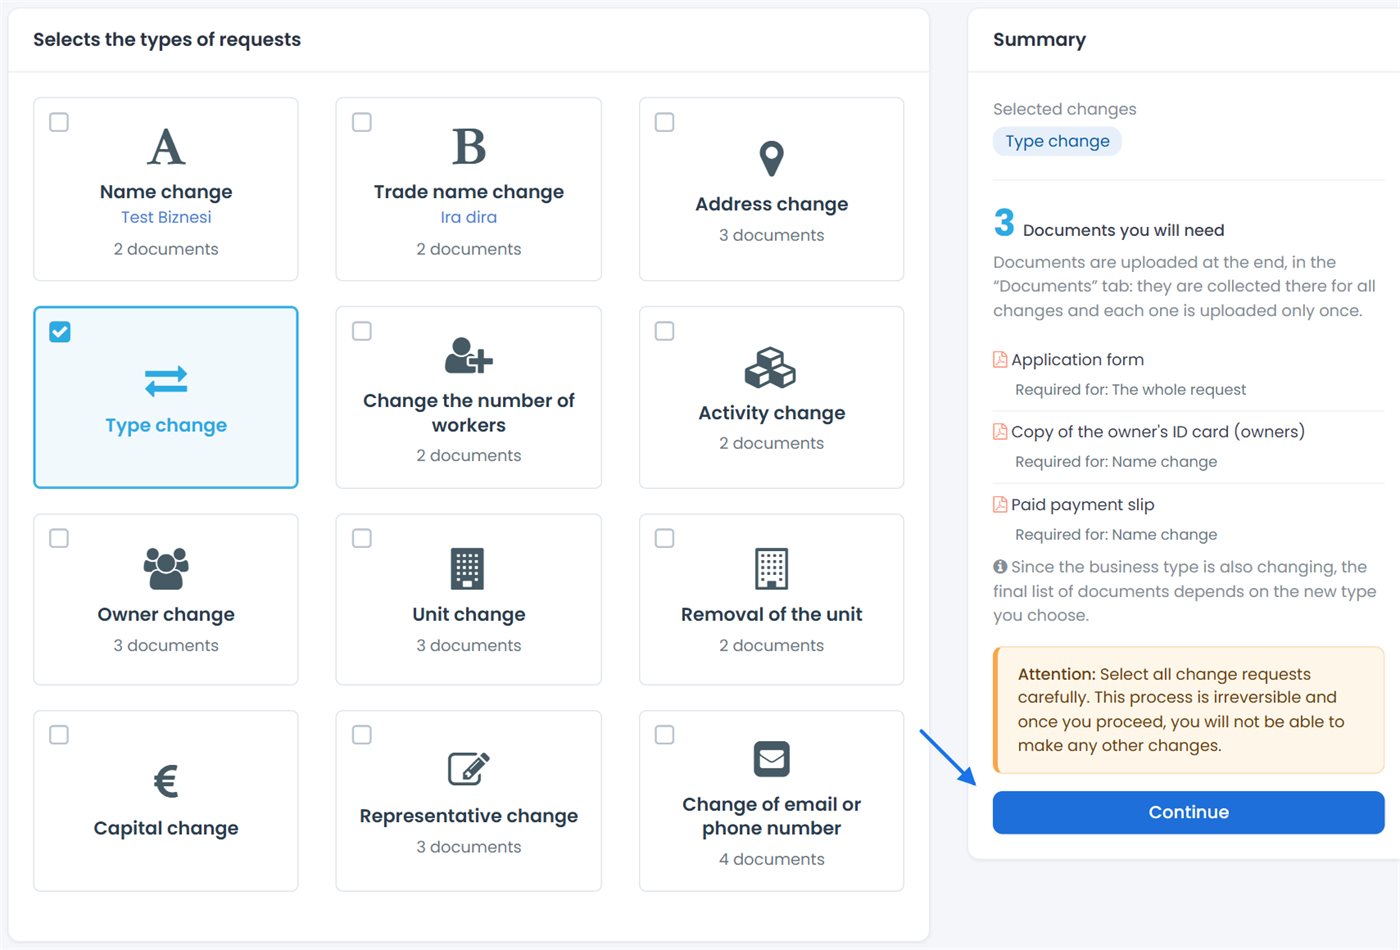
The Selects the types of requests page has one card for each change. On the right is the Summary box. At the top, this notice appears: “If the case is not completed within 10 days, it is automatically deleted from the system.”
Which changes are offered for each type of business
| Change | I.B. | G.P., L.P. | L.L.C., J.S.C., A.C. | Foreign company | Representative Office |
|---|---|---|---|---|---|
| Name, trade name, address, number of workers, activity, units, removal of units, representative, email or phone | ✓ | ✓ | ✓ | ✓ | ✓ |
| Type (business type) | ✓ | ✓ | ✓ | ✓ only to J.S.C. | — |
| Owners | only together with Type | ✓ | ✓ | ✓ | ✓ |
| Capital | only together with Type | ✓ | ✓ | ✓ | ✓ |
| Board | — | — | ✓ | ✓ | — |
Selection and the Summary
- Click the cards of the changes you need. You can choose as many cards as you like. The selected card turns blue and gets a ✓ mark; click it again to remove it. On the card you see how many documents that change requires. For the name and trade name you also see the current value.
- Check the Summary box: Selected changes and Documents you will need. For each document, Required for shows which change requires it. A document required by several changes is counted once.
- Click Continue. The button is active only when you have selected at least one card.
- The Selected requests window opens, with the Careful! warning, the list of requests and the documents you will need. In the list you may also see changes that the system adds by itself (see below).
- Click Continue to create the request, or Cancel to go back to the cards. Once the request is created, the page for filling it in opens (Filling in the request).
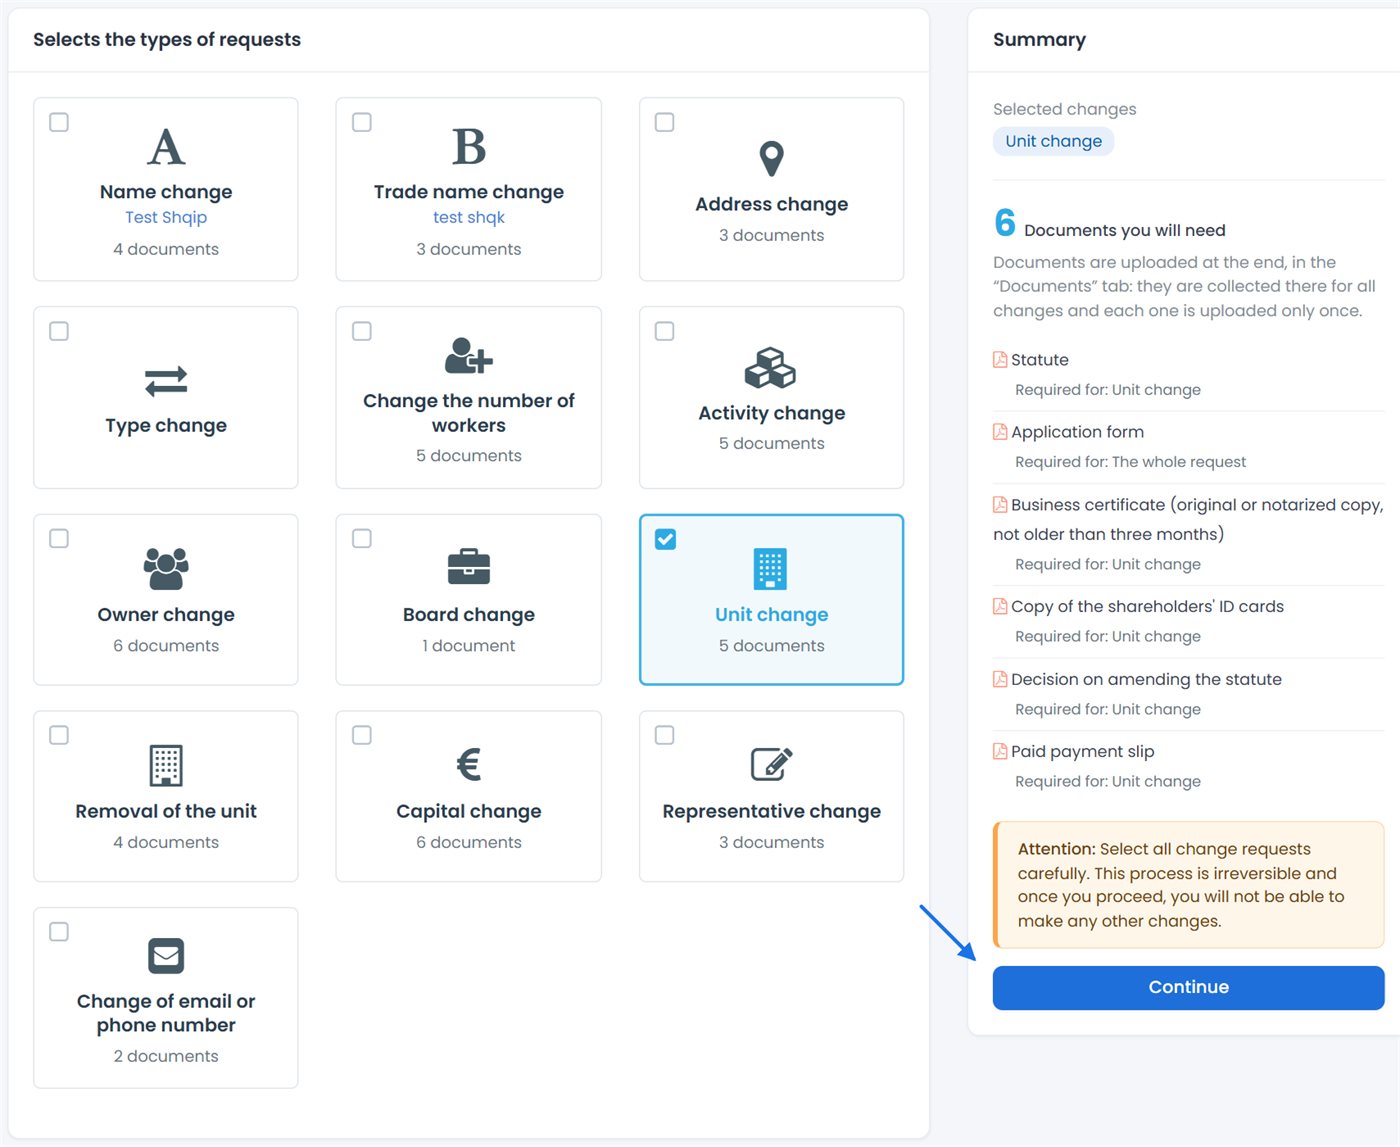
“Select all change requests carefully. This process is irreversible and once you proceed, you will not be able to make any other changes.” After you click Continue in the window, you cannot add or remove changes. If you made a mistake, delete the request (the draft) in the List of requests and start over.
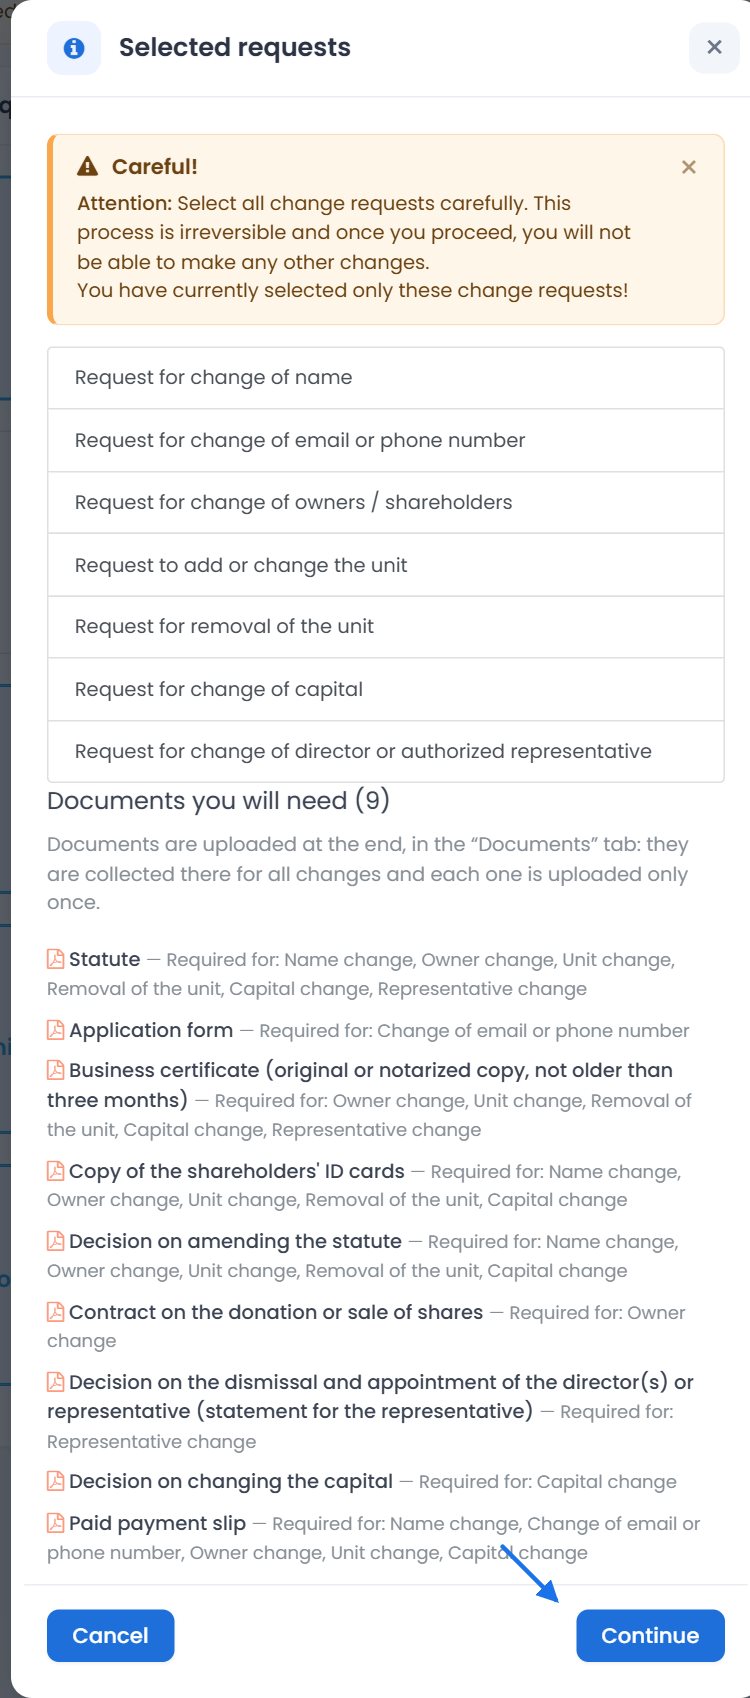
Rules during selection
- Individual business (I.B.): the Owner change and Capital change cards appear only when you select Type change. If you remove the type, they are removed too.
- I.B. with a type change: the system adds the name change by itself (and the trade name change, when the name and trade name are the same). Do not select Name change together with the type or the owners, because the request is rejected: “In case a name change is chosen for the individual business then a type change or owner change cannot be chosen at the same time.”
- Foreign company with a type change: if the company has no board, the system adds Board change by itself.
- Same name and trade name: under Article 27 of Law No. 06/L-016, the trade name must be different from the company name. If your business has the same name and trade name, Address change (and, for businesses that are not I.B., also Type change) must be selected together with Name change or Trade name change. Otherwise the system takes you back to the cards with this warning.
- Type change: the final list of documents depends on the new type, so the documents for the type are not counted in the Summary yet.
Filling in the request: steps and tabs
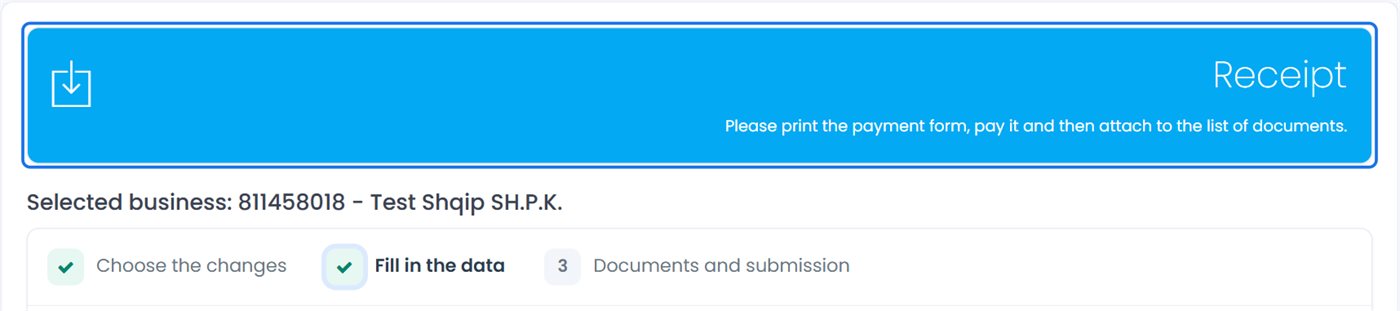
Once the request is created, its page opens. At the top you see:
- Selected business: the business number and name;
- the notice “The request was created on … If the case is not completed within 10 days, it is automatically deleted from the system.”;
- the blue Receipt box, when the request has a payment slip: “Please print the payment form, pay it and then attach to the list of documents.” The payment slip opens by itself in a new window. If the browser blocks the window, click the box, or get it later from the List of requests (Actions Receipt). For when the payment slip is created, see Documents and submission.
Below them are the steps and tabs of the request:
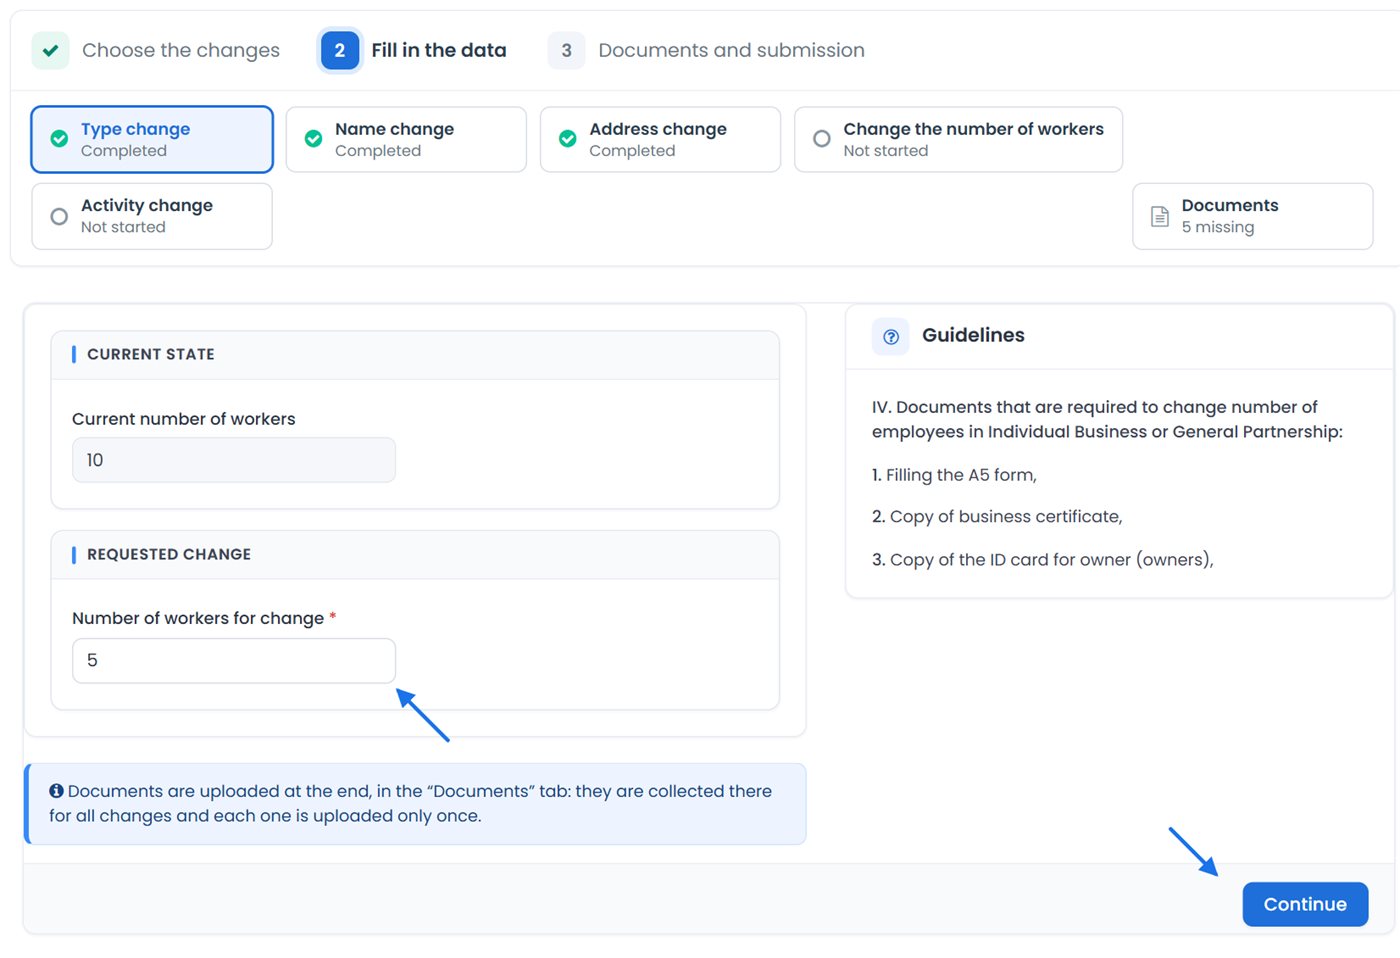
- Steps: 1 Choose the changes (done, with ✓), 2 Fill in the data and 3 Documents and submission.
- One tab for each selected change. Type change is always first, because the new type affects the other changes; Capital change comes before Owner change, so that the owners' shares are compared with the new capital.
- Under the tab name, its status is shown: Not started, In progress or Completed (with a green mark).
- On the right is the Documents tab, which shows how many documents are missing (e.g. 3 missing) or All uploaded.
How to move between tabs
- Fill in the form of the open tab. Fields marked * are required.
- Click Continue at the bottom right. The data is saved, the tab is marked Completed and the next tab opens. After the last change, Documents opens.
- To view or correct a change, click its tab. After correcting it, click Continue again.
- Step 2 Fill in the data takes you to the first change that has not been completed yet. Step 3 Documents and submission takes you to the Documents tab.
In the simple forms (name, address, type…) nothing is saved without Continue. In the tabs with lists (activities, units, owners, representatives, board), every addition or removal is saved immediately, but the tab is marked Completed only after you click Continue. When a table does not fit entirely on the screen, scroll it sideways to see the other columns.
You can leave the request and continue it later, within 10 days, from the List of requests (Actions Continue). In every form, the blue box at the bottom reminds you that documents are uploaded at the end. For some changes, the Guidelines box on the right lists the documents needed.
Each tab is explained below. The forms usually have two parts: Current state (read-only) and Requested change.
Name change
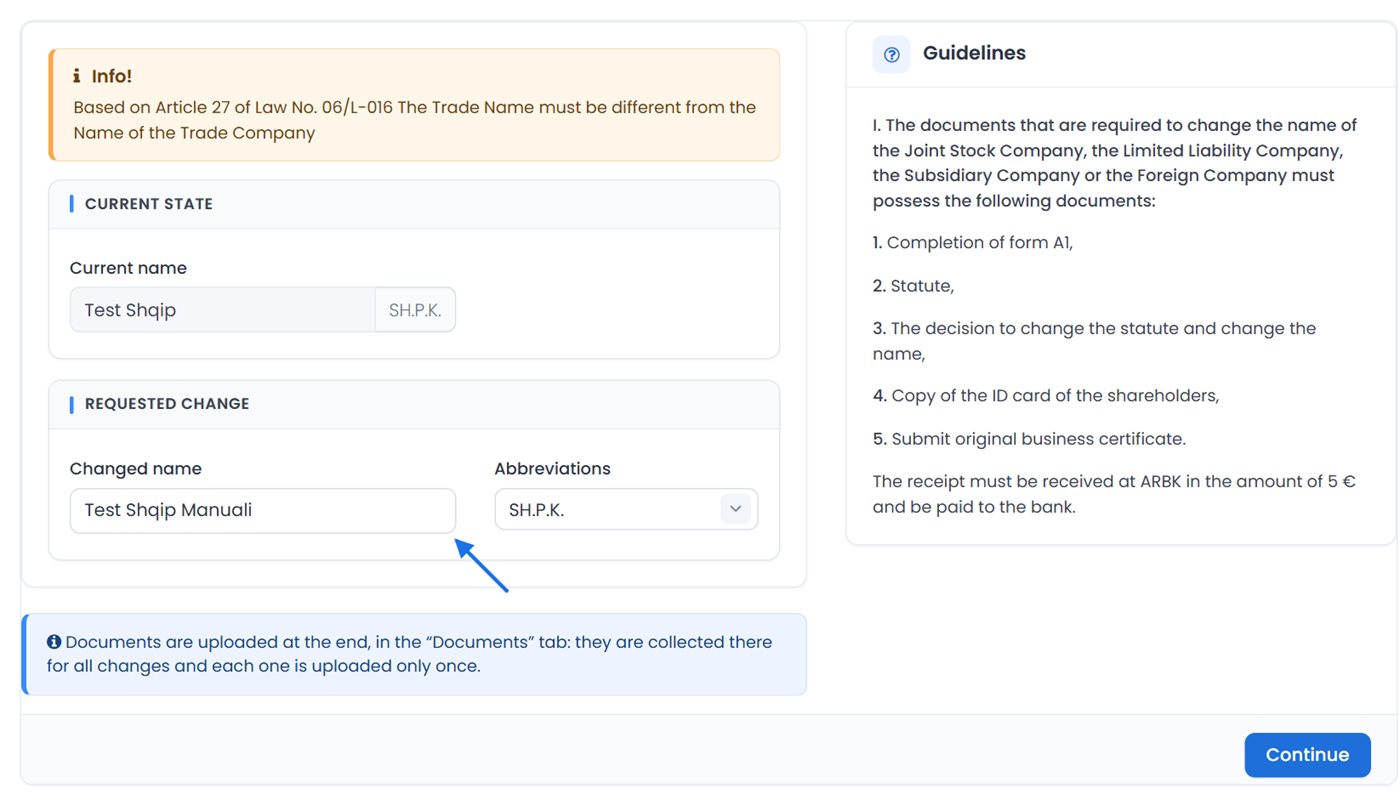
At the top, the yellow Info! box reminds you that the trade name must be different from the company name (Article 27 of Law No. 06/L-016).
- Current state: Current name, with the abbreviation of the business type.
- Requested change: Changed name * and Abbreviations (the same abbreviation in Albanian, English or Serbian, e.g. SH.P.K., L.L.C. or D.O.O.).
Enter the new name and click Continue. The checks:
- special characters are not allowed;
- the name must not be taken: “Business with this name exists.”;
- when the request also has a type change, the abbreviations are those of the new type.
Individual business (I.B.)
The name of an individual business is the owner's name. So it is changed only when the owner's name has changed.
- It cannot be selected together with Type change or Owner change. With a type change, the name is added by itself.
- Owner with a Kosovo personal number: the new name is taken from the civil registry. The Changed name field is filled in by itself and you cannot change it. If the name in the civil registry is the same as the owner's name in the business, the request is not allowed: “There has been no change in the owner's personal data for the business in question”. If the owner's data is incomplete: “Some of the person's details are missing, please contact the Civil Registration Agency for their completion.”
- Foreign owner (with a passport): you enter the new name yourself. It must start with the owner's first name and continue with the new surname.
When the request has only a name or trade name change and the business has the same name and trade name, no payment slip is created.
Trade name change
The tab looks like Name change, with the same Info box about Article 27.
- Current state: Current trade name.
- Requested change: Trade name changed.
Enter the new trade name and click Continue. Special characters are not allowed, and the trade name must not be taken: “Business with this trade name exists.” The trade name must be different from the business name.
Address change
The form has four parts: Current address and Current contact (read-only), New address and New contact.
- Under New address, select Municipality for change *.
-
The other fields depend on the municipality:
- In municipalities where addresses are taken from the address register, select from the lists Street for change *, Entry for change *, Place for change and, when the building has floors, Floor for change and Apartment number for change. If an element is missing from the list: “If one of the address elements does not exist, please contact the Urban Planning Department of your Municipality.”
- In the other municipalities, select Place for change * and, under Address for changed *, click Choose location.
- In the Choose location window, enter the street (e.g. Agim Ramadani) and the number. You can move the pin on the map to show the exact location. Click Save.
- Confirm the address: “Confirm address! My business address is: …” Yes, confirm it!
- Under New contact, fill in Phone number for change * and Email for change * (required even when they do not change), and optionally Web site for change. An institutional email is not allowed.
- Click Continue.
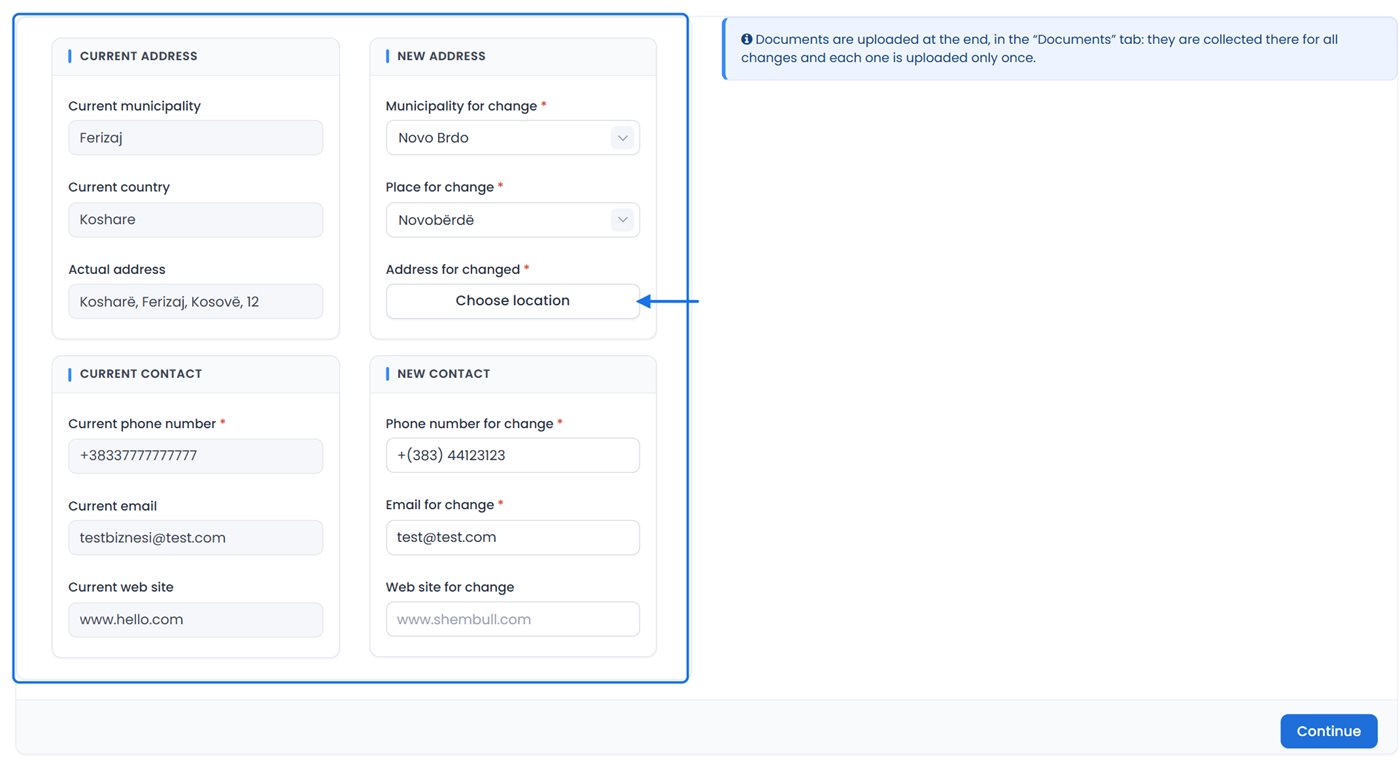
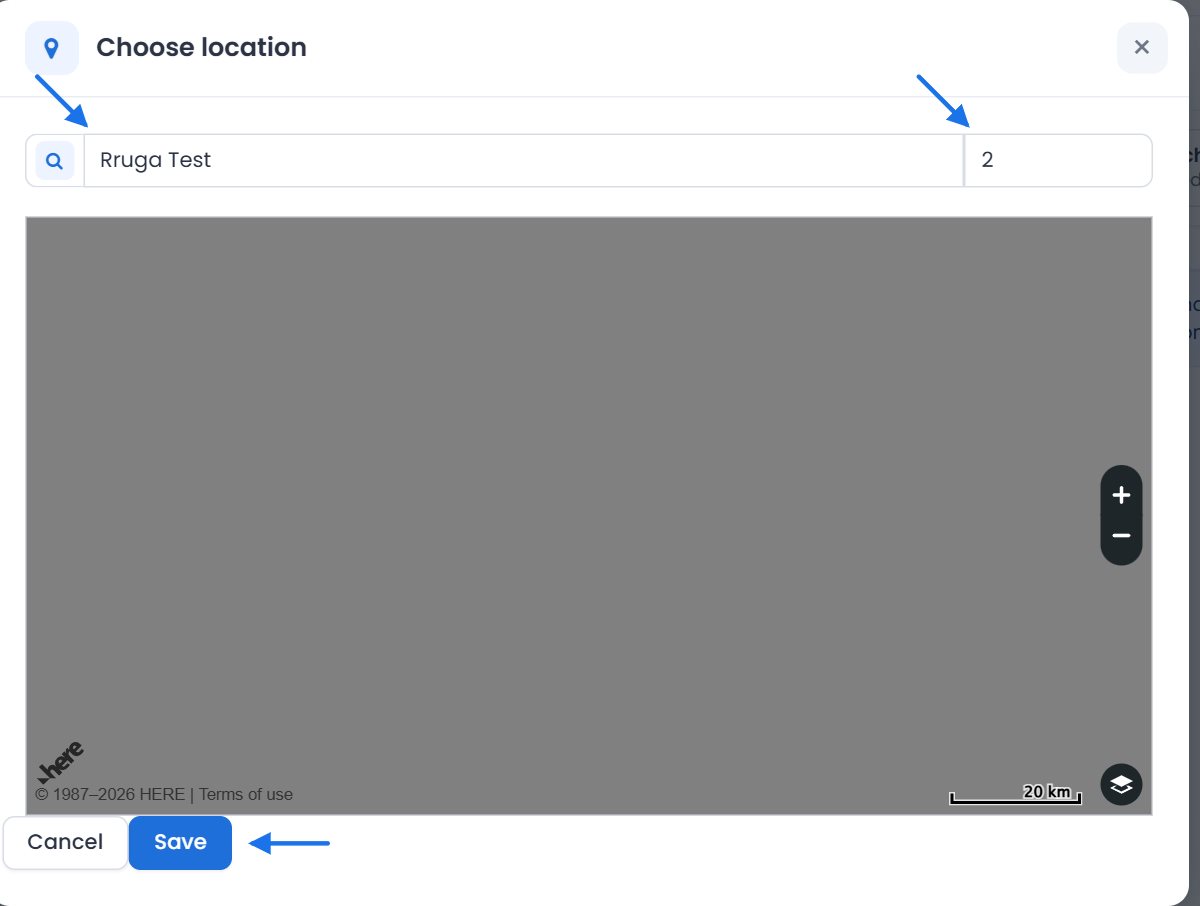
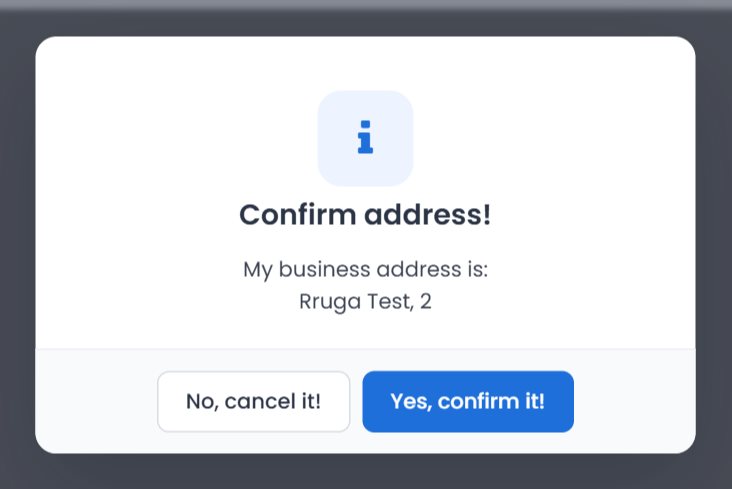
If the address is not found on the map, you can save it as you described it, with Save. If the business has the same name and trade name, the address change also requires a name or trade name change (see Rules during selection).
Type change
- Current state: Current business type.
- Requested change: Business type for change * (the current type is not in the list).
- Select the new type and click Continue.
- The page refreshes. The payment slip is created, because the amount depends on the new type, and the next tab opens.
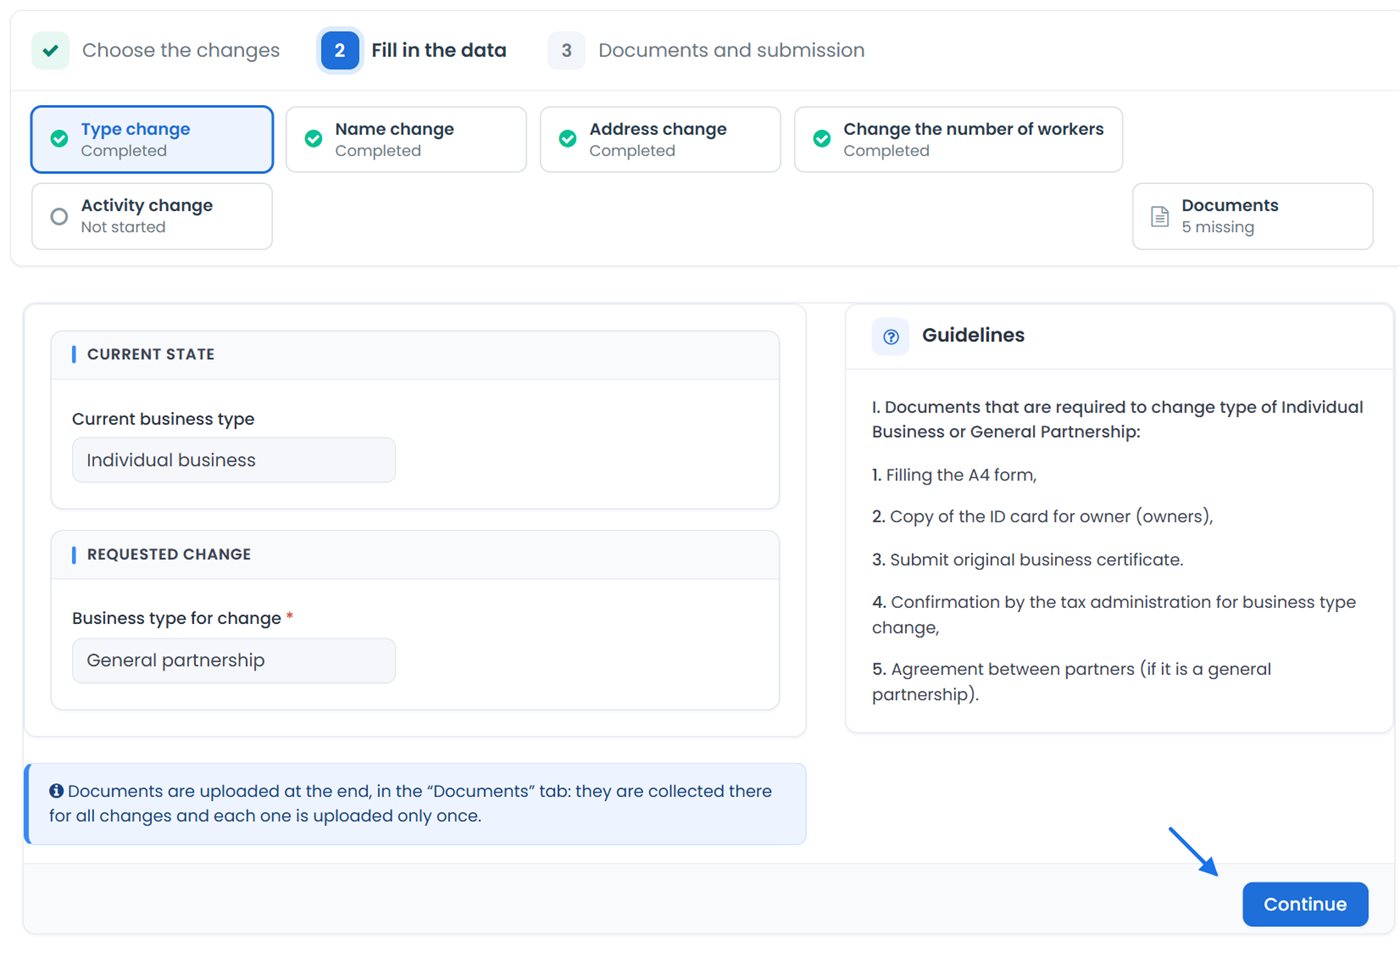
- A foreign company can only be changed to a Joint Stock Company. The Representative Office does not have this change.
- Once the payment slip is created, the new type can no longer be changed (except for a foreign company): the field becomes read-only. If you selected the wrong type, delete the request and start over (see Rules).
- The other changes and the documents follow the new type: e.g. the abbreviation of the name, the statute (for L.P., L.L.C., J.S.C., Foreign company, A.C.) and the minimum capital of a J.S.C.
- For an I.B., the name change is added by itself. For a foreign company without a board, the board change is added by itself.
Change the number of workers
- Current state: Current number of workers.
- Requested change: Number of workers for change *.
Enter the new number and click Continue. The new number must be different from the current one. The form looks like the one in the figure in Filling in the request.
Activity change
On the left, in the Activity section (“Select the activity according to the NACE classification and its type.”), you add activities. Below it is the table of current activities. On the right is the List of activities for change, with every addition or removal.
- To add: select Activity * and Type of activity *, then click Add.
- To remove: on the current activity, click Remove.
- To cancel an addition or removal: in the List of activities for change, click Delete.
- Click Continue. The Confirm! window lists “Activities that have been added” and “Activities that have left”. Click Yes, confirm it!
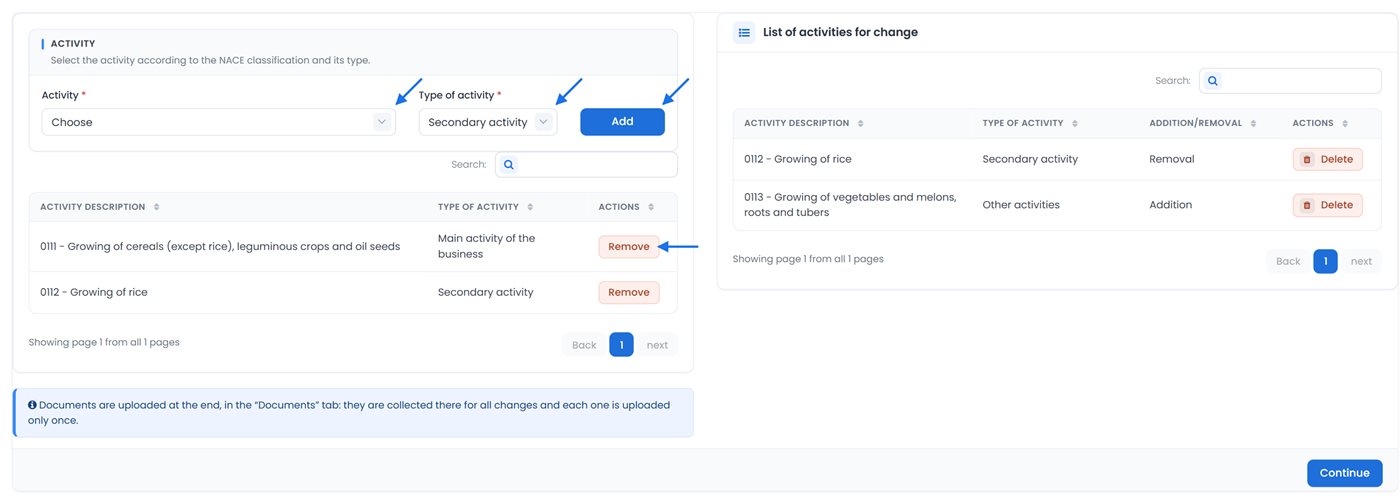
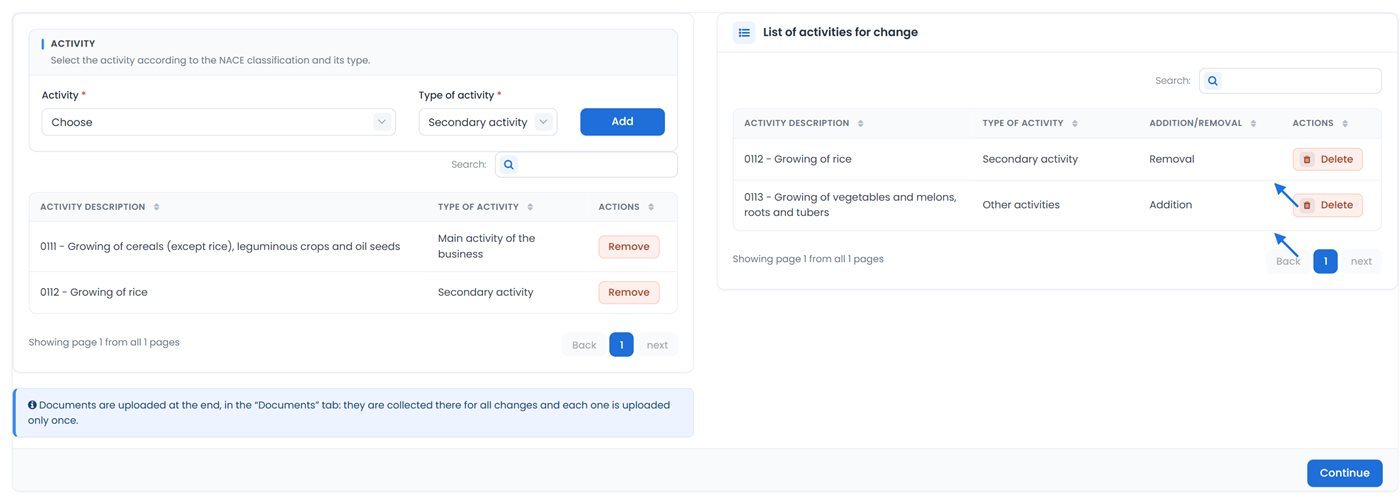
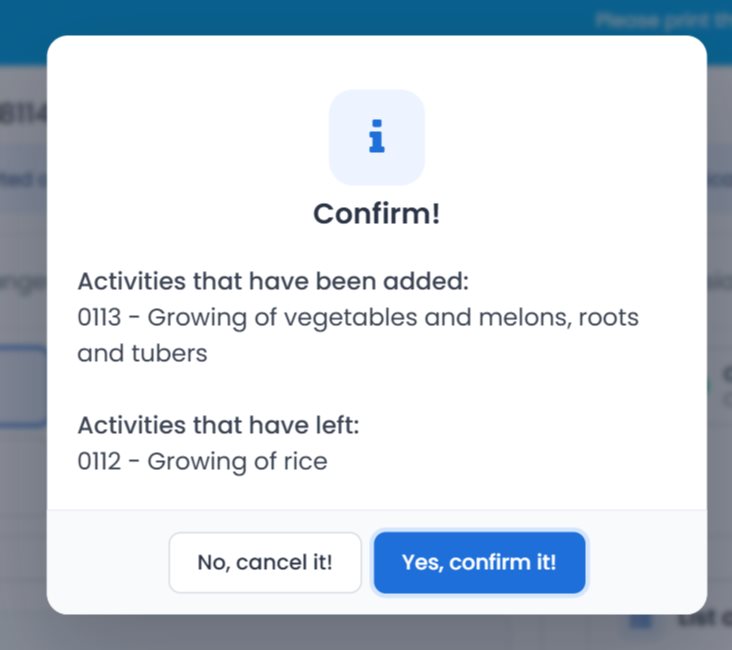
- At least one addition or removal is needed: “Please add or remove an activity.”
- The business must always have exactly one main activity: “Business can not have no main activity or have two main activities at the same time.” If you remove the main activity, add a new main activity in the same request.
Unit change
In this tab you add new units or change existing units. To close a unit, use Removal of the unit.
- Under Name and activity, fill in Unit name * and select Type of activity *.
- Under Unit address, select Municipality * and then the location, the same way as in Address change: either from the address register lists, or with Place * and Choose location.
- Click Add. The unit appears in the List of units for change.
- To change an existing unit: in the List of units, open Actions Change. Its data is filled into the form: change the fields and click Add.
- Click Continue. At least one unit must be added or changed: “Please add, change or remove a unit.”
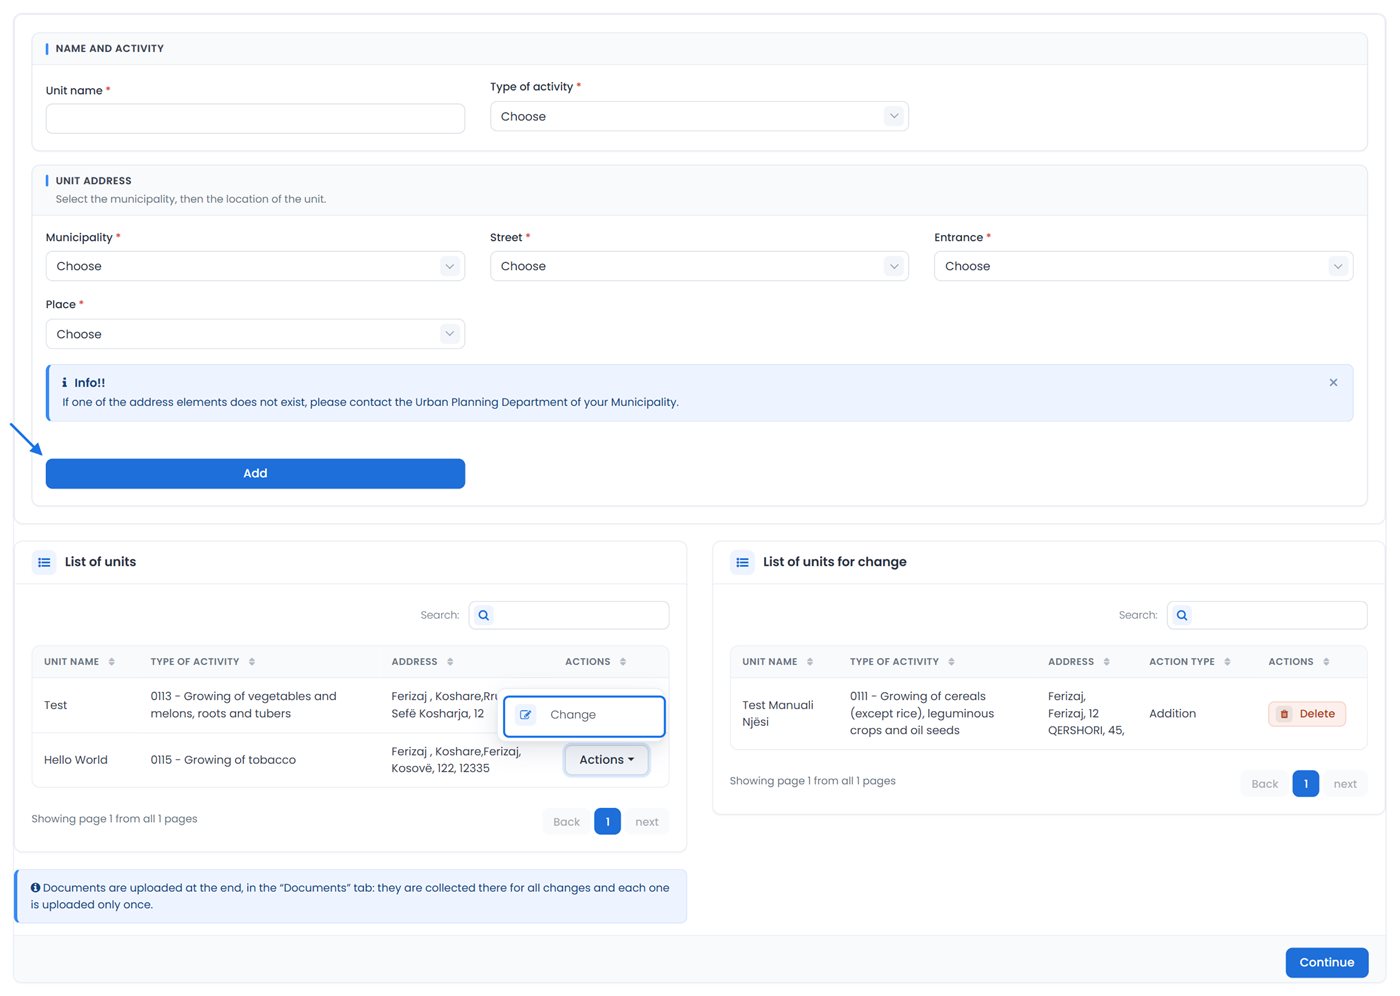
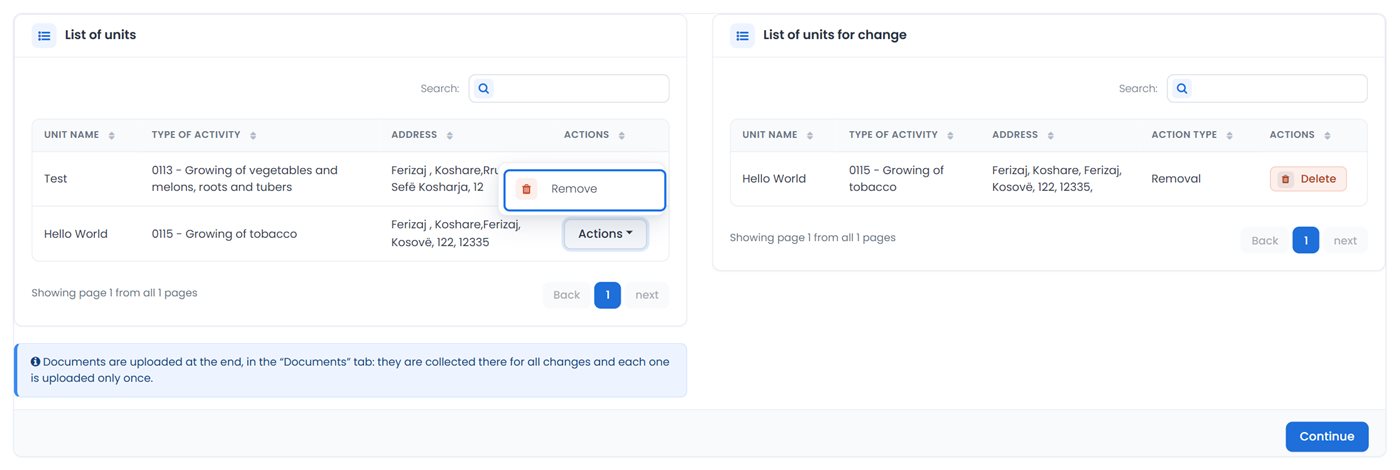
Removal of the unit
- In the List of units, on the unit that is being closed, open Actions Remove.
- The unit appears immediately in the List of units for change, without a confirmation prompt. If you made a mistake, remove it from there with Delete. Repeat for the other units.
- Click Continue. At least one unit must be removed: “Please remove a unit.”
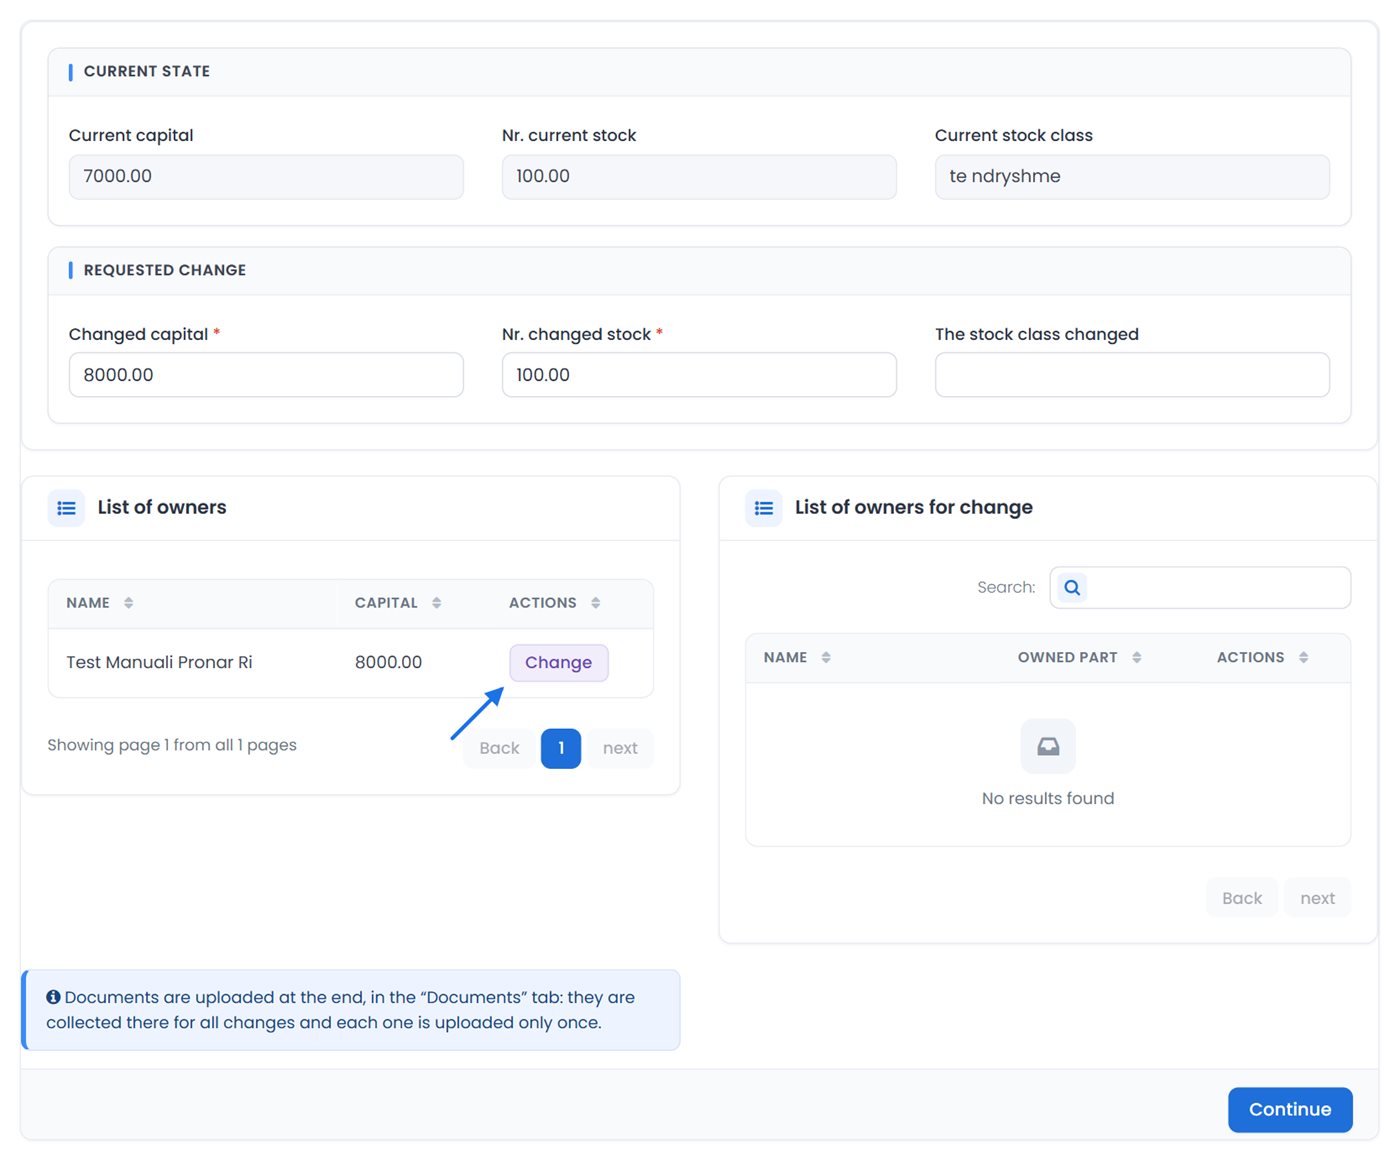
Capital change
- Current state: Current capital, Nr. current stock, Current stock class.
- Requested change: Changed capital *, Nr. changed stock * (if you have no shares, enter 0) and The stock class changed.
- Below: the List of owners (name, capital, Change) and the List of owners for change. When the request also has Owner change, the new owners also appear in the list, once you have saved that tab.
- Enter the new capital and the number of shares.
- For each owner whose share changes, click Change. Without the new capital, “Please fill out the capital.” appears.
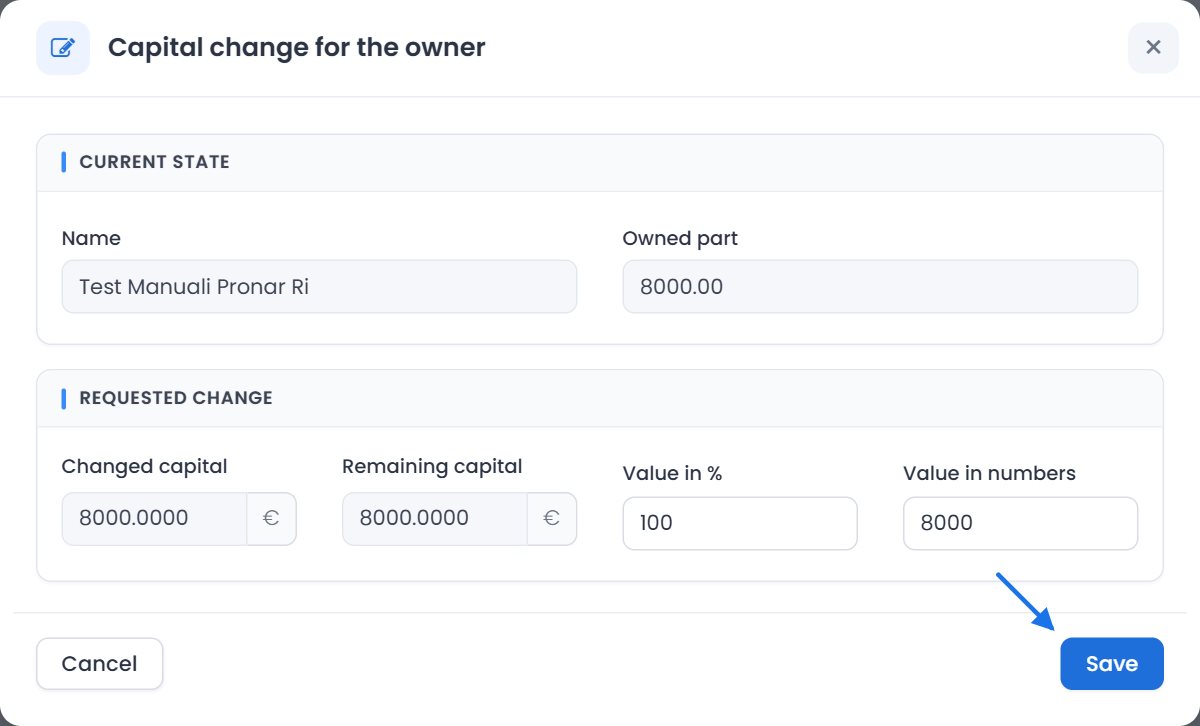
- In the Capital change for the owner window you see the name and the current ownership share, as well as Changed capital and Remaining capital (read-only). Enter the new share in Value in % or Value in numbers and click Save.
- Click Continue.
- You must set the capital for at least one owner: “Please set the capital for at least one owner.” Exception: when the request also has Owner change; then you adjust the shares there.
- The sum of the owners' shares must equal the new capital: “The equity amount of the owners should be the same as the total capital of the business.” The message also shows both amounts. When the request also includes the owners, this is checked again at Finish.
- For a joint stock company, the capital cannot be less than €10,000. When the type is changed too, the conditions of the new type apply.
- For an I.B., this change is offered only together with the type change.
Owner change
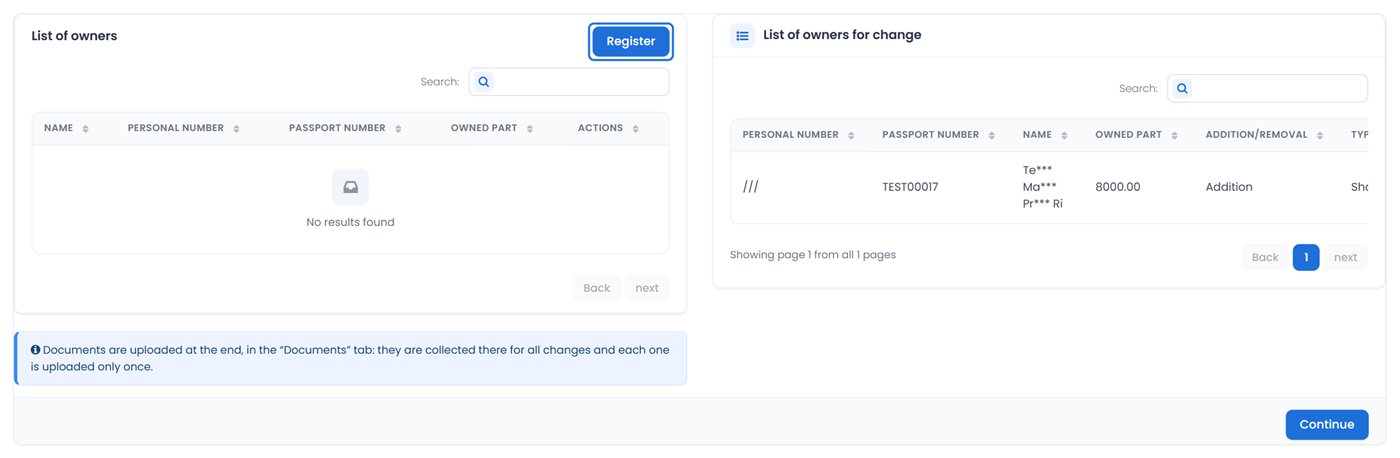
On the left is the List of owners (name, personal or passport number, ownership share) with the Register button. On the right is the List of owners for change: personal or passport number, name, ownership share, Addition/Removal (for joint stock companies also the shareholder type), and under Actions the Details and Delete buttons (to cancel the change).
If no owners are registered for the business, the List of owners is empty and you add the owners with Register.
Adding an owner
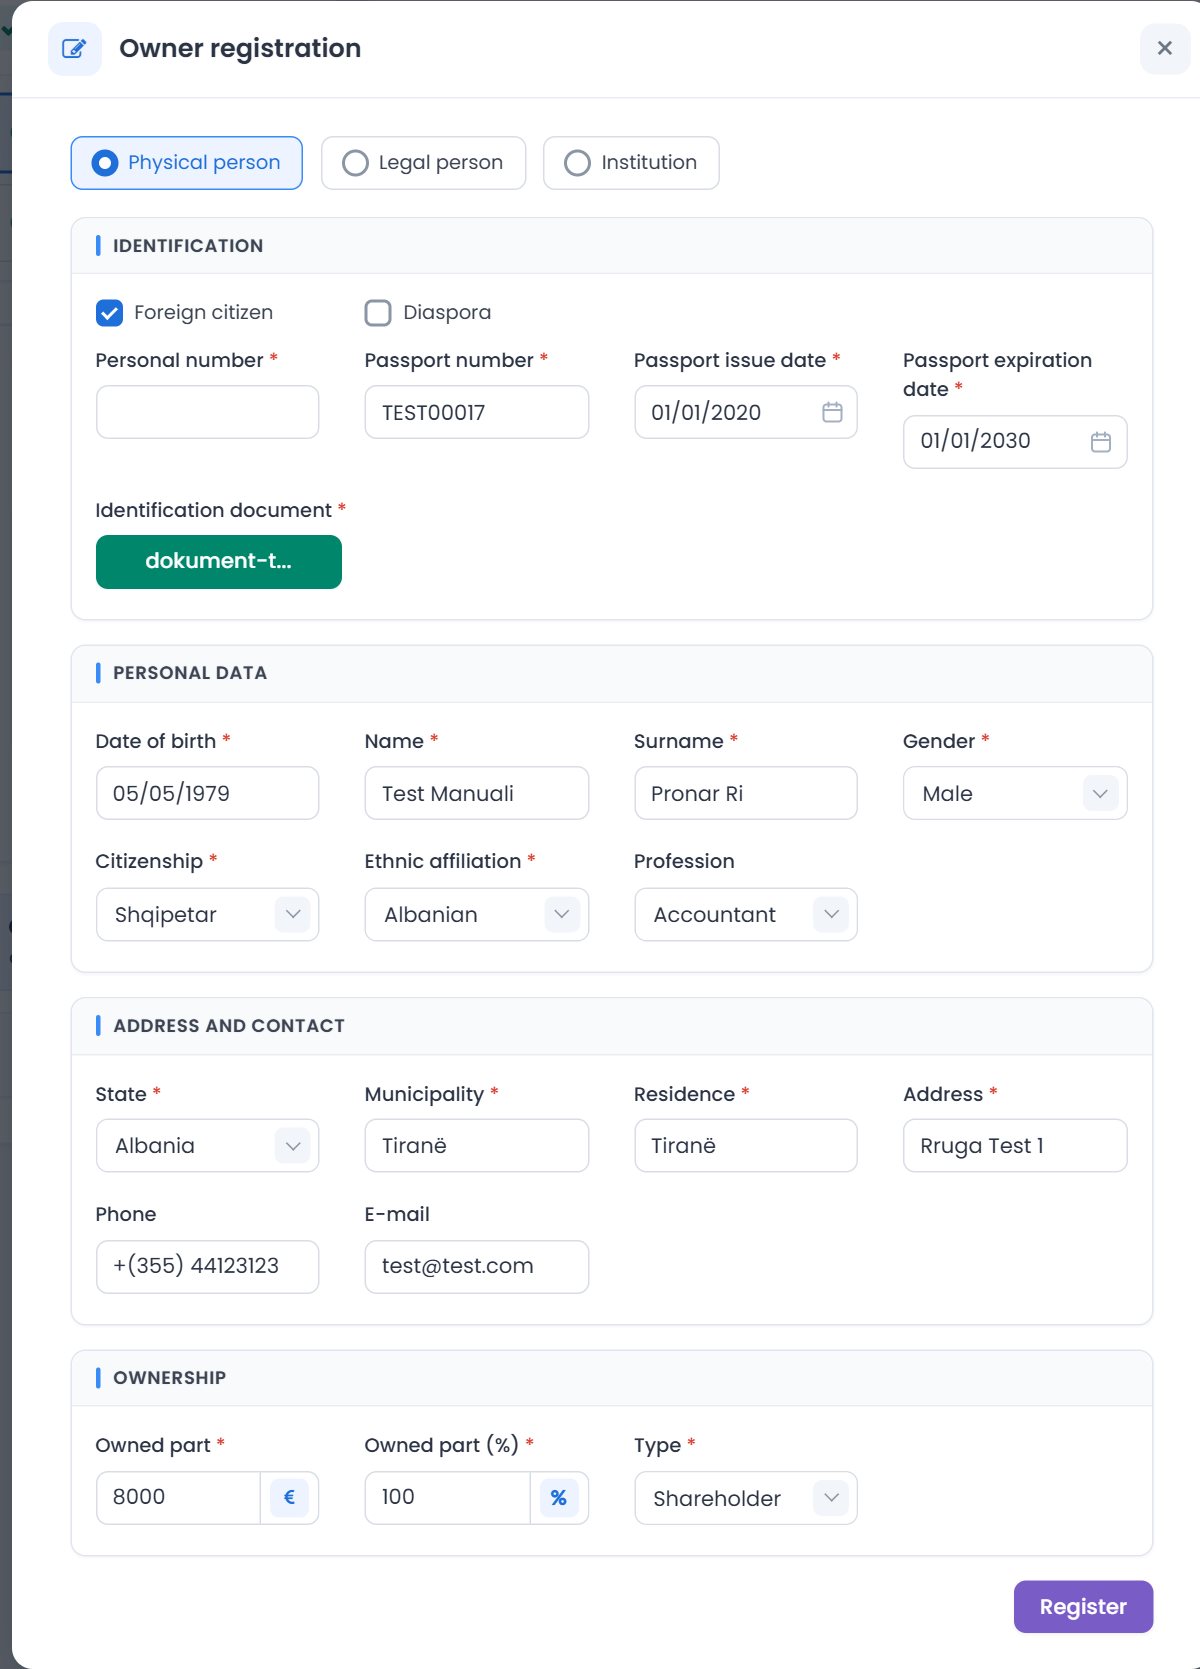
- Click Register. The Owner registration window opens.
- Select Physical person, Legal person or Institution. For an individual business, only a physical person is offered.
- Under Identification, for a physical person: enter the Personal number *. The data is taken from the civil registry and shown partly hidden (***). For foreign citizens, check Foreign citizen and fill in Passport number *, Passport issue date * and Passport expiration date *. For a legal person, enter the NUI * (or check Foreign company); for an institution, select the institution.
- Under Identification document *, click Append and choose the PDF document (ID card, passport or business certificate).
- Fill in Personal data and Address and contact, where they have not been filled in automatically.
- Under Ownership, fill in Owned part * (in euros) and Owned part (%) *; for L.L.C. and J.S.C. also the shareholder Type *. For an individual business this section has no fields.
- Click Register. The owner appears in the list for change.
Changing or removing an existing owner
In the List of owners, open Actions on the owner and select Change (the same window opens with their data) or Remove. At the end, click Continue.
- At least one change is needed: “Please register or remove a owner.”
- You cannot remove all the owners, and you cannot register the same owner twice.
- The shares cannot exceed the capital: “The given value exceeds the total capital.” The system shows you the remaining capital.
- An individual business has only one owner, and one person cannot have more than one individual business.
- For businesses with the activities 6010, 6020 or 6110, an owner change is allowed only with the permission of the KPM. A warning appears at the top, and an additional document is required under Documents.
- The owner's identification document is uploaded only in their window (Identification document), not in the Documents tab.
Representative change
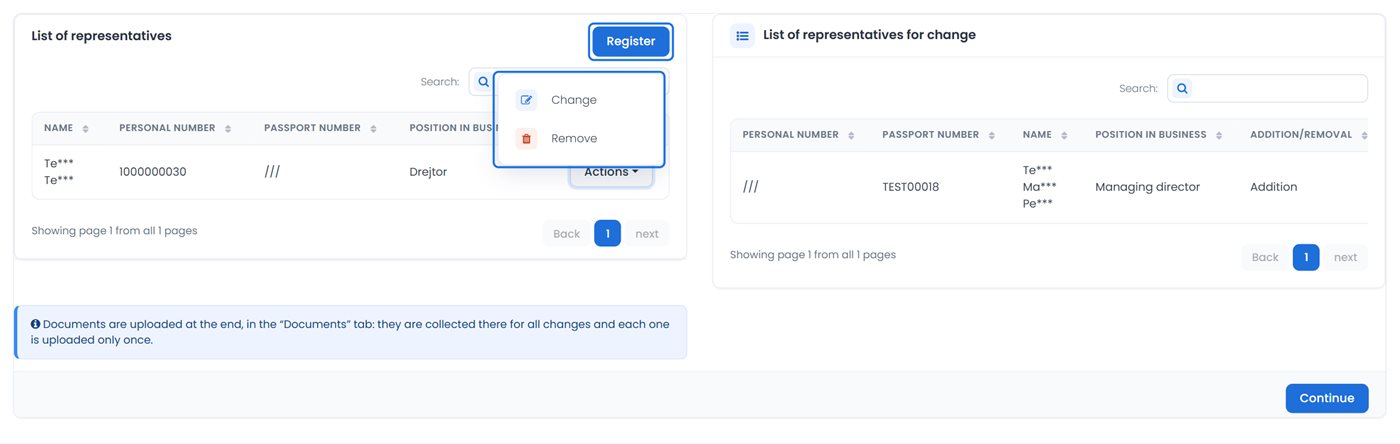
The tab has the List of representatives (name, personal or passport number, position in the business) with the Register button, and the List of representatives for change.
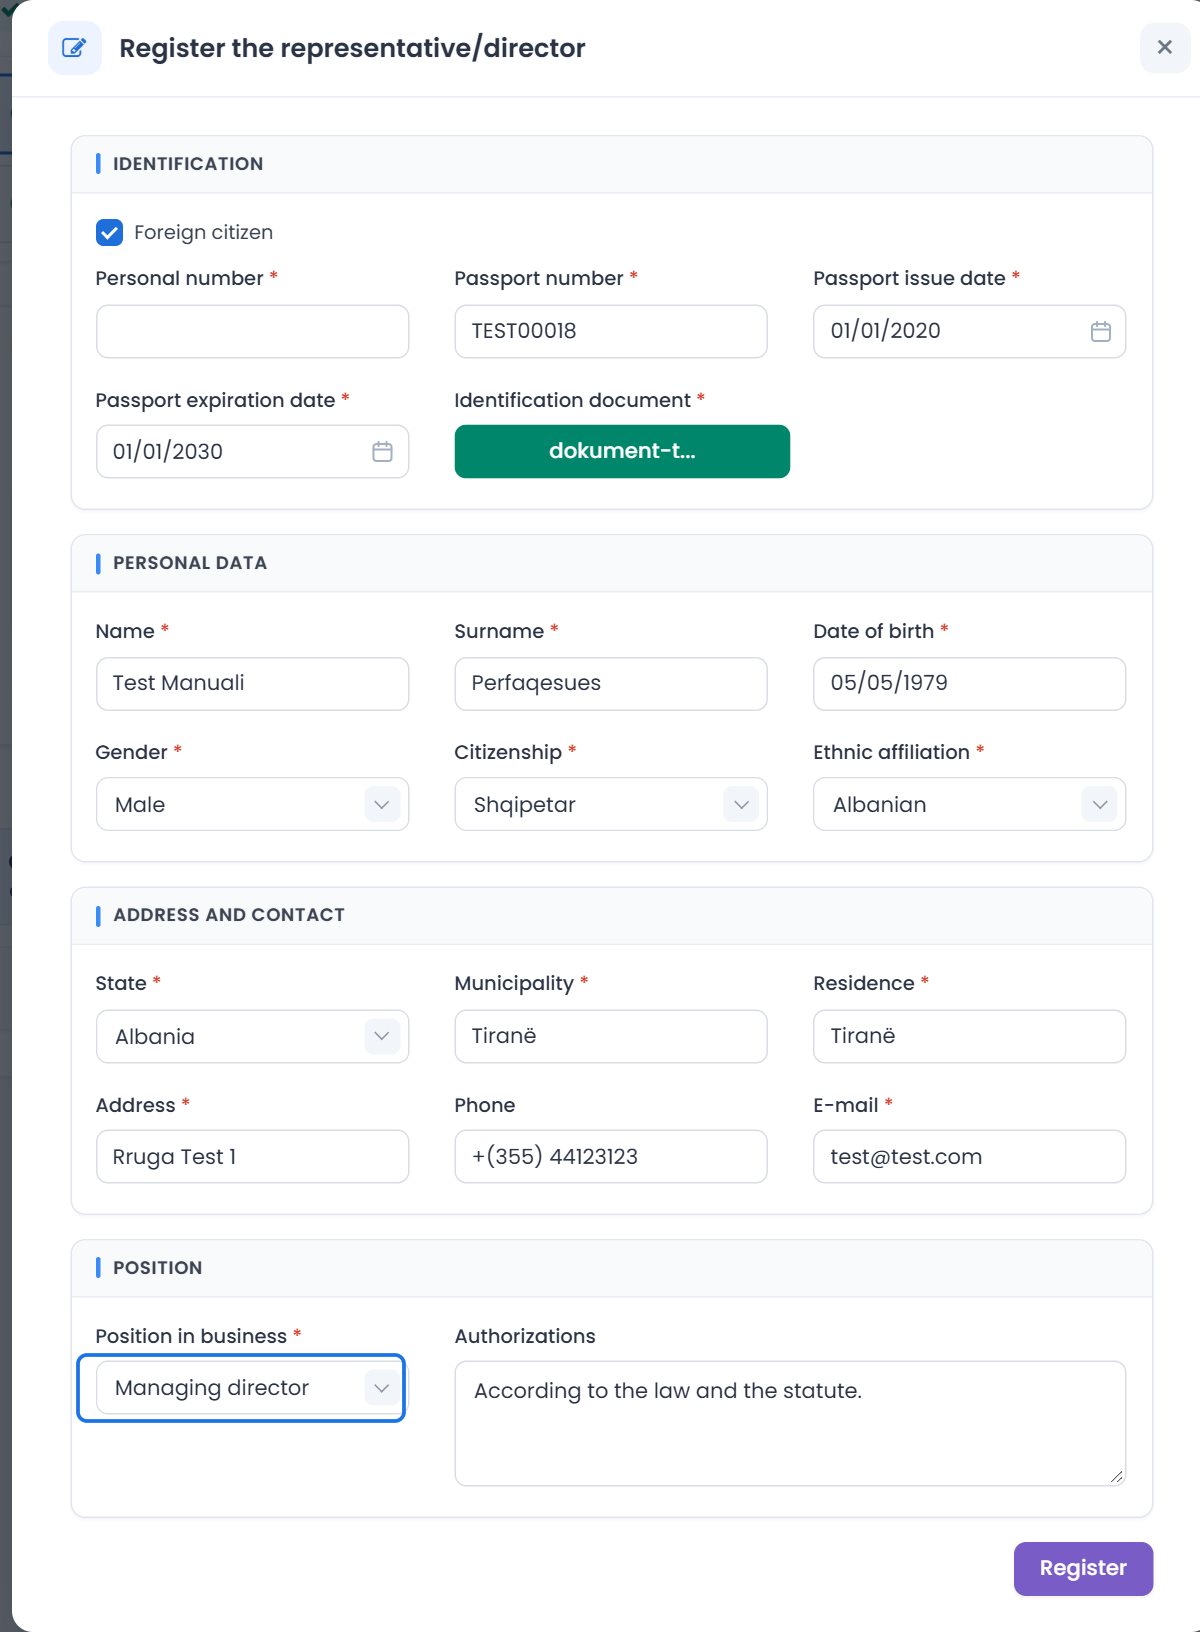
- For a new representative, click Register. The Register the representative/director window accepts only a physical person. The identification and the identification document are filled in as for owners. Under Address and contact, the email is required.
- Under Position, select Position in business * and, if needed, enter Authorizations. Click Register.
- For an existing representative: Actions Change or Remove.
- Click Continue.
- At least one change is needed: “Please register or remove a representative.” You cannot register the same representative twice.
- You cannot remove all the representatives. This is checked at Finish.
- A joint stock company must have a representative in one of the positions MANAGING DIRECTOR, EXECUTIVE DIRECTOR, CHAIRMAN or CHIEF EXECUTIVE OFFICER.
- For an individual business, only the owner can be the authorized representative.
Board change
Offered for L.L.C., J.S.C., foreign companies and A.C. The tab looks like Representative change: List of directors with Register and Actions (Change, Remove), and List of directors for change.
- For a new member, click Register. In the Board registration window, fill in the identification, the identification document, the personal data (including Profession *), the address and Position in business *. Click Register.
- For existing members, use Change or Remove.
- Click Continue. At least one change is needed: “Please register or remove a director.”
- You cannot register the same member twice.
- For joint stock companies registered after February 10, 2019, the board must meet the 50% quota of women (“The number of members of the board of directors must be contain the fifty percent (50%) quota of women on the board.”), and the entire board cannot be removed.
- For a foreign company without a board, this change is added by itself when you change the type.
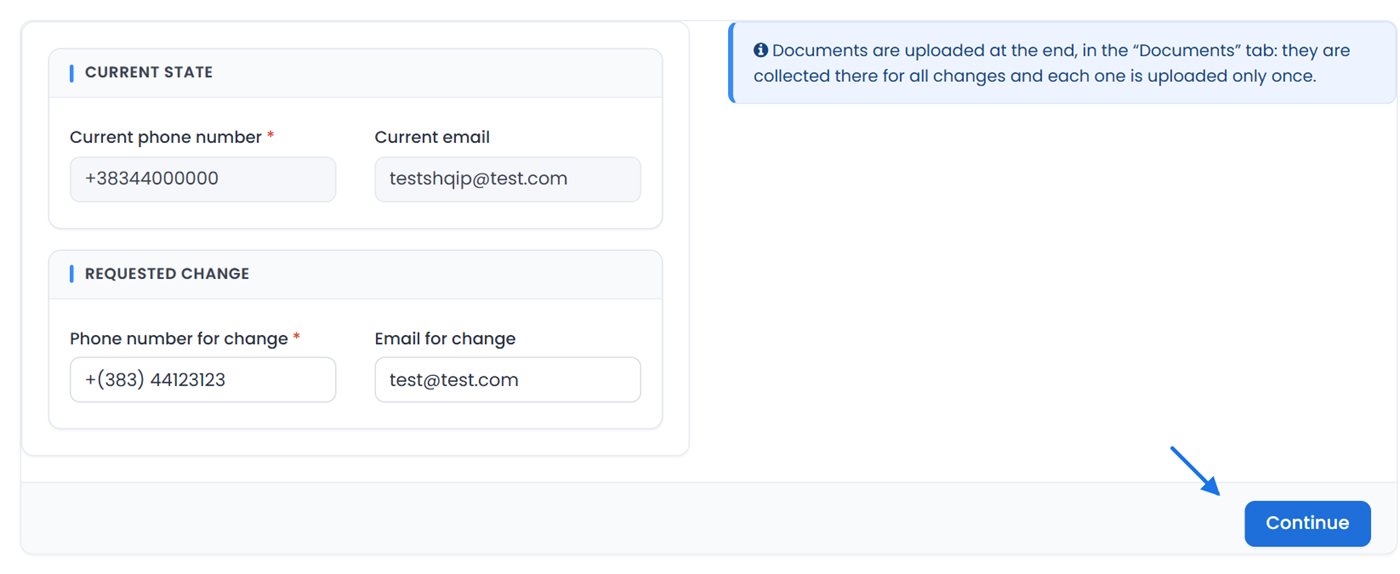
Change of email or phone number
- Current state: Current phone number and Current email.
- Requested change: Phone number for change * and Email for change.
Enter the new data and click Continue. At least one of them must change: “You need to change your email or phone number”. An institutional email is not allowed. You can see the required documents in the Summary and in the Documents tab.
Documents and submitting the request
The Documents tab collects the documents of all the changes. Each document is uploaded only once and applies to all the changes that require it. The tab has these parts:
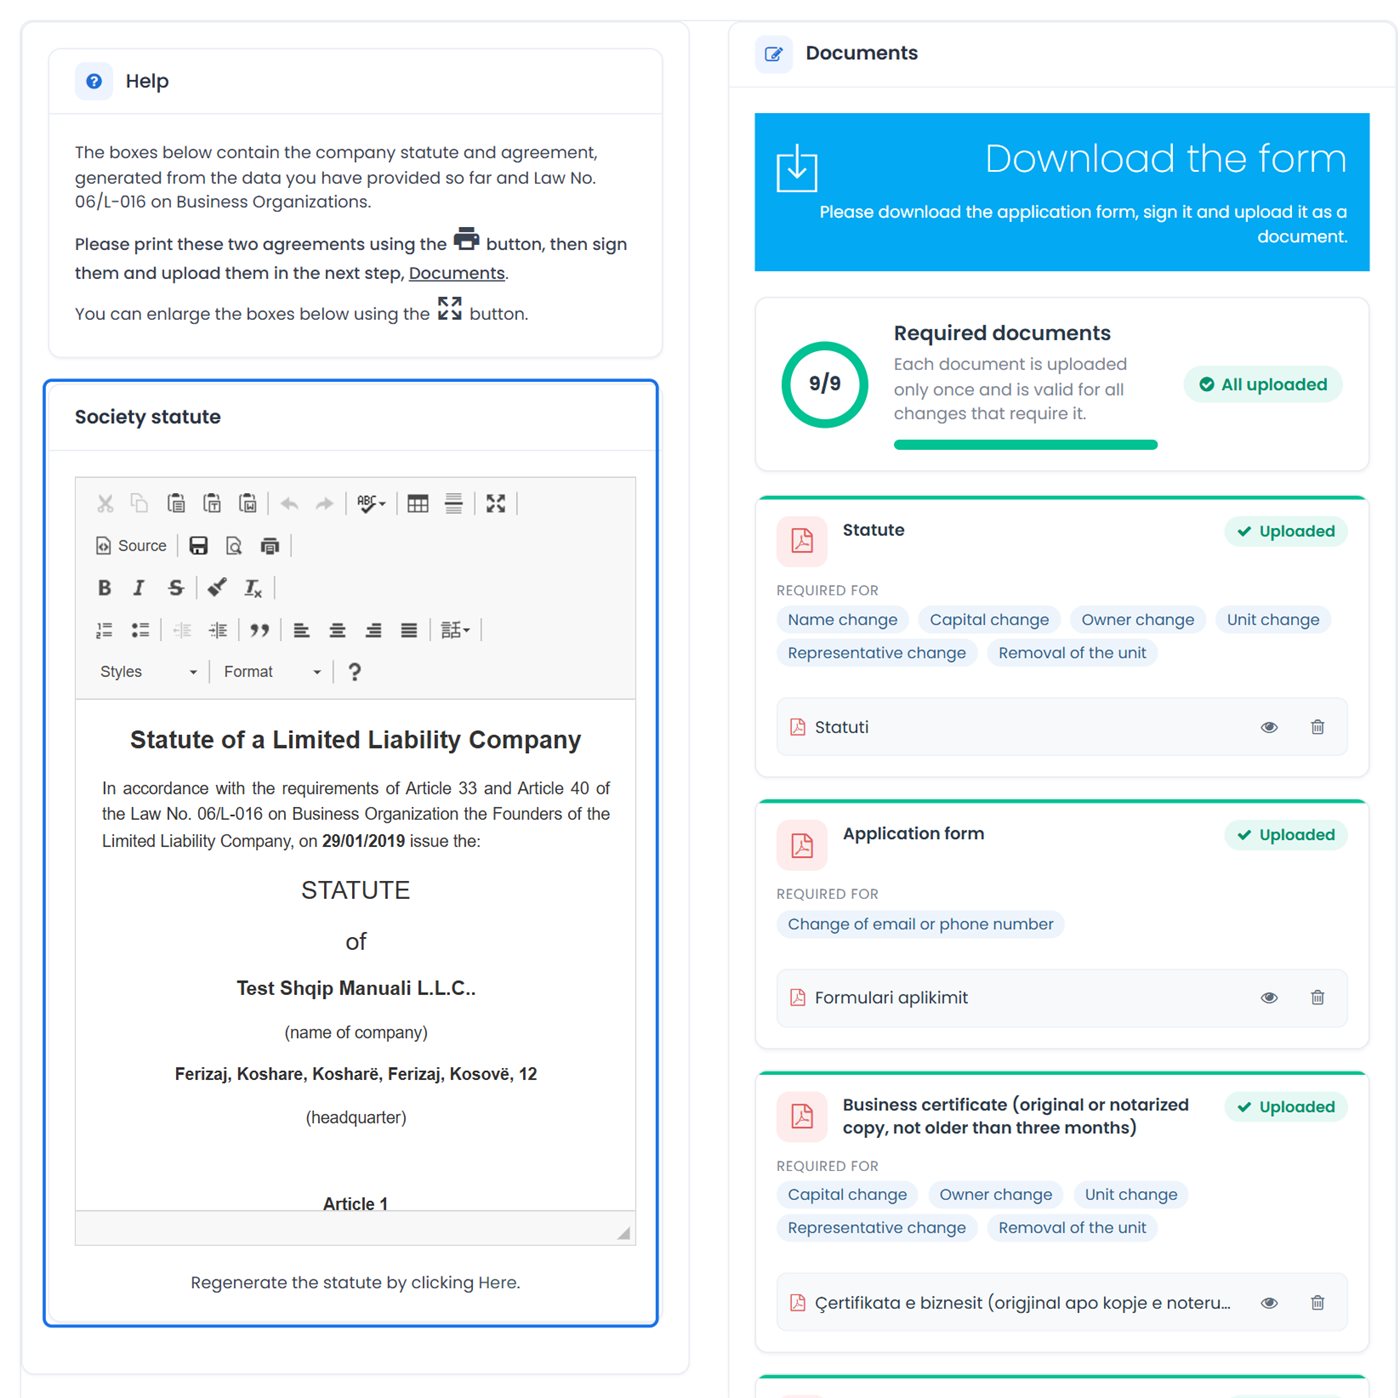
- The blue Download the form box: “Please download the application form, sign it and upload it as a document.”
- Society statute, on the left, for L.P., L.L.C., J.S.C., foreign companies and A.C. (or when the new type is one of them), except when the request changes only the address or the contact. The statute is generated from the business data. Print it with the printer button, sign it and upload it with the documents. If needed, click Regenerate the statute by clicking here.
- Required documents: one card for each document, with the status Missing or Uploaded and with Required for (the change that requires it, or The whole request). At the top you see how many have been uploaded and how many are missing. Examples: Application form, Statute, Decision on amending the statute, Business certificate, Copy of the owner's ID card, Paid payment slip.
- Other documents (optional): “If you have additional documents, enter the document name and upload it.”
- Click Download the form. Print it, sign it and scan it as a PDF. Do the same with the statute, if it appears.
- If the request has a payment slip, pay it at the bank and scan the paid payment slip.
- On each card marked Missing, click Choose the PDF document and select the file (PDF only, up to 10 MB). The card changes to Uploaded. With the eye icon (Look) you open the document, and with the trash can (Delete) you remove it.
- For additional documents, under Other documents enter the Document name and select the PDF. The name must not be repeated.
- Click Finish.
What happens when you click Finish
The system checks the request. If something is missing, a message appears and the request is not submitted:
- incomplete changes: “These changes have not been completed yet: …. Open each tab and click ‘Continue’.”;
- missing documents: “The following documents are missing: …”, with the change each one is required for;
- owners and representatives: they cannot all be removed; the sum of the owners' shares must equal the new capital; for an I.B. only the owner is the authorized representative.
When everything is in order, the request is submitted for review immediately, without a confirmation prompt, so check it before you click. The List of requests opens with the message “Success! Status for application/request has been successfully saved.” After submission, documents can no longer be uploaded or deleted.
Payment slip
- The payment slip is created automatically when the request is created, after you click Continue in the Selected requests window.
- When the request has a type change, the payment slip is created after you save the Type change tab, because the amount depends on the new type.
- When the request has only a name or trade name change and the business has the same name and trade name, no payment slip is created.
- You upload the paid payment slip as a document (Paid payment slip). You can find the payment slip in the list at any time: Actions Receipt.
Instead of Download the form, the officer has the Register/Change applicant box. The applicant must be registered before Finish; otherwise: “Please register the applicant before you complete the application.” On the document cards the officer also has the Scan button. The payment slip is created the same way as for citizens.
List of requests
The list opens from Business change List of requests, and also by itself after Finish. It shows the requests you have created for the selected business. For the requests of another business, select that business on the home page.
Columns: Ordinal number, Business number, Business name, Type of request, Municipality, Phone, Status, Application date and Actions. A request that has not been submitted yet (the draft) has no status or application date. During review, the status reads Under review, with the date.
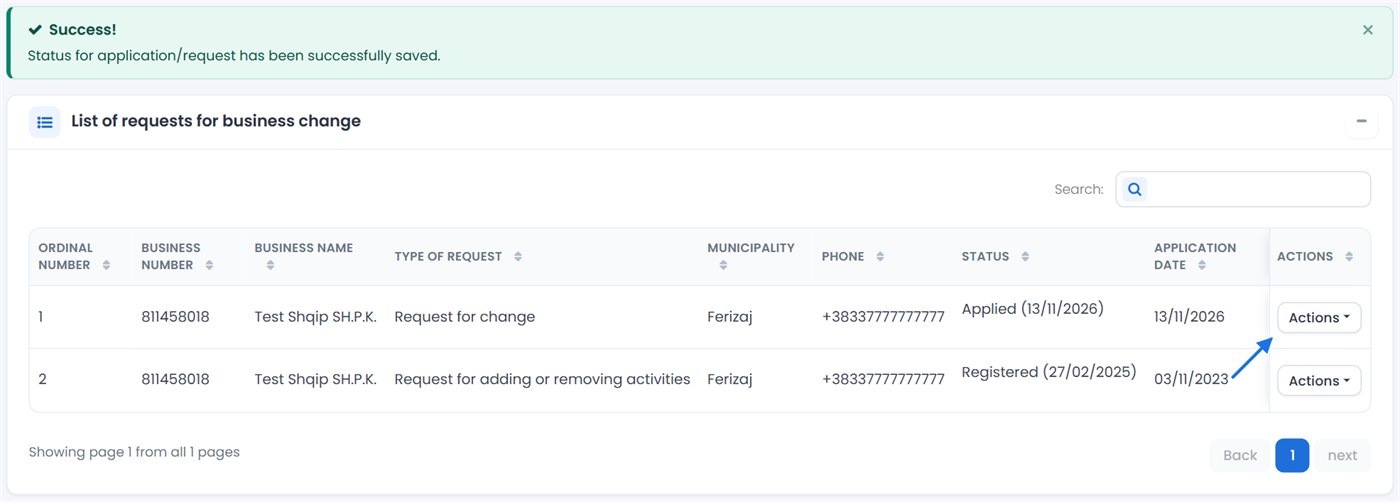
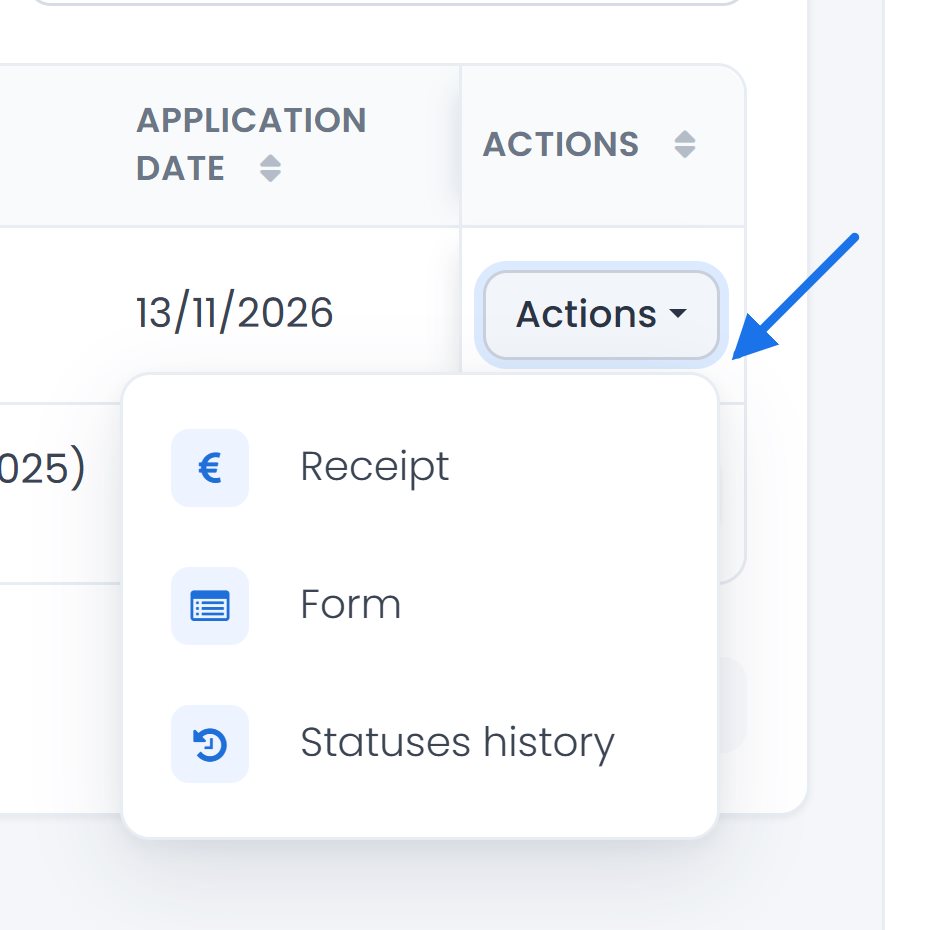
The Actions button of the row shows only the actions that apply to the status of the request:
| Action | When it appears | What it does |
|---|---|---|
| Continue | the draft, before Finish | Opens the request so you can continue filling it in. |
| Delete | the draft, before Finish | Deletes the request, after confirmation. This action cannot be undone. |
| Receipt | when the request has a payment slip | Opens the payment slip for printing. |
| Form | after submission | Opens the request form for printing. |
| Statuses history | after submission | Opens the window with the statuses: status type, date, notes and user. |
| Notes | when the request has been returned for completion or has been rejected | Shows the officer's notes (Summary of notes). |
| Fill | when the request has been returned for completion | Opens the request so you can make the requested additions. |
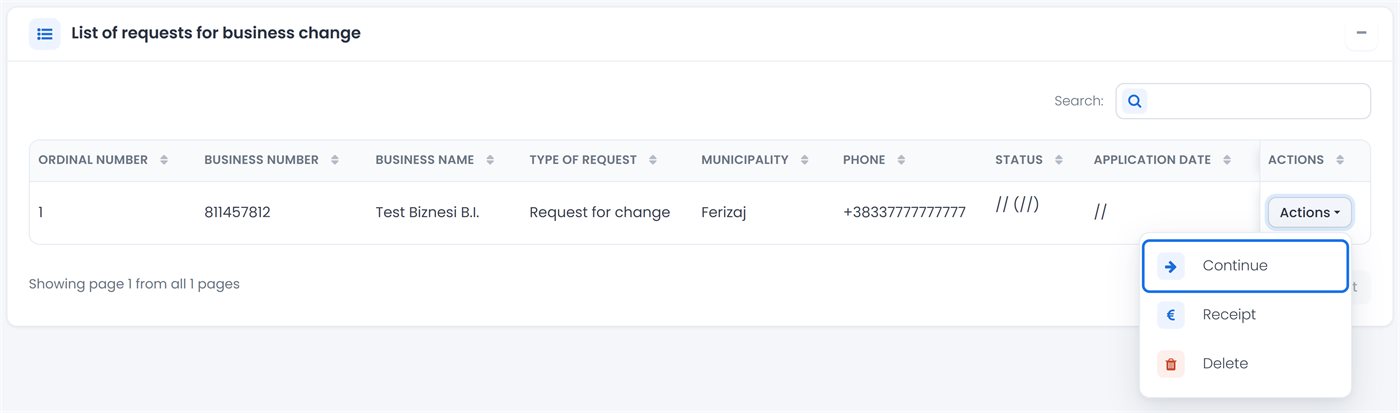
“If you have paid the payment note please do not delete the request, since you must attach it to the documents.”
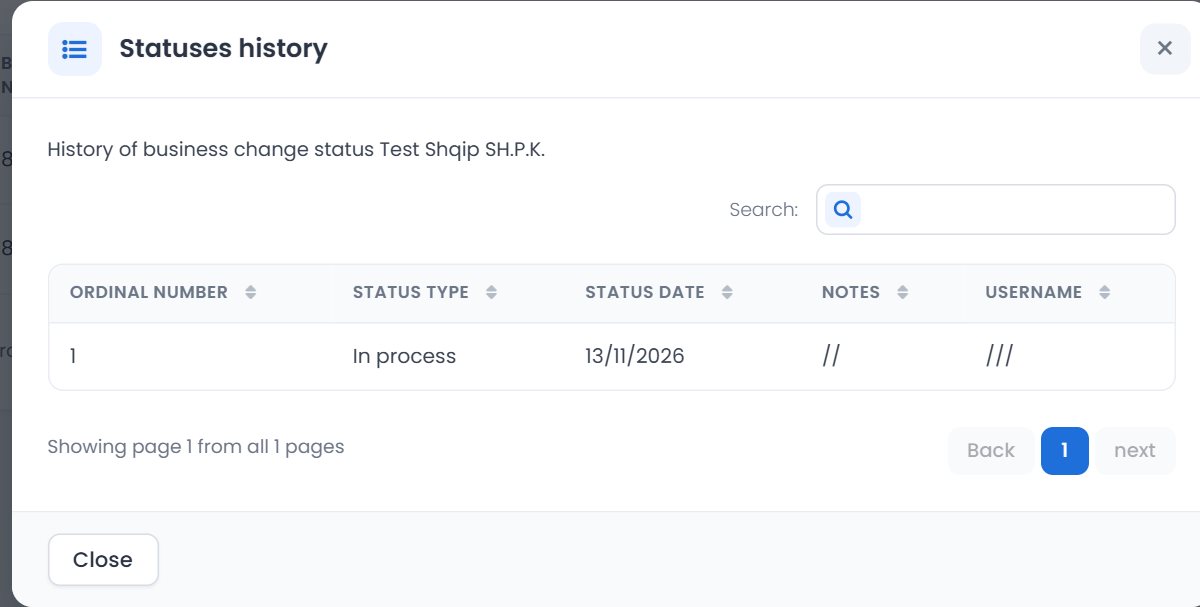
When the request is returned for completion
- On the request, open Actions Notes and read what the officer asks for.
- Open Actions Fill. In the tabs where the officer has left notes, a blue box with the notes appears at the top.
- Correct the data and click Continue in each tab you change.
- In Documents, upload the requested documents and click Finish. The request goes back for review.
When the officer returns the request for completion or makes a decision on it, the system sends an email notification. Returned requests that are not completed also get a reminder email. When your online request is registered and changes the certificate or the additional information, you receive the new document online to print it yourself.
The officer's list shows the requests the officer has created, for all businesses. The officer can delete the draft only when the request has no payment slip.
Rules you need to know
- Only one open request per business. A new request cannot be created until the previous request of the business is registered or rejected. This applies to any open request, including another person's draft and a deregistration request. The message: “You have made a preliminary request! You have to wait until your request is completed. The application was registered by: … and has the status: …” Requests for additional information and for a duplicate certificate do not block it.
- The choice of changes cannot be undone. After the request is created, you cannot add or remove changes. To change your selection, delete the draft and start over.
- The draft is deleted after 10 days. A request that is not finished within 10 days is deleted automatically. The creation date is shown at the top of the request page.
- Deletion is allowed only before submission. After you click Finish, the request cannot be deleted, and documents can no longer be uploaded or deleted.
- Only the creator can continue it. The draft and a request returned for completion can be continued only by the user who created them.
- Before the request: a verified account, a new business certificate, and no prohibition on the change you are requesting (see How to start a request).
- The name and trade name must be different (Article 27 of Law No. 06/L-016). See Rules during selection.
- Individual business: the name change is not selected together with the type or the owners; owners and capital are offered only with the type change (see Name change).
- Documents: PDF only, up to 10 MB per document. All the required documents must be uploaded before Finish.
- Payment slip: do not delete a request for which you have paid the payment slip.
4Business deregistration
With a deregistration request, you ask ARBK to close your business. You fill in the request online in two steps: 1 Application (the reason for deregistration) and 2 Documents. ARBK then reviews the request and notifies you by email.
- Your account must be verified (see Account verification).
- Choose the business as a Representative (see Choosing a business). The request is made for the business whose name appears at the top, in the header bar.
- The business must already have a new certificate. Otherwise “To apply for a cancellation, you must be provided with a new business certificate.” appears.
- If there is an earlier request for the business that has not been completed yet, you cannot make another one. “You have made a preliminary request! You have to wait until your request is completed…” appears, with the name of the person who made it and its status.
- If the business has already been closed, “Your business is vanished.” appears.
- A request that is not completed within 10 days is deleted automatically by the system.
Step 1: Application (reason for deregistration)
- In the menu, choose Business deregistration Deregistration request.
- The Deregistration request page opens with the Fill in the deregistration request card and two steps, 1 Application and 2 Documents. A notice about the 10-day deadline appears at the top.
- In Complete the request, choose Type of reason. The field is required: without it, “Please choose the reason for the deletion.” appears.
- If the Describe the reason ... field opens for the chosen reason, describe the reason briefly.
- On the right, in Guidelines, read which documents are needed (see below). Prepare them as PDF files.
- Click Save. The request is saved and you move on to step 2 Documents.
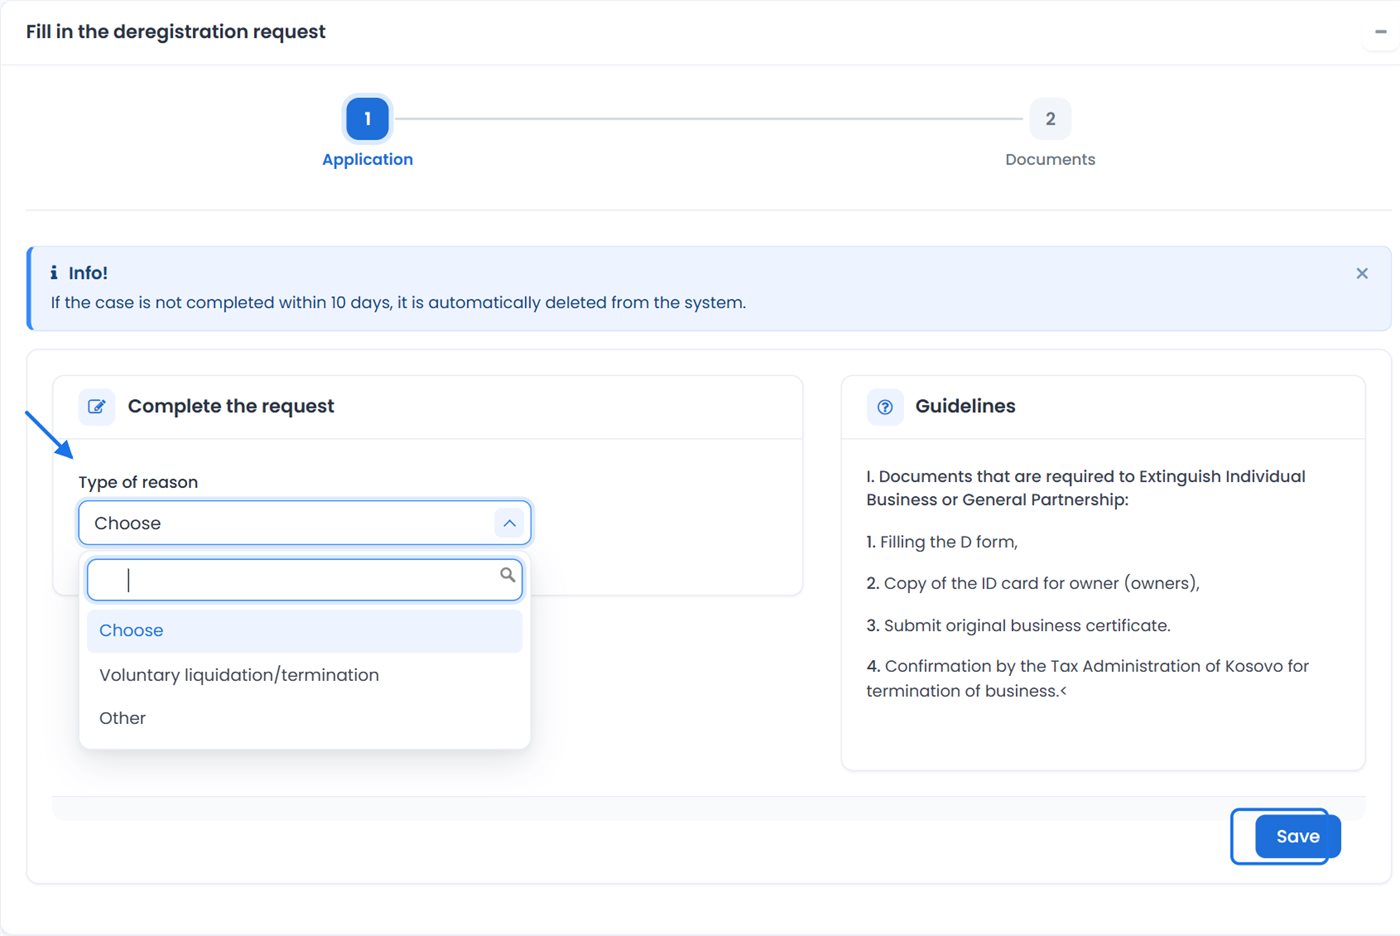
The Guidelines box lists the documents needed to close an Individual business or a General partnership:
- filling in form D;
- a copy of the ID card of the owner (owners);
- the original business certificate, which must be handed in;
- the confirmation from the Tax Administration of Kosovo for the termination of the business.
The exact documents required for your type of business are the ones offered in Type of document in step 2.
Step 2: Documents
- On the right, click the blue Download the form box. The request form opens with the business data. Print it, sign it and scan it as a PDF, because you must upload it as a document.
- In Uploading documents, choose Type of document (*).
- If the Document name (*) field appears for the chosen type, enter the name. It must be different from the names of the documents you have uploaded before.
- Click Append and choose the PDF file. The upload starts immediately and the document is added to the List of documents.
- Repeat steps 2–4 for each required document.
- Check the list: Look opens the document, Delete deletes it after you confirm (e.g. when you have uploaded the wrong file).
- Click Finish. The request is sent to ARBK and the list of requests opens with the message “Request has been successfully registered.”
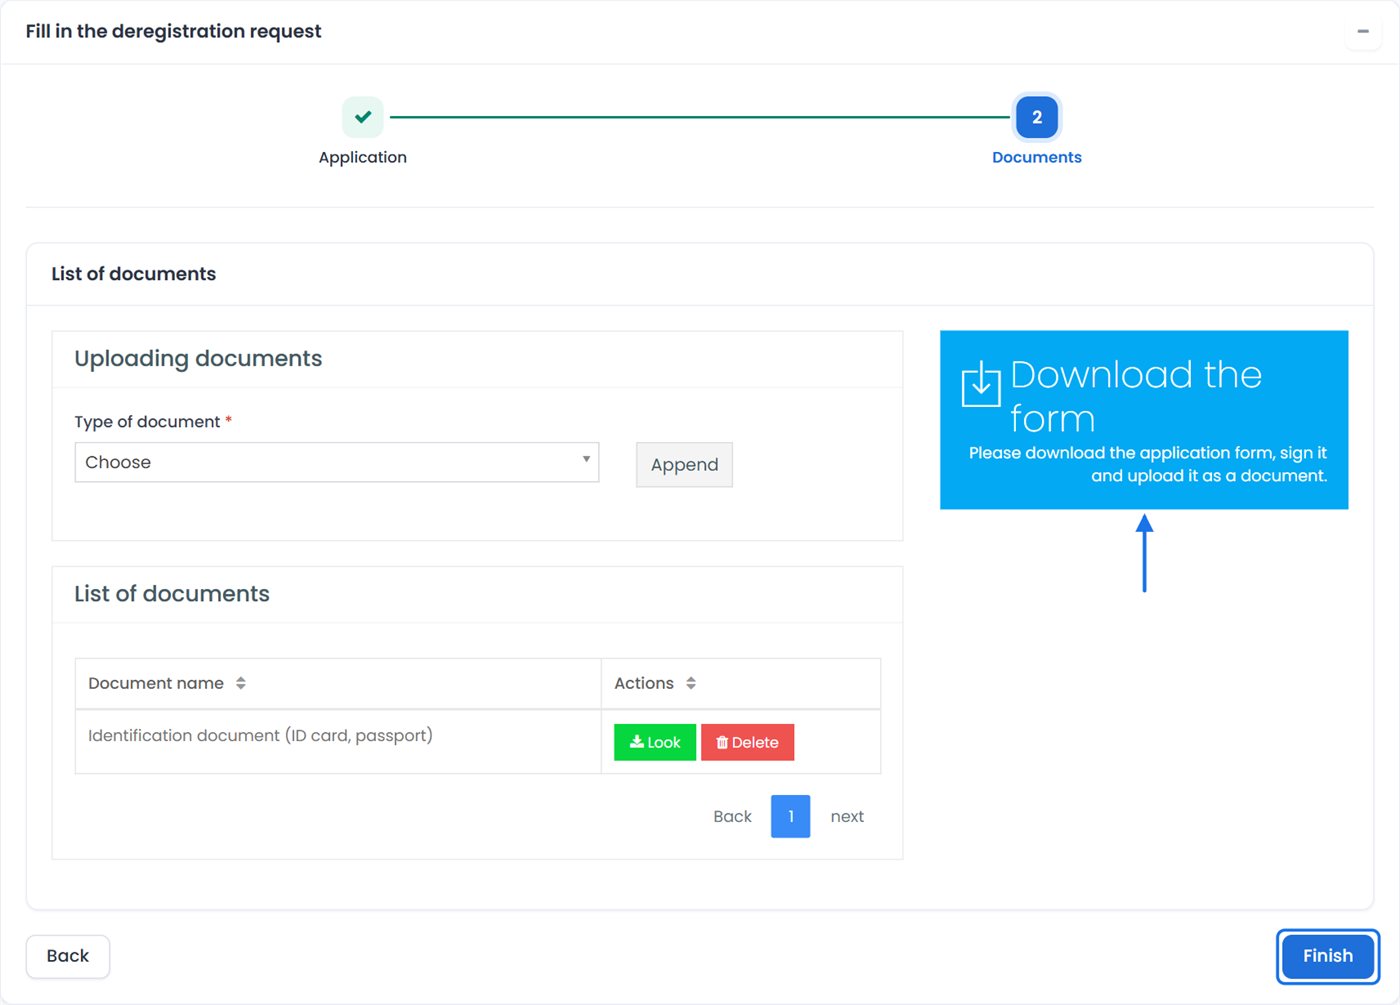
Only PDF documents are allowed, up to 10 MB each. If a required document is missing, Finish does not send the request and “All documents must be attached!” appears.
The Back button takes you back to step 1. The saved reason is kept: you can change it and click Save again. The uploaded documents are not lost.
List of deregistration requests
You can find your requests under Business deregistration List of requests. The table has the columns Ordinal number, Business number, Business name, Municipality, Phone, Status, Application date and Actions. While ARBK is reviewing the request, the status is Under review, with the date.
The Actions button shows only the actions that are allowed for the status of the request:
| Action | What it does |
|---|---|
| Continue | Continues a request you have not finished. Step 1 opens. |
| Fill | When ARBK returns the request for completion: correct the reason or the documents and click Finish again. |
| Notes | Opens ARBK's notes on the request (e.g. why it was returned). |
| Receipt | Opens the payment slip, when one has been issued for the request. |
| Delete | Deletes the request, after you confirm. This cannot be undone. |
| Form | Opens the deregistration request form, so you can print it. |
| Notification of cancellation | After ARBK registers the deregistration, opens the electronic notice of deregistration (PDF) in a new tab, so you can save or print it. |
| Statuses history | Shows how the status of the request has changed. |
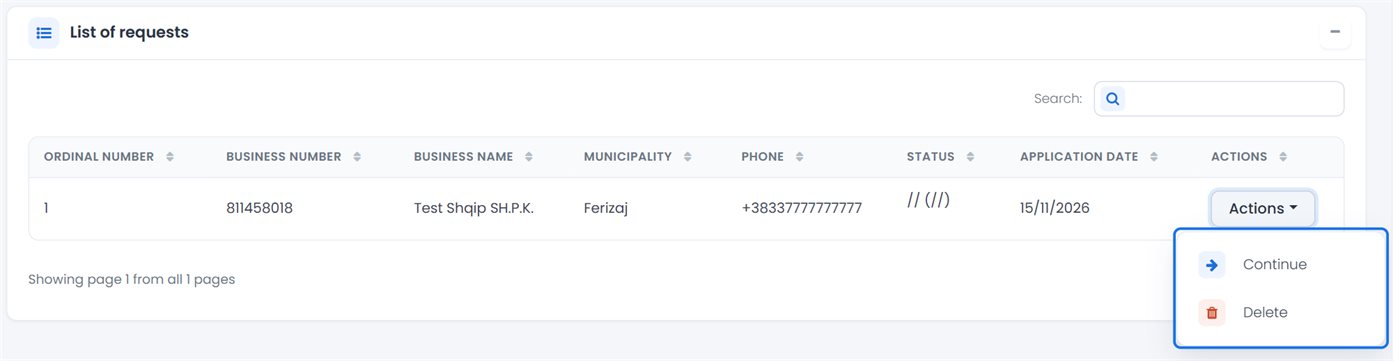
ARBK notifies you by email when the request is returned for completion (with the reason), when it is approved or when it is rejected. A returned request that is not completed within 10 days is deleted automatically. After the deregistration is registered, you receive an email with the link to the electronic notice. The request stays in the list even after the business has been closed, although the business can no longer be selected.
The officer opens the request from the Register: they search for the business and, under Actions, choose Deregistration request (with no business selected, “…you must first select the business from the register.” appears). The reason and the documents are filled in on one page, with the Scan option, and before Save the applicant must be registered in the Register/Change applicant box.
5Request for additional information
With this request, you get information registered for your business from ARBK: the business history, owners, representatives, activities, units, documents, etc. The information is paid for: the system calculates the number of pages and the total in euros, and issues the payment slip after you save the request.
- Your account must be verified (see Account verification).
- Choose the business as a Representative (see Choosing a business). The information is requested for the selected business.
- The business must already have a new certificate. Otherwise “To apply for information, you must be provided with a new business certificate.” appears.
- If there is an earlier request for the business that has not been completed yet, “You have made a preliminary request!…” appears and you must wait for it to be completed.
Filling in the request
- In the menu, choose Additional information Request for information.
- The Additional information page opens with the Choose additional information card. The Info box at the top explains what the information you choose contains.
- In Type of additional information, choose the information.
- Choose Without stamp or With stamp.
- Click Choose. “Information has been selected successfully.” appears (for documents: “Document has been selected successfully”) and the information is added to the list on the right, with Number of pages and Type (without stamp or with stamp).
- Repeat steps 3–5 for the other information you need. To remove an item from the list, click Delete in its row.
- Below the list you see the Total number of pages and the Total in euro.
- Click Save. The list of requests opens with the message “Request has been successfully registered.” The payment slip for the total is issued now.
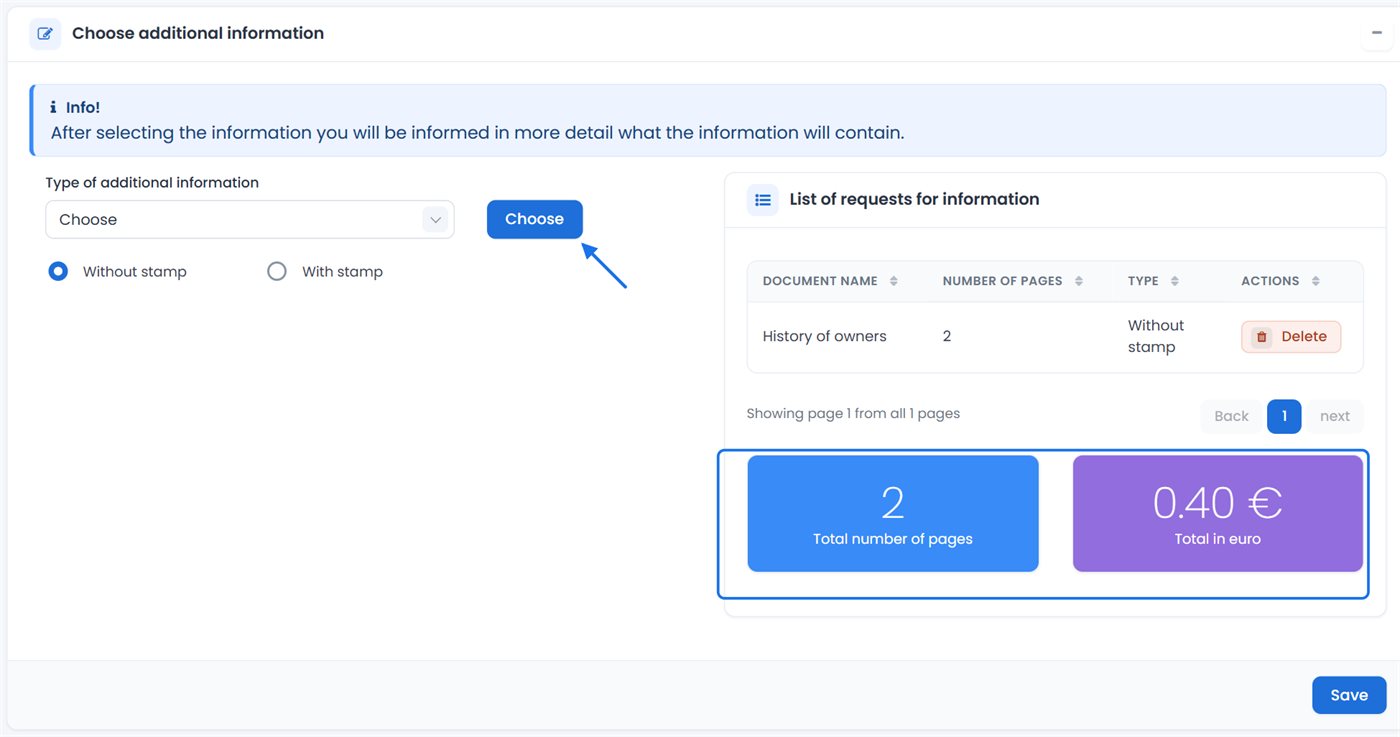
Business documents
When you choose the information type for the business documents, the Choose button is hidden and the business's List of documents appears below. Choose Without stamp or With stamp above the list, then in the row of the document you need, click Actions Choose. The document is added to the list on the right.
Types of information
The list of types depends on the type of business. The Info box describes them as follows:
| Information | What it contains |
|---|---|
| Complete business history | All the information about the business and its history. |
| History of business data | The current data of the business (name, type, address, capital, etc.) and their history. |
| History of owners | The current data of the owners (name, address, ownership share, etc.) and their history. |
| History of representatives | The current data of the representatives (name, address, position in the business, etc.) and their history. |
| Board history | The current data of the board (name, address, position in the business, etc.) and its history. |
| History of activities | The current data of the activities (code, type, description) and their history. |
| History of units | The current data of the units (name, address, main activity, etc.) and their history. |
| Documents | The list of the business documents, from which you choose the documents you need. |
| Additional information | The current data of the business. |
The request is created as soon as you choose the first item of information. If you leave the page without clicking Save, you can find the request in the list and continue it with Actions Continue. With no information in the list, Save shows “Please select at least one additional information.”
List of information requests
You can find your requests under Additional information List of requests. The List of requests for information table has the columns Ordinal number, Business number, Business name, Municipality, Phone, Status, Application date and Actions.
The Actions button shows only the actions that are allowed for the status of the request:
| Action | What it does |
|---|---|
| Continue | Continues a request you have not saved. |
| Receipt | Opens the payment slip together with the invoice (one PDF), for payment. |
| Delete | Deletes the request, after you confirm. This cannot be undone. |
| Form | Opens the request form for the release of data, so you can print it. |
| Statuses history | Shows how the status of the request has changed. |
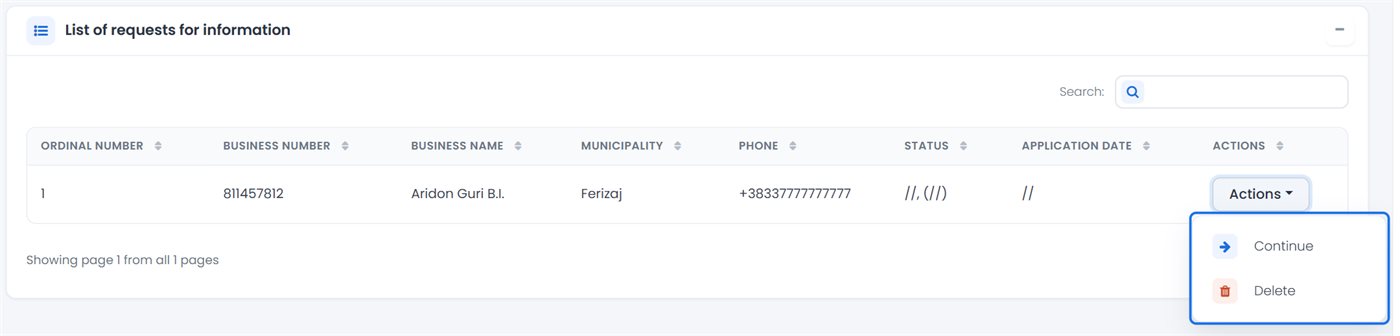
Pay the payment slip and follow the status of the request in this list. ARBK confirms the payment, and then the request moves on to review.
The officer opens the request from the Register: they search for the business and, under Actions, choose Additional information. If they open the request from the menu with no business selected, the system sends them to the Register with the message “To apply for information you must first select the business from the register.” The rest of the request is the same.